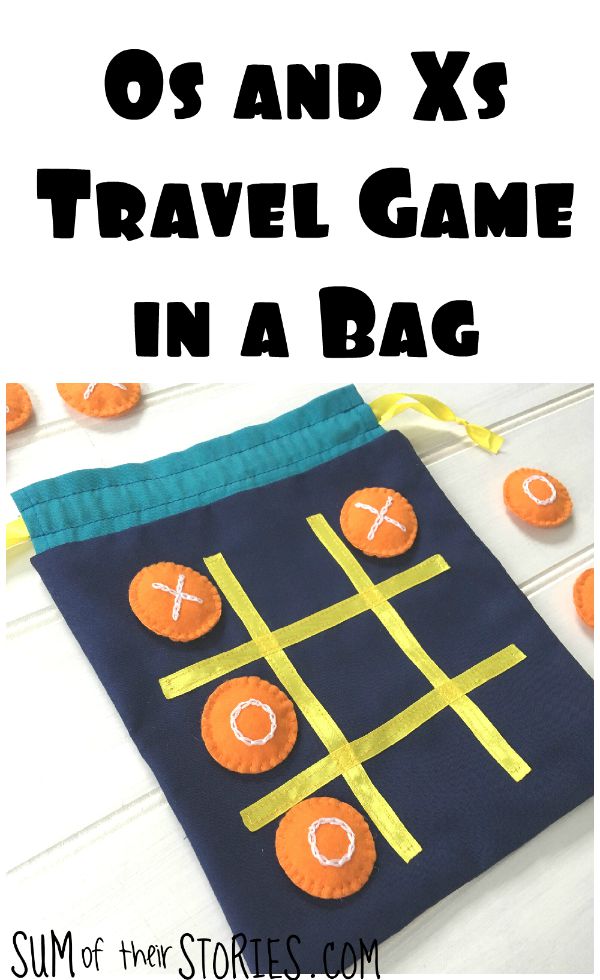
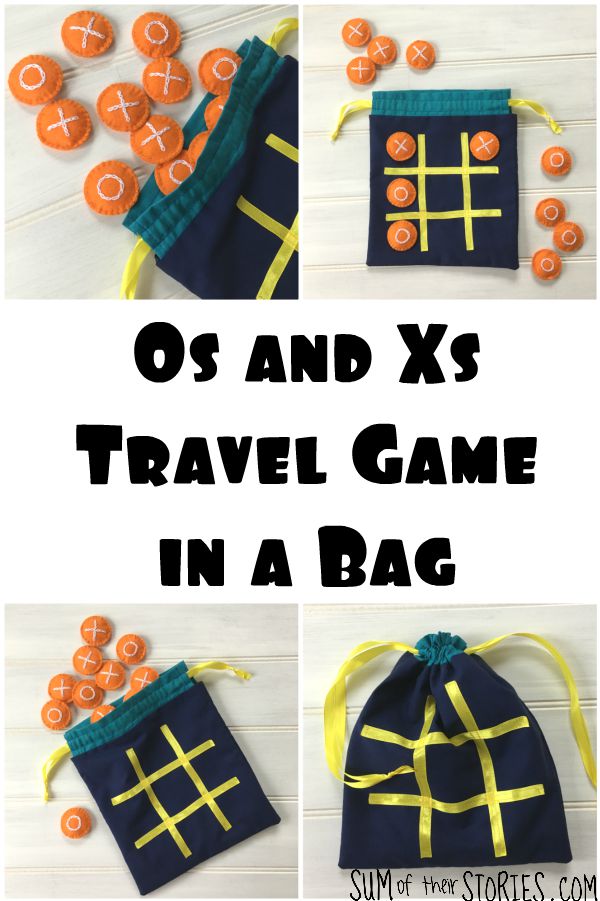
Noughts and Crosses Travel Game
/

You know that dead simple game with the O’s and the X’s, do you call it Noughts and Crosses or Tic Tac Toe or maybe something else?
Here in the UK we call it Noughts and Crosses so that’s what I’m going with, I think you’ll all manage to translate if necessary!
I made a Noughts and Crosses travel game in a bag as a gift for this Christmas so now I can share it with you and show how simple it is to make this fun game as a gift for a little one. You can use any colours of fabric and felt that you have, I went for a navy main fabric, with a little turquoise, and then orange felt counters and yellow ribbon for the board and drawstring.
To make a noughts and crosses travel game in a bag you will need:
4 squares of fabric 10” x 10” (25cm x 25cm)
2 pieces of fabric 10” x 4” (25cm x 10cm)
2 lengths of ribbon 26” (66cm) for the drawstring
4 lengths of ribbon 7” (18cm)
a piece of bright felt
embroidery thread - one matching the felt and one contrast
a tiny amount of fibre fill
Something approx 1 3/4” (4-5cm) round to draw around, I used a cotton reel
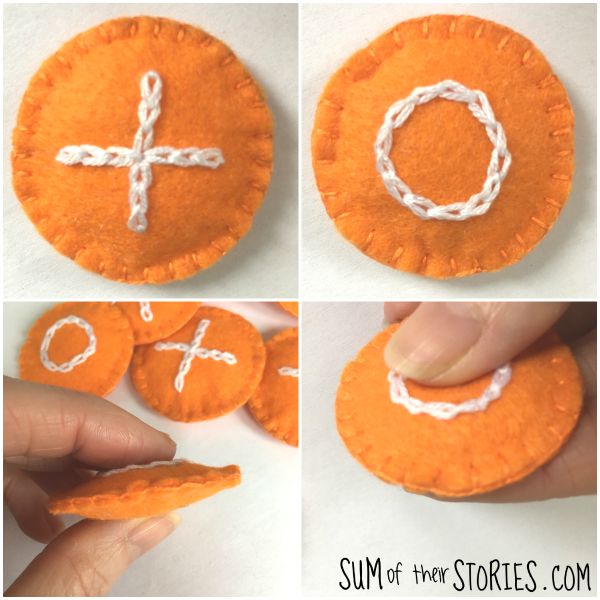
Start by making the counters, to play noughts and crosses you need 5 counters of each type. I made 6 of each so that there is a spare. Technically you only need 5 Os and 4 Xs but then O would always have to go first and there’s no fun in that!
For each counter you need 2 circles of felt so to make 6 of each you type need to draw round your circular item 24 times, then cut the circles out.

Using the contrast thread embroider O on 6 of the felt circles and X on another 6. Use 2 strands of embroidery thread and a chain stitch. A whipped back stitch would work well too. I didn’t draw the O’s and Xs first (mostly because I couldn’t find my air soluble pen, I just stitched them straight on. It was simple enough to keep them even. The Xs are easiest to stitch in 4 spikes working out from the centre. I didn’t take any ‘as I went along’ photos I’m afraid but from the close up shots you can see easily enough.
Once you have embroidered on 12 of the circles place them together in pairs and blanket stitch round the outside using the matching thread. Use 2 strands of thread. Leave a small gap and stuff with a small amount of the fibre fill. Then carry on round and close up the gap.
Now make the bag, which is both the playing board and the place to keep the pieces all together.
Take one of the 10” square pieces and lay on the 4 shorter ribbons in a # pattern. Use one of the counters you’ve made to check they are spaced correctly. Pin the ribbon in place and then stitch it with a thread colour that matched the ribbon.
My ribbon was pretty fray-ey so I sealed the ends carefully in a flame. You could use a fray stop liquid if you prefer.

Make the bag up in exactly the same way as my drawstring patchwork bag. I’ve not repeated them here, just pop over and follow the steps from the point (once the patchwork is finished) marked by a *

And there you have it, a simple and fun travel game. All the pieces pop into the drawstring bag when not in use.

I had fun on Christmas day playing this with my cousin’s little boy, he’s almost 4 and picked it up really quickly. And so far none of the pieces have got lost either - yay!

I’ll be sharing this idea over at these link ups