Dotty Greeting Card Tutorial
/A handmade greeting card is always special to receive and cards can be quick and easy to make, like this simple dotty greeting card idea.


This simple dotty greeting card tutorial was first published in May 2014 and has been updated, some additional photos added and republished.
How to make a simple dotty greeting card
What you need to make a dotty greeting card
A blank card - mine was 5'‘ x 7” and envelope
Another piece of card 4.5” x 6.5”
Scrap card, pencil, scissors
Something circular to draw around, a glass is ideal
Colouring pens - I use Promarkers
A sentiment - I used die cut letters but a stamp or sticker will work nicely too
You might find a tiny bit of blu tack/poster tack handy too
Several of these steps are optional, that’s the beauty of crafting - you can make things however you want to. I’ll explain what I did at each stage but give options as we go along.
Be warned I made several of these cards and the photos of the steps do switch around a little from card to card.
Preparing your card
Start with a blank card, mine was a 5"x7". Cut another piece of card just a little bit smaller.

This additional layer is actually optional, I needed it because my promarker colouring pens bleed through the cardboard a little, as you can see below. If your pens don’t bleed through the card you are using you can create your design straight onto the card.

Colour Edging the Card
An optional step but one I like to do - adding a coloured edge around your top layer of card.
If you are going to add a coloured edge to your card then I’d recommend doing this first, before you go any further with your card making because this is the bit most likely to go wrong. I figure it is much better to “stuff it up” at the beginning than mess up on your lovely finished design!
That said, please don't let that put you off, it's not difficult. You place the card on a bit of scrap paper and draw down the edge with a colouring pen.

It’s a good idea to practice this first on scrap card. The trick is to be fairly quick and decisive with the pen, you don’t want to do it too gingerly or you wont get a nice finish. If the pen slips onto the card you end up with a mess (been there, done that!) If that happens don’t panic, just turn it over and have another go.
You can also use an ink pad to colour the edges of your card or layer this card onto a fractionally larger colourful card if you prefer.
Add the sentiment
Now add your sentiment. You could stamp a greeting using a stamp and inkpad or apply a greeting sticker.
I used die cut letters, cut from coloured envelopes (which I always save as a great source of coloured paper) with my Quickutz squeeze.

Arrange your letters in the centre of the card and glue into place.

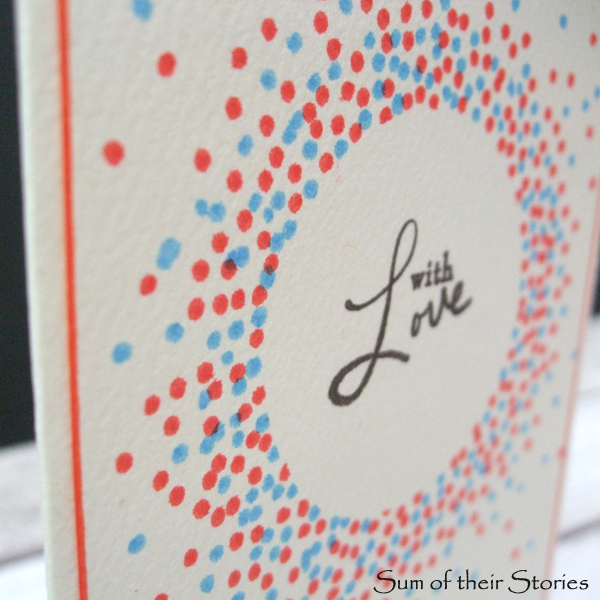
Apply the dots
Cut a circle of scrap paper big enough to cover your wording. I drew round a glass for mine and then just cut it out. This one is 8.5cm (just over 3”) in diameter.
Pop your card circle centrally over the sentiment, grab a pen and start dotting. You might find it helpful to secure the card in place temporarily with a couple of teeny tiny blobs of blu tack/poster tack.

Apply more dots near the paper circle, less further away.

A mix of colours give a nice effect, use as many colours as you like. Stop when you think it looks done, peel the paper circle off and assess. Remember, you can always add more dots but once they are on you can't take them away!
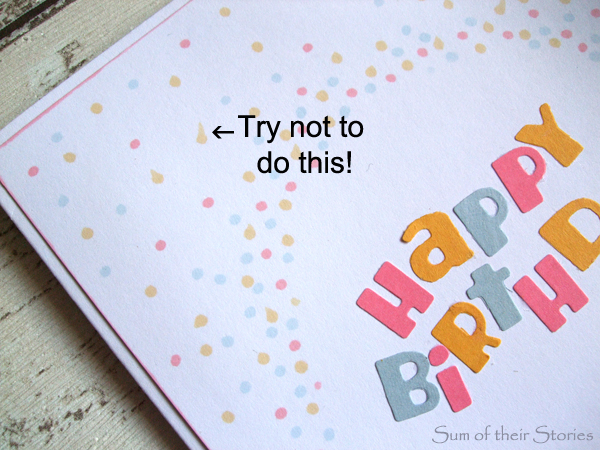
What can go wrong: Don't rush, when I got carried away some of my dots turned into slightly less attractive flicks. Take your time to create nice even dots.
Once your dotting is completed simply glue the decorated layer to your card and your dotty card is completed.

More ideas to make dotty greeting cards
Because this dotty card idea is so quick and easy, I made a load more and tried out some variations on the theme.

On black card a gold, silver and bronze sharpie look great

Use stamps instead of die cut letters
Vary the density and colour of dots

Personalise your dotty card with your best "fancy" writing, add little gems to dot the i's and add a little extra bling.

These dotty cards are quick, fun and easy to create with craft supplies that you probably already have. There are so many variations possible, just enjoy your dotting and see what unique cards you can create. Enjoy!
Julie
I'll be linking up this project at all these lovely link parties