

Lino Cutting Starter Kit Giveaway
/
I’m really excited because today I’m bringing a fantastic giveaway to all my UK people. In collaboration with the lovely folks at Office Stationery, I’ve put together a lino cut starter kit and have one to give away.
The kit contains everything you need to try out the fabulous craft of lino cutting and create some lovely printed cards or pictures. All you need to provide is something flat to prep your ink on and your choice of card or paper to print onto.
Who remembers lino cutting from their school days?
Our very brave 3rd year juniors teacher (that’s 9 - 10 year olds, year 5 today or Grade 4 in the US) let us loose with lino squares and cutters. I don’t actually know what she was thinking as I was a reasonably sensible and well behaved kid and I gouged a chunk out of my left index finger which bled all through lunchtime and all afternoon. I have a very distinct memory of sitting in the playground with my finger, wrapped in a damp, blue paper towel held high above my head to help stop the bleeding. That was what first aid looked like in the 1970’s!
Sadly I have no recollection of what my lino cut looked like, maybe I never finished it after that drama?
Fast forward to art at secondary school and the mid 1980’s and I do remember doing a very cool cut of a stylised piano keyboard at an angle so it disappeared off to a vanishing point, top left of my lino block.
Now, after a gap of at least 35 years I have rediscovered the beauty and magic that is the lino cut. It really is super simple to create something fun. Like most crafts I imagine it could take many years and a lot of practice to do something really intricate and extraordinary but you really can make something passable and totally non-embarrassing pretty much straight away.
A simple lino cut will take you around 30 minutes or so to design and cut and another 30 minutes to print off 10 or more. The difficult thing will be stopping and not printing a hundred, it really is a magical process.
In case you can’t remember, or worst still you never had the chance to try lino cutting at school, here’s the basic steps:
First decide on a design. Simple is best, my top tip would be take your idea and simplify it!
Draw the design in soft pencil onto a lino block.
Use a lino cutting tool to cut the design out. At this point, and I cannot stress this enough - KEEP BOTH YOUR HANDS BEHIND THE TOOL AT ALL TIMES! 9 year old me is yelling this at you! No matter how much you want to hold that block at the top - DO NOT! Hold it at the bottom and ALWAYS cut away from yourself.
The lino cuts really smoothly and with minimal pressure or force but this is because the tools are really really sharp. One slip and your finger will bleed for the rest of the day! This craft is so much fun as long as you keep this simple rule in mind.

Once your design is cut you need to ink it up.
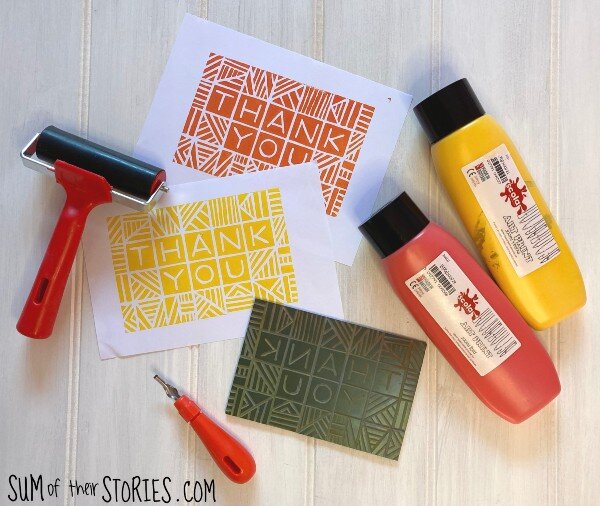
Place a blob of ink from the kit onto something really smooth. I used a piece of glass from an old picture frame. This worked great but do be careful of sharp edges if you do that. Something like a toughened glass chopping board or worktop saver would be better. If you had a smooth plastic tray that might work well too.
Use a roller from the kit to roll the ink out really thinly. What you are doing is trying to get a smooth and even layer on the roller. Blobs will go into the cut grooves and ruin your print, so the ink on the roller must be thin and smooth.
Roll the lino block all over with the ink, take your time, it stays wet for ages so don’t rush this stage.
Place you paper down on top of the lino block and using another clean roller, roll it well all over.
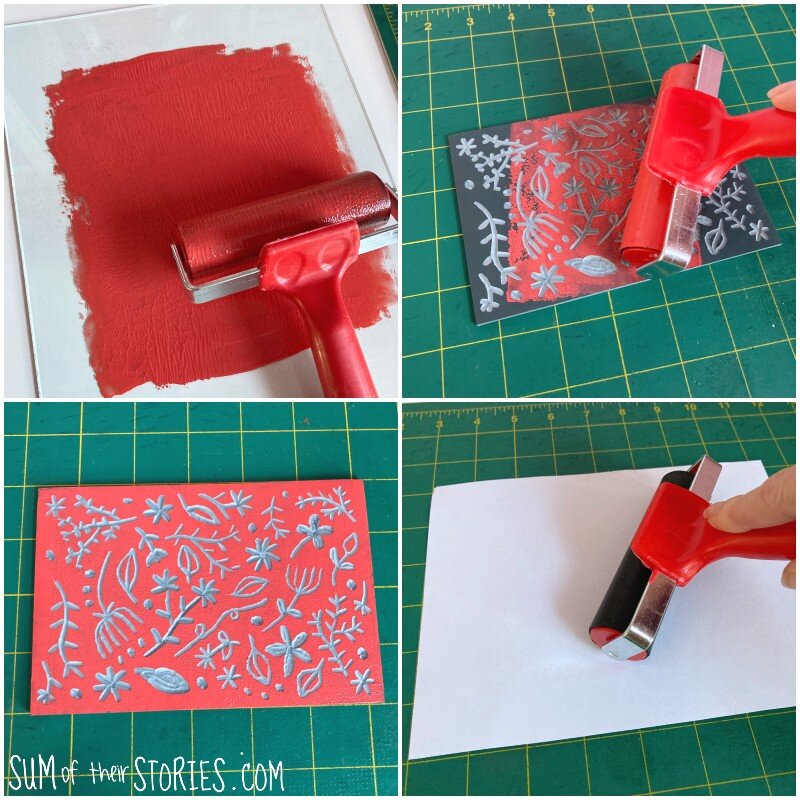
Now is the best bit ever - carefully peel the paper back and admire your print. The sound it makes is just wonderful!
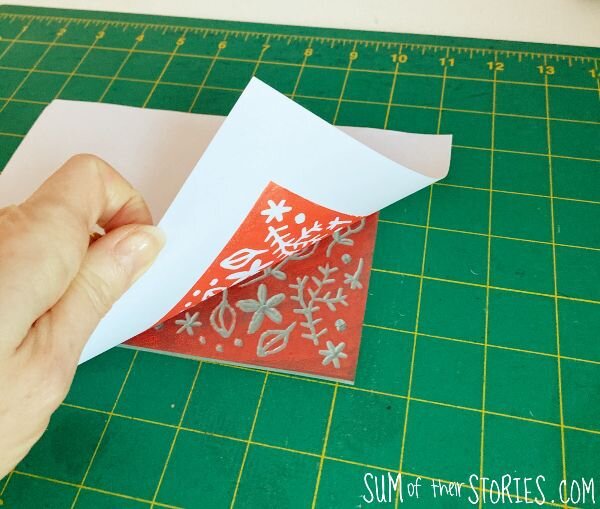
Put that print somewhere out of the way to dry and look at your lino block. If any ink has gone into the cut grooves clean that off and then re ink it and make another print. Continue making fabulous prints until you run out of space to put them or realise it’s time to make dinner/pick up the kids/walk the dog! This is SO addictive.
When you are finished everything just washes clean with water. The ink on your prints does take a while to dry, I’ve given mine a full 24 hours.
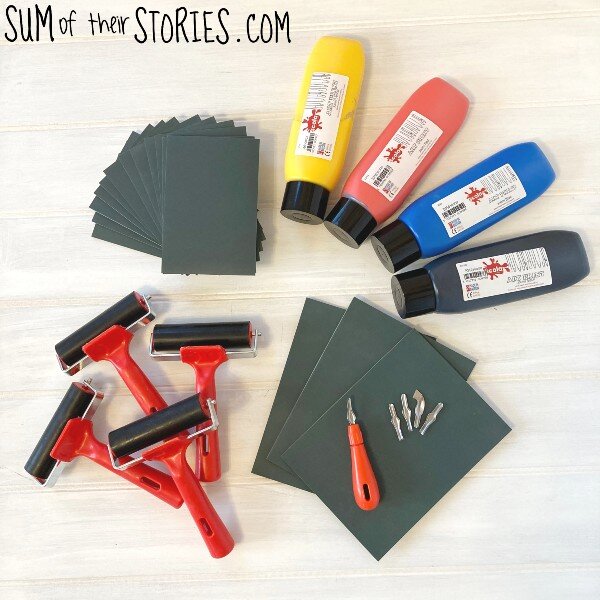
I’ve got so many ideas I’d like to try and this kit from Office Stationery has a pack of 12 15cm x 10cm (8” x 4”) blocks and 3 20cm x 15cm (8” x 6”) blocks so plenty to experiment with.
You also get a cutting tool with a selection of different cutters, a pack of 4 rollers and a large tube of printing ink in red, blue, yellow and black. You can mix the inks to make others colours too.
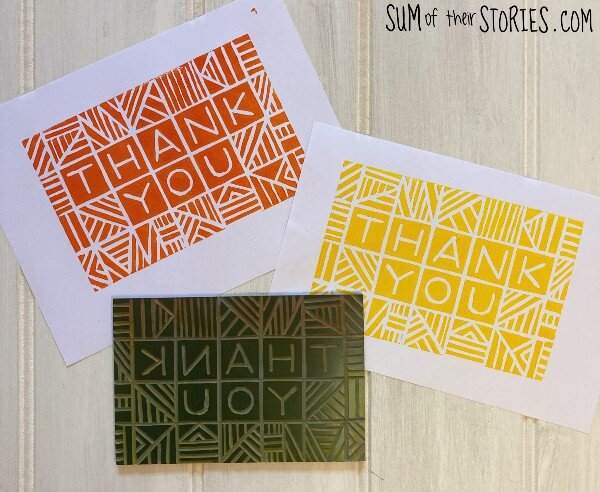
A design like this THANK YOU was really easy, something like this would be perfect for a first attempt. The simple lines are easy to cut, I honestly think you are more like to get a good result if you keep it simple. Just remember that any text needs to be mirrored (Guess who knew that but still wasted a block by cutting it wrong the first time? Doh!!)
Office Stationery sell all the basic office supplies as you would expect but they also have a really wide range of art and craft supplies. Large packs that are perfect for schools or art groups but also many items in smaller pack sizes that are perfect for home use.
Now that I’ve made you itch to have a go at lino cutting let’s get on to the fun bit, the giveaway.
The giveaway is limited to the UK and you must be over 18 as the kit includes the super sharp tools that we talked about. There are lots of ways to enter, the more entries you make the better your chance of being the lucky winner.
The giveaway is run by Office Stationery and the prize will be sent directly by them. When you click through on an entry option do make sure you pop back here to confirm your entry. Just click continue each time. The first time you’ll be asked for your name and email address. It’s worth just checking that you’ve got a tick for the entry, to make sure it’s gone through properly.
Good luck and happy printing!
Ths giveaway is now closed


