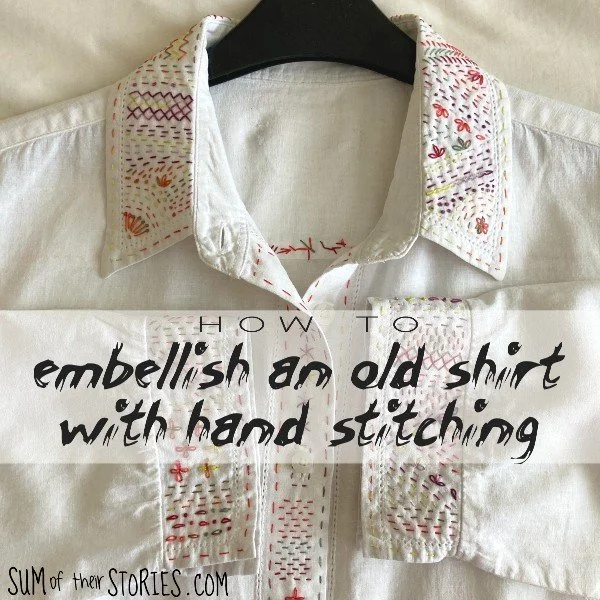
How to Embellish an Old Shirt with Simple Hand Stitching
/Give a whole new look to a plain blouse with some really simple embroidery stitching.

This is one of my most favourite craft projects of all time! If you read Sum of their Stories often you will know I say this quite often about lots of different projects but you know I always mean it, right? I get very excited when I’m trying out a new craft idea and the results are just what I was hoping for. This was one of these moments, the more I stitched the more I loved how it was coming out.

Let me start by saying this is not a new idea that I’ve come up with myself. I first saw embroidery like this over on Instagram and have since joined some slow stitching and visible mending groups on facebook where you can see all sorts of lovely simple stitching used to embellish and repair. I’m simply going to share with you what I did to decorate this plain white shirt so you can do the same. Do you have a plain shirt that NEEDS a beautiful new look like this? Of course you do!! :-D
Let me show you how easy it is.
How to embroider on a plain button down shirt
What you need:
A plain shirt
An embroidery needle - sharp and with a large eye
Embroidery scissors

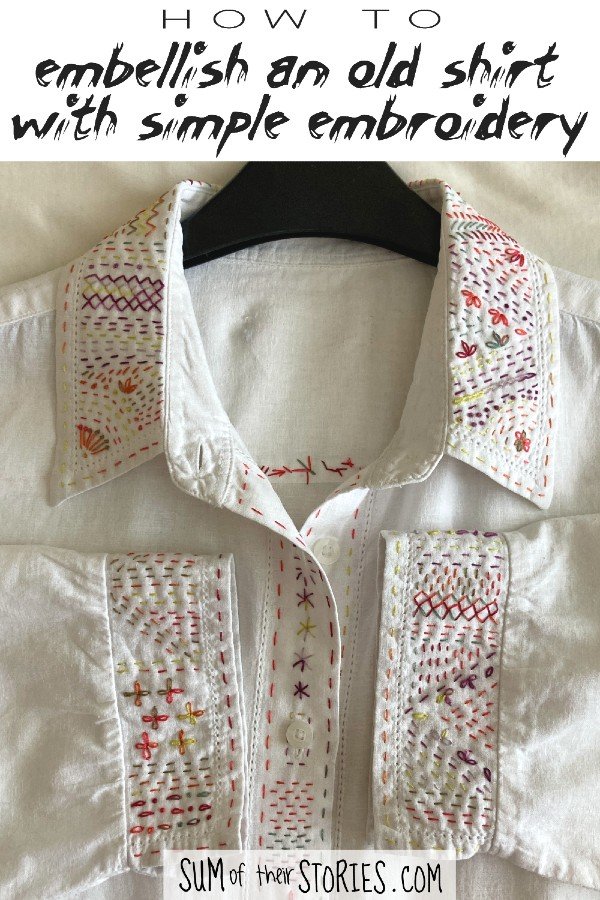
My shirt is a white linen with a collar, 3/4 length sleeves with cuffs. There is a little bit of an edging detail on the collar and cuffs too. Your shirt can be any type, and colour, any woven fabric, with any detail already on it. It really doesn’t matter, this idea will work on any garment made from a woven fabric. I think it would be more difficult on a stretch fabric, especially for a beginner so I would recommend starting with something woven.
Choosing a variegated thread
I used a mix of 3 different variegated threads, mainly because this is what I already had in my craft stash. My 3 skeins were already part used and I didn’t use up all of any of them. It’s hard to tell exactly how much you’ll need but I would estimate I used about one and a quarter skeins in total on this shirt. If you are buying new I would certainly get more than just one skein unless you only want to decorate the collar and cuffs for example in which case I imagine you’d be able to get that out of one skein.
The threads I used are all DMC:
4503 which is a mix of purples, lilacs and a pale yellow
4517 which is reds, corals and greys
4510 yellows, oranges and almost brown
These DMC threads come with 6 strands, I used 2 strands at a time throughout for my embroidery.
Separating your threads
To separate your threads you first need to cut a length of thread. Somewhere around 40 - 50cm (15” - 20”) is about right, I wouldn’t advise going any longer than that or you might get in a tangle when stitching. Hold the 6 strands of thread firmly at the top and pull just one strand out. The other 5 will bunch up a bit but that’s ok, still holding on at the top, give them a shake and they will smooth out again easily. Now pull out another strand. Smooth the remaining 4 strands again with a shake so they are not in a mess for next time and then lay your 2 pulled strands next to each other to re-combine them. Tie a knot at the end, thread onto the needle and you are ready to start stitching.
There is a method of embroidery where you only pull out 1 longer thread and then fold that long strand in half to start your embroidery without a knot (I show you how in my guide for 9 easy embroidery stitches) but that is not suitable for the variegated thread we are using here. The colours in the 2 strands won’t line up and the resulting stitches will be a bit mixed and the colours muddied. If you are using a solid colour of embroidery thread you can most definitely use that no knot method but for variegated thread I really wouldn’t recommend it.
Start stitching
I’m not kidding when I say that this way of embellishing a shirt is really easy and a lot of fun. Even if you’ve not embroidered before you will be able to do this. There are no rules, you can stitch what you want, where you want - whoop whoop!
For a beginner I would recommend starting with a simple running stitch. If you don’t already know how then you can have a read of my guide to basic embroidery stitches. Actually if you are new to embroidery I’d recommend you have a read of my basic embroidery stitch guide for advice on all the stitches you might want to try and also how to cast off securely when you thread is finished.
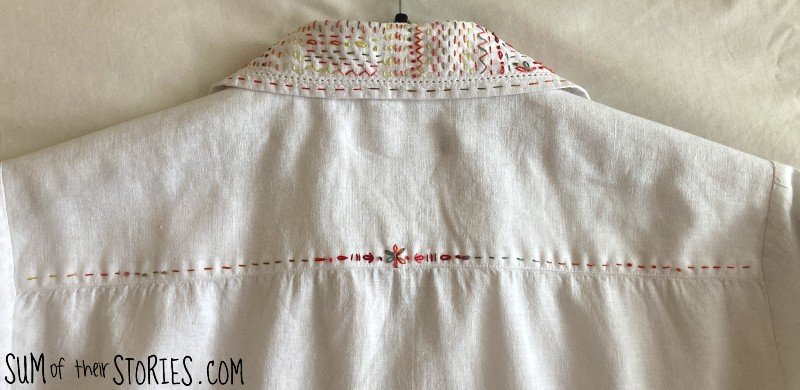
I started on the collar at the back of the neck, it’s as good a place to start as any.

I stitched right through both layers of fabric on the collar and I found it quicker, and easier to get my stitches even, if I did several stitches at once as you can see in this photo above. Once you’ve pulled the needle through just straighten up the fabric and make sure it’s not puckering up before you start your next stitch or row of stitches. If you pull the thread too tight the fabric will pucker and wrinkle so it’s worth taking a second to make sure it’s all smooth before you continue.
You can see that I stitched one section with running stitches that lined up with the previous row and some where they sort of alternated.
The dots are french knots and I threw in some zig zags too as took my fancy.
To stitch the zig zags I stitched a row of diagonal stitches with gaps between each stitch in one direction and then worked back down the row working stitches diagonally in the other direction.
You can see how the colours change with the variegated thread but I didn’t have to keep starting and stopping my threads which makes the whole thing quicker and easier.

Continue stitching all over the collar, you can stick with running stitch over the whole thing or mix things up like I did and add in some french knots, straight stitches and lazy daisies.
Work all the stitches in one direction or mix things up and have them going horizontally for a bit, or diagonally, or even in a curve.
Each time I started a new thread I picked a different variegated thread, I really liked how multicoloured it turned out but if you want a more co-ordinated look you could choose differently.
It’s perfectly fine to jump around with your stitching and do a little here, a little there and then fill in the gap later. That’s what I did. Just have fun, stitch what you like where you like. Make it as simple or as complicated as you like.

You can see from the photos I incorporated quite a lot of lazy daisy flowers in my design, the only reason for this is because I like stitching them. My main issue was knowing when to stop. I was enjoying the whole process so much it really is a wonder that the whole shirt isn’t completely covered! In the end I stitched all over the collar, both cuffs and then the buttonhole band. I also added a little stitching across the back.

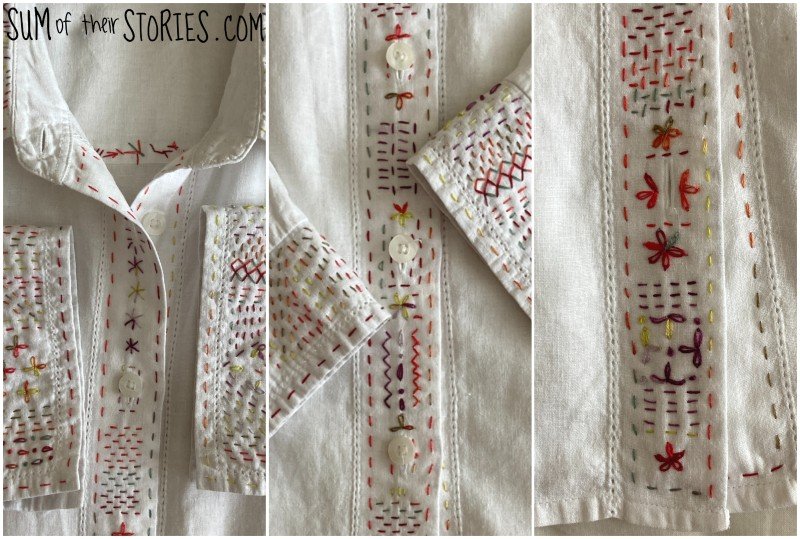
My original plan for the buttonhole band was just to stitch a running stitch all around the edge, then I thought maybe just a little stitch or 2 around each button hole but in the end I just couldn’t stop and I covered the whole thing. And you know what, I’m not even a tiny bit sorry!
You can use these photos to inspire you for stitch ideas and patterns of course, but once you get started I’m sure the stitches will just flow. There is no right or wrong, stitch whatever you like and remember if you really don’t like something you can always unpick it and start again.

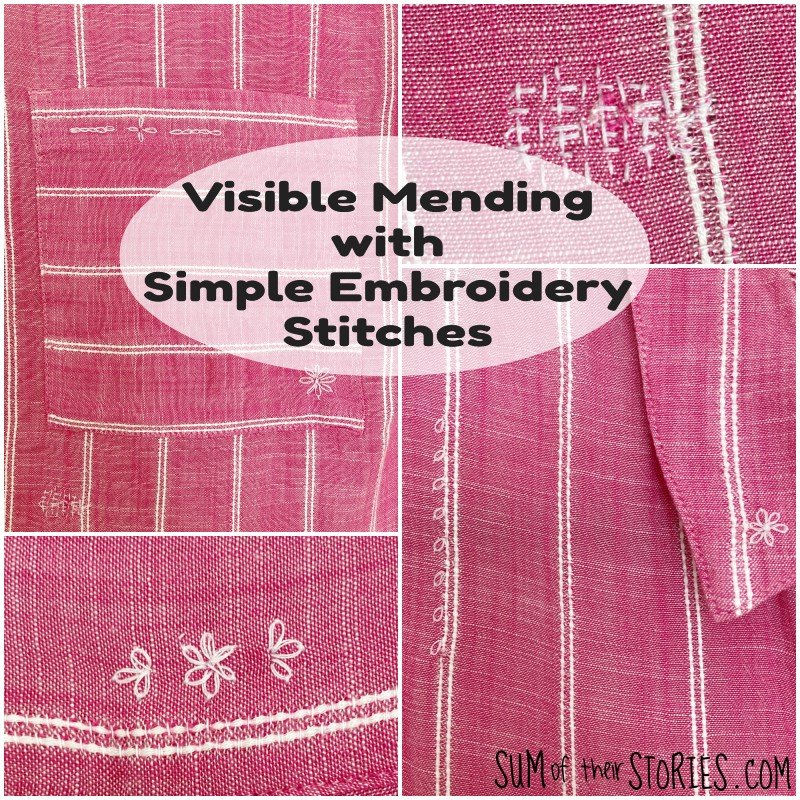
The stitches on this shirt are purely decorative but you can use this style of embroidery for repairs too. A small patch of fabric could be placed over a tear or hole and then embroidered over, incorporating it into your design.
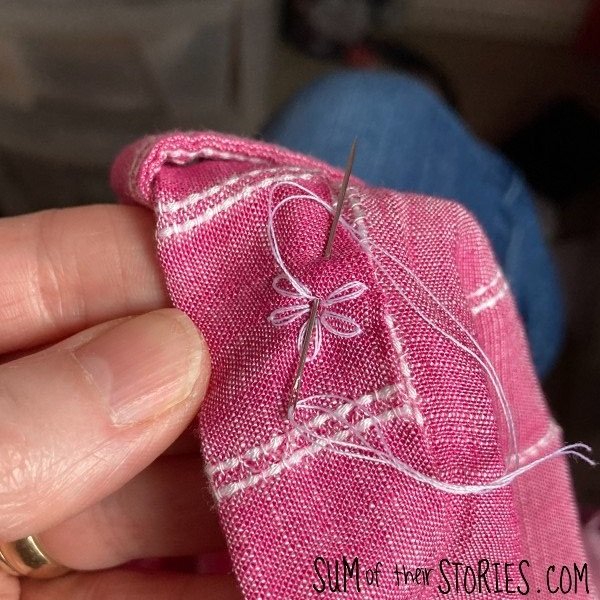
You might remember I repaired a pretty pink shirt last summer which had just a few damaged areas then added some decorative embroidery too. That was a little more subtle than this shirt, but I can always return to it and add more stitches when i feel like it!
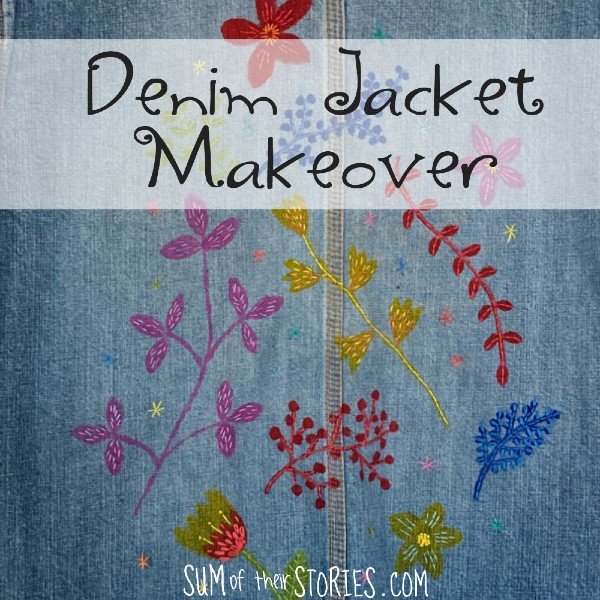
You might also like to check out this denim jacket update which involved fabric paint and some simple embroidery.
How long will this kind of embroidery take
I embroidered this shirt in the evenings whilst watching TV. I didn’t keep a close check but I estimate it took me about 5 evenings in total and that’s probably a couple of hours each evening. I do stop my stitching when the tv gets very exciting or complicated and I, of course, stop for tea breaks too so that’s a 10 hour estimate, give or take a little. So not a super quick project but most definitely one of those craft projects which is as much about the journey as the destination. Slow stitching, as it is called, is a wonderful and mindful creative process, I cannot recommend it highly enough.
Julie
I’ll be sharing this embroidery idea at some of these link ups