How to sew a handy travel cutlery roll placemat
/

Are you like me and trying to avoid using disposable plastic cutlery these days for picnics and take aways on the move? A little pouch or roll to keep a set of cutlery in is really useful, you can keep it in your work bag or the car so if you do stop unexpectedly food you can say no to a useless flimsy plastic fork.
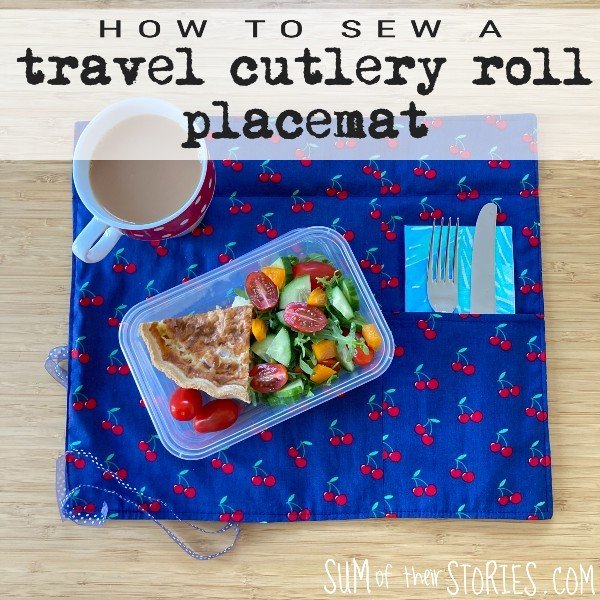
To help my ‘reducing disposable plastics journey’ I made myself this travel cutlery roll includes a built in placemat too. The placemat makes it great if you are someone who eats at your desk but want to avoid crumbs everywhere but it’s also ideal if sitting at a wooden picnic table in the park which is questionably clean!
I’ve made this travel cutlery roll and placemat from a really cute cotton fabric print covered with cherries. I love the idea of using a food themed fabric print for a cutlery roll like this but of course you could use any fabric you have. You do want to chose something washable and not too fine or slippery. A quilting cotton, cotton poplin, chambray or a lightweight denim, linen etc would all be ideal.
The cherry print fabric I used is this cotton poplin from Minerva: Cherry Print fabric.
Let's get started.

How to sew a travel cutlery roll and placemat
You will need to cut 4 pieces of fabric. They can be all the same fabric, as I have here or you could mix and match for a patchwork effect.
The back - 13" x 15" (33cm x 38cm)
2 Front pieces - one 10.5" x 13" (27cm x 33cm) and one 5.5" x 13" (14cm x 33cm)
The Pocket - 5.5" x 7" (14cm x 18cm)
Plus a length of coordinating ribbon 34" (86cm)

Sewing the cutlery roll
Start by turning a small double hem on the pocket piece at the top and stitching it.

Place the large front piece face up, lay the pocket piece face down in the bottom right corner and layer the smaller front piece on top, also face down. Stitch down the right side.

Open up and press. Fold the ribbon in half and pin it 5" (12.5cm) from the bottom of the left side.

Lay the back piece on top, right sides together and stitch round leaving a gap for turning. Just take care to make sure you don’t catch the ribbon in your stitches anywhere other than the place on the left side where you pinned it.
Trim the corners to reduce bulk then turn out through the gap. Use something like a chopstick to get right into the corners. Press and then top stitch all round.
Mark a line 2.5" from the top and stitch across to make a fold line and press.

That's it! Your cutlery roll/placemat/desk spill saver is finished. Tuck a napkin and your cutlery into the pocket, flap the top down to keep everything secure and then roll it all up and tie with the ribbon.


When you are ready to eat just untie the ribbon and open up your cutlery roll placemat and enjoy your meal. Bon Appetit!
Caring for your cutlery roll
These cutlery rolls can just be bunged in the washing machine to keep them clean. You could use a wipe clean waterproof fabric for the front pieces but personally I find wipe clean things can sometimes get a little bit icky in the seams so for me a good wash of a regular fabric is more practical.
More ideas to adapt this basic travel cutlery roll idea
These travel cutlery roll placemats only take about 30 minutes to make so it wouldn't take too long to make them for the whole family. They would be a lot of fun make in a mix of different fruit or food print fabrics. You could make each roll/placemat different or mix and match prints. If you only have a small amount of a cute print you could just use that on the pocket maybe. Or how about embroidering or appliqueing names or initials on the pocket fabric first to personalise the cutlery rolls?
Another possible adaptation would be to add a layer of interfacing or wadding to make the mat padded. I was thinking about keeping things clean with this roll placemat mash up rather than heat protection so I wanted this to be thin, lightweight and taking up minimal space in my bag but if you eat a lot of hot food at work you could easily add an extra layer for insulation.

This travel cutlery roll is really quick and easy to make so it would be a great project for a beginner sewer.
Julie
I’ll be sharing this project at some of these link ups