

Halloween Sew a Softie - Trick or Treat Bags
/

This October we’ve got another Sew a Softie blog hop, this time with a Halloween theme,
Today I’m sharing a tutorial to make a simple ‘Halloween eyes’ trick or treat bag. It’s really easy, perfect for beginner sewists.
We’ve got a cute little bonus Halloween spider bag charm too, I must have a thing for spiders, my last Sew a Softie was Incy WIncy Spider!

Before we begin I must explain that I have picked a project that highlights just how different the English language can be all round the world. To make each of these bags I used a pack of 2 very inexpensive flannels. Here in the UK we call that little square of towelling fabric that you use to wash yourself a flannel. I’ve been told in other parts of the world you call it a washcloth or a facecloth. I’m going to try to remember to call it a facecloth but if I forget and say flannel you know I don’t mean ‘a piece of flannel fabric’ or ‘evasive flattery!’
Note for the adult assistant to the craft project - These bags are handsewn, so you might want to run a line of stitches on a sewing machine in a colour matching the cloth around these 3 sides as well as the hand stitching just to make the bags extra secure. Or if the child making the bag is old enough, maybe they can try that themselves. I did this after the bags were made.
To make your own Trick or Treat bag you will need:
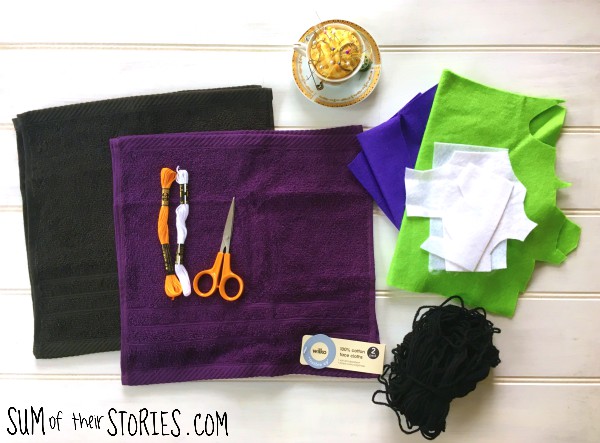
A pack of 2 facecloths/flannels - mine were just £1 for a pack of 2 in Wilkos Amazon have some similar ones here and here.
Felt - scraps to make the eyes
A larger piece of felt OR acrylic wool (to make the handles)
A sharp sewing needle with a large eye
Scissors
Pins
Decorating a Trick or Treat Bag with Eye Applique
I’ll go through how to make the black Trick or Treat bag with the white eyes first:
First cut any labels from your face cloth.
Then cut 2 circles from the white felt. About 1.5’ - 2” (4cm - 5.5cm) in diameter is about right.
Fold each circle in half and cut a tiny half circle in the middle so that you’ve made a hole when you open it back out. If you want to make the little spider too then keep the middles to be the spiders eyes.

Pin them into position on one of the face cloths, anywhere you think they look good.
Take a length of the white embroidery thread, if you look closely you’ll see it is made up of 6 strands. To sew the eyes you only need 3 of the strands so you’ll need to separate them. You can just pull them apart but that might lead to a big ol’ tangly mess. It’s much better to pull each strand out individually and them put 3 back together.
Sew the eyes in place with a running stitch.

When both eyes are sewn on lay this face cloth on top of the other.

Assembling your simple trick or treat bag
Pin the layers together to hold them in place and then take a fresh length of embroidery thread. This time you are going to stitch with all 6 strands. Don’t be tempted to have a great long length of thread, about as long as your arm is the maximum. You might think you’ll save time not having to cast off and start a new thread half way round with a long thread but it WILL get tangled, it always does, and in the end that will take much longer! Trust me!
You are going to stitch down one side, across the bottom and back up the other side. Start with a secure knot, you can hide it between the layers. Do at least 5 stitches up at the top before you stitch down the side. This is where the bag will be strained with all your lovely treats (hopefully) so make sure it is well secured.

Be careful not to pull your stitches too tight, stop every now and again and lay the bag flat on a table and just check that the fabric is not puckering up. If it is then gently pull on the fabric to smooth it out before carrying on. when you get back to the top again be sure to do another 5 stitches together to make your bag strong.
Making plaited yarn handles
Now you need to give your bag handles.
On this black bag I made plaited yarn handles. To do this kind you need to cut 30 lengths of yarn that are all 25” (64cm)
Divide them into 2 bunches for the 2 handles, 15 strands in each bunch.
Working with one bunch at a time, tie them in a knot at one end and then plait the length.
Crafting is always better with friends, if you have a friend handy then get them to hold the knotted end of your yarn whilst you plait. Sadly I was on my own when I made these Trick or Treat bags so I used my mug to hold the end of the yarn.

When you get to the end, tie another knot at the other end. Repeat with the other bunch of yarn so you have 2 handles.
Now you need to sew the handles to the bag. One handle goes on the front of the bag, one on the back.
Position them about 3” (8cm) from the edge. Stitch above the knot, over and at least 10 times making the handle secure. Try to make a few extra stitches that go through the handle as well as lots of stitches that go over it. I’ve lightened this photo right up so you can see better.

That’s it, your bag is ready for you to take out Trick or Treating.

The purple bag is made in almost the same way.
I tried cutting out a couple of eye options for this one.

Whatever style of eyes you choose you sew them on the same as for the black bag.
Sew the bag up in the same way too.
For the purple bag I made felt handles.
Cut 2 pieces of felt each one 16” (40cm) x 2.5” (6cm)
Fold them in half and sew up using 6 strands of embroidery thread.
Attach them to the bag, as before 3” (8cm) in from the edge. Overlap them 1.5” (3cm) on to the bag and then stitch round in a rectangle.


Just as a little bonus I made a little mini spider bag charm too. You could make this as a little toy instead with out the hanging thread to pop in your pocket if you’d rather, or use it as a halloween decoration.
To make the mini felt spider bag charm you will need:

Scraps of black and white felt (I used the middles from the eyes on the black Trick or Treat bag, otherwise cut 2 tiny white ovals)
Black Yarn
Black and Orange embroidery thread
A tiny bit of fibre fill
Cut 2 circles from the black felt about 2” (5cm) in diameter.
Using the black embroidery thread sew the tiny white felt eyes onto one of the black circles.
Cut 4 lengths of yarn 8” (20cm)
Tie a knot in the middle of them, place it between the black felt circles. Stitch round with a running stitch leaving a little gap. Pop a little of the fibre fill in then stitch up the gap.

Add a 15” (38cm) length of coloured thread to hang your spider up or attach it to your bag if you want.


You could add more pairs of eyes to your bag if you like, maybe in different colours. Or maybe you could put eyes on both sides if you have more time. If you can find orange face cloths, you could make a pumpkin face using the same method. Whether it is scary or cute is up to you!
Just to say again, a note to the adult “helper” if the stitches are very large or loopy or uneven you might want to wizz round the sides and base of the bag with a matching thread on the sewing machine, just to make sure no goodies are lost out in the street on Halloween evening.
Quick, easy and fun to make, plus you can use them year after year.
Julie


