

Fun Quote Notebook DIY
/
Today I’m joining a group of my fellow creative bloggers to bring you the Dollar Store Challenge Blog Hop. As I’m in the UK it’s a bit different for me, we have Pound shops here instead of Dollar Stores but it seems the stuff they stock is pretty much the same.
Meet the other participants of the Dollar Store Craft Challenge
Across the Blvd | Purple Hues & Me
Southern Sunflowers | Stone Cottage Adventures
Comfort Spring | Cookies, Coffee and Crafts
Slices of Life | Sum of their Stories
For my contribution to the blog hop I’m giving a fun quote makeover to a free promotional gift notebook using supplies from the £ shop. You could even get your notebook from the £ shop or $ store, mine just happened to be one with a company logo on the front. It also has a little bit of elastic at the side and a handy pen attached so was a pretty nice freebie notebook to start with, perfect for a bit of an upgrade.
Irritatingly I thought I had taken a photo of the notebook before but it seems I didn’t. You can imagine a blue notebook with a company logo on the front can’t you?
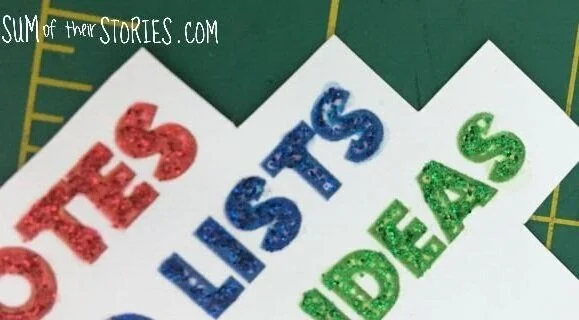
I love a good note nook, I have lots and use them all the time for all sorts of things. Most of my note books contain notes, to do lists, brilliant ideas and profound thoughts so that’s what I decided to go with!
To make your own fun quote notebook you will need:
A notebook
A printed quote (you can download one of mine below or make your own on a computer)
A laminator and laminating pouches
Glue Strips or strong double sided tape
If you are making a colourful glittered note book quote you will also need:
Glitter
PVA Glue - I used Anita’s Tacky Glue
A paintbrush
The supplies I bought in our local £ shop was the laminating pouches and glitter. I find for a craft like this, inexpensive laminating pouches are just as good as the more expensive ones from a stationery shop.
The idea here is a simple one, we’re going to cover up the company logo on the notebook with a fun ‘to do list’ quote. Easy eh? I’ve got a few options for you.
First you need to choose your quote and get it printed out ready.
You can copy and paste these images into a word document on your computer to print or download them from Google docs. Just resize as you need to so they will fit on your notebook.
There is this, option 1 with a fun mix of fancy fonts. You can download it here.

Or you might prefer this colourful option, download it here:

Once you decided on the version you want print it on your computer, trim neatly so it will fit on your notebook and then laminate it.
The laminating is actually only essential if you are glittering the letters but it will make the notebook upgrade last much longer and feel a bit more special anyway. You could try a clear sticky backed plastic if you prefer, I think the effect would be the same. (When I used stickers to decorate a notebook in a Tetris design a few years ago I used sticky backed plastic and it worked well) What you cannot do is glitter straight over the ink from a regular home printer, the colours run and you’ll end up with a hot mess - not good!
Once it is laminated, trim it close to the paper.
If you are not glittering then all you need to do is use the glue strips or double sided tape to fix the quote to the notebook. This is not a time to skimp on the tape, use plenty and then press firmly or weigh it down with a book to make sure it is well stuck.


If you’ve printed the colourful version and don’t want to glitter it then this is the sort of look you’ll get.

I have a love/hate relationship with glitter. I love the way it looks but I know environmentally it’s not great and I really don’t like the way it gets everywhere.
All that said, this notebook looked like it was crying out for a little bit of glitter so that is what it got!
Apply pva to the letters with a paintbrush and then sprinkle with glitter, then tap off any excess. I matched the colours to the print underneath.

Do one colour at a time and give it time to dry before you do the next one.
Once it’s dry use a dry brush to remove any loose glitter and then apply another layer of glue to seal.

This glittering process is really easy but it is a little bit time consuming. Look at that sparkle though! Totally worth the effort.

Look closely here on the yellow letters and you can see what happens when you don’t let the glue totally dry before you glitter the next colour! Some of the pink glitter got mixed in with the yellow, not a disaster but lesson learnt!

That’s it, a simple and inexpensive way to turn a plain notebook or one with a company logo on the front, into a fun notebook, perfect for your notes, to do lists, brilliant ideas and profound thoughts.

Now let’s see what ideas and projects the other participants in the Dollar Store Craft Challenge have come up with.


