Funem Studio Weaving Loom Kit Review
/
A few weeks ago I was excited to receive a weaving loom kit from Fūnem Studio to review. This loom kit was gifted to me by Fūnem Studio in exchange for my honest review. I love trying out a new craft and weaving is something which I’d not really done at all before, save for a little toy loom I had when I was a child and wove one table mat and one coaster on!
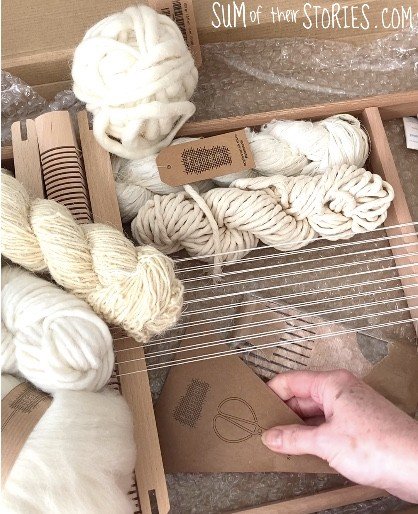
I was sent the Weaving Project Kit, a large size loom with Neutral colourway yarns.
The loom is measures 45cm x 33cm (18” x 13”) with a weaving area of 39cm x 27 cm (15.5” x 10.5”) and comes with 7 large skeins of various textured yarns and a skein of cotton warp thread. The kit also had 2 shuttles, a comb, scissors and large needle.
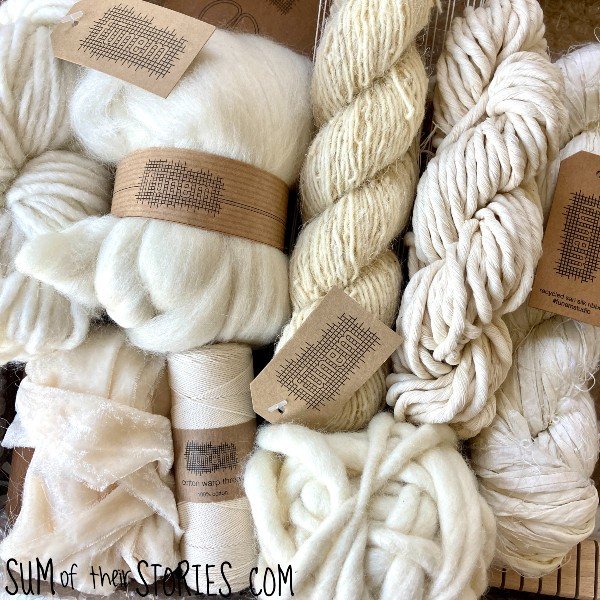
Just look at all the gorgeous textures of these yarns!
From their website I gather that Fūnem now automatically provide access to some basic instructions via email with all their kits. I didn’t have that with my kit but instead I simply googled “weaving for beginners” and found dozens of great tutorials online.
These are all sites I found that are worth checking out:
As soon as I saw this box of goodies I knew I needed to make a wall hanging. It would just be rude not to!
As you can see in the first photo, the loom had a small portion in the centre already threaded up with a section of warp threads. This wasn’t as wide as I wanted my wall hanging to be so I added a few more warp threads each side.
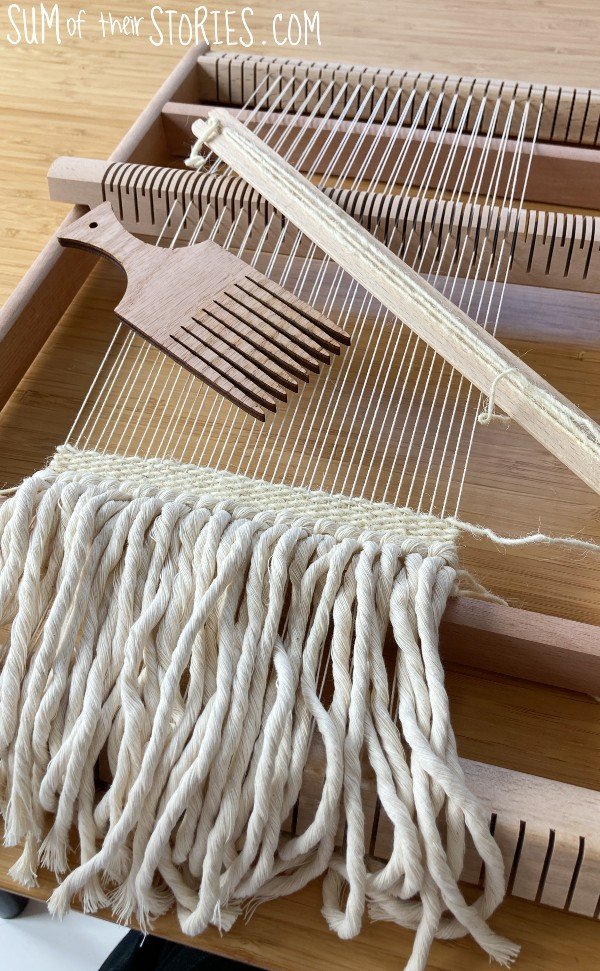
I started my wall hanging with a row of tassels and then the weaving commenced.
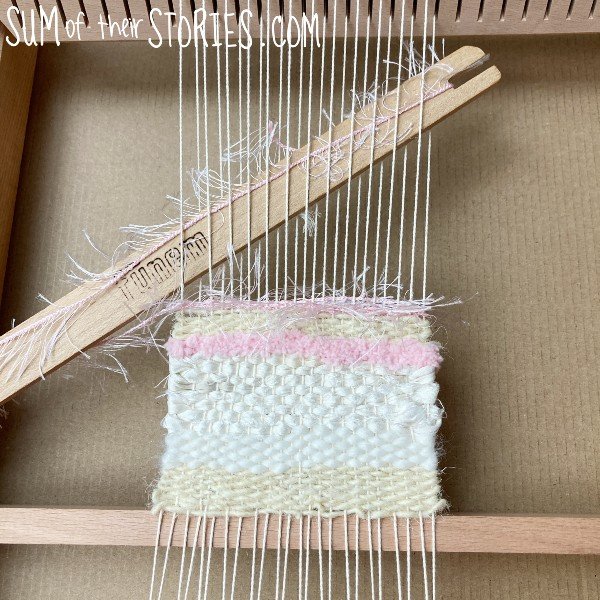
The loom comes with a bar called a heddle that goes across and lifts the warp threads up and then down. You twist the heddle towards you then away from you and that action moves the warp threads up then down alternately making weaving an absolute breeze.
At first I wrapped the shuttles in yarn but on reflection I don’t think that was necessary. I just needed to tie the yarn onto one end really which makes it easier to pass the shuttle through, especially towards the end when you are working closer to the heddle.
Another mistake I made was leaving the ends loose at first. I thought you’d weave them in afterward, like you do with knitting and crochet! Turns out you can weave the end in first which makes it all a bit neater as you weave.
The comb in the kit is not for your hair, it’s for pushing down the weft threads and making everything neat and firm.
It didn’t take long for me to get a rhythm going and start to feel like a proper weaver!
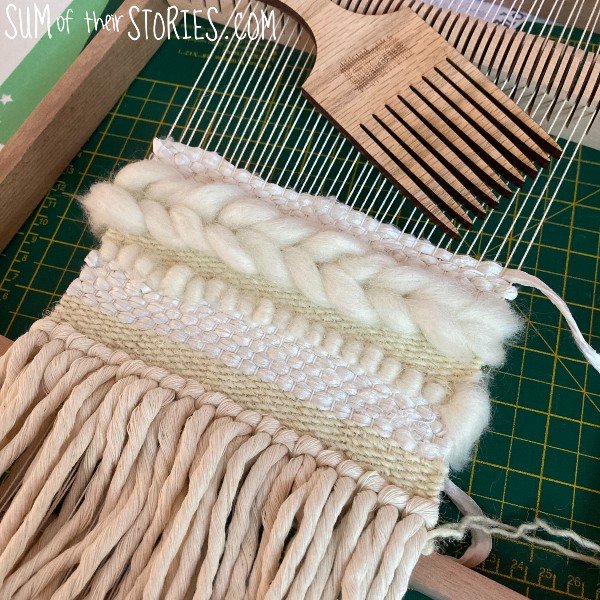
Adding the roving to add extra texture was fun and really easy. I wove the roving in by hand though, the shuttle didn’t seem to be suitable for that.
I didn’t do any sort of pre planning with this wall hanging, I just went with the flow and added yarns as it took my fancy. The Fūnem Studio Instagram feed is a great place for inspiration.
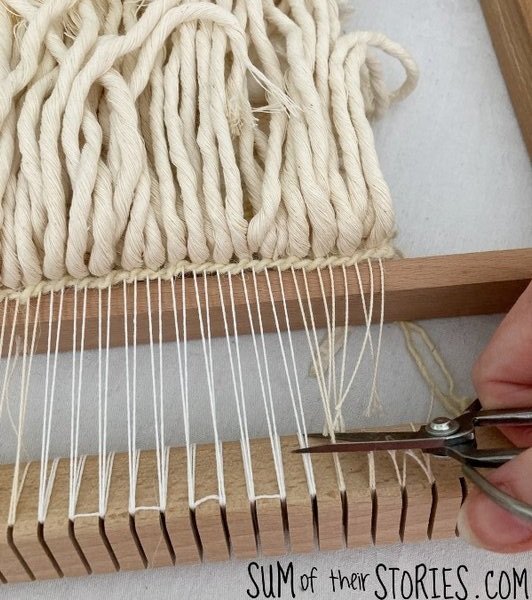
Cutting the weaving off the loom was a slightly scary moment, for some reason I thought the whole thing might fall apart, but of course it didn’t! I cut off and tied the bottom edge then cut off the top.
Some of the You Tube tutorials I subsequently watched suggest adding a strip of card at the top of the weaving which you can later remove and replace with a length of dowel to hang your wall hanging. That seems like a great idea but I didn’t see that tip until I was almost finished. I actually wove my hanging from the bottom up. This might be all wrong and top down is probably the right way. You know what? It worked so I’m not going to worry about it! For a first attempt I am pretty pleased with my weaving. I will try from the top down next time and see how it goes.
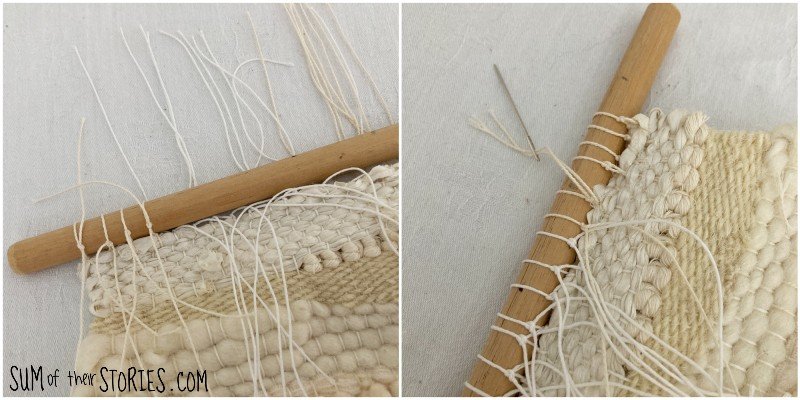
Because I had woven from the bottom up I didn’t have a nice neat line of loops to attach my weaving to a length of dowel. Instead I cut the work off the loom and tied it to the dowel and then just tidied all the warp ends by sewing them in using a regular tapestry needle.
I had an idea that my wall hanging would be as neat on the back as it was on the front. It would have been it is wasn’t for that roving. I couldn’t work out how to secure that properly at all. Online tutorials suggested tucking it in but I guess my pushing down with the comb had been so effective there just didn’t seem to be any room for that. Instead I busted out a needle felting needle and stabbed away at the back of the roving to secure it to itself. Maybe not the proper way but it worked really well.


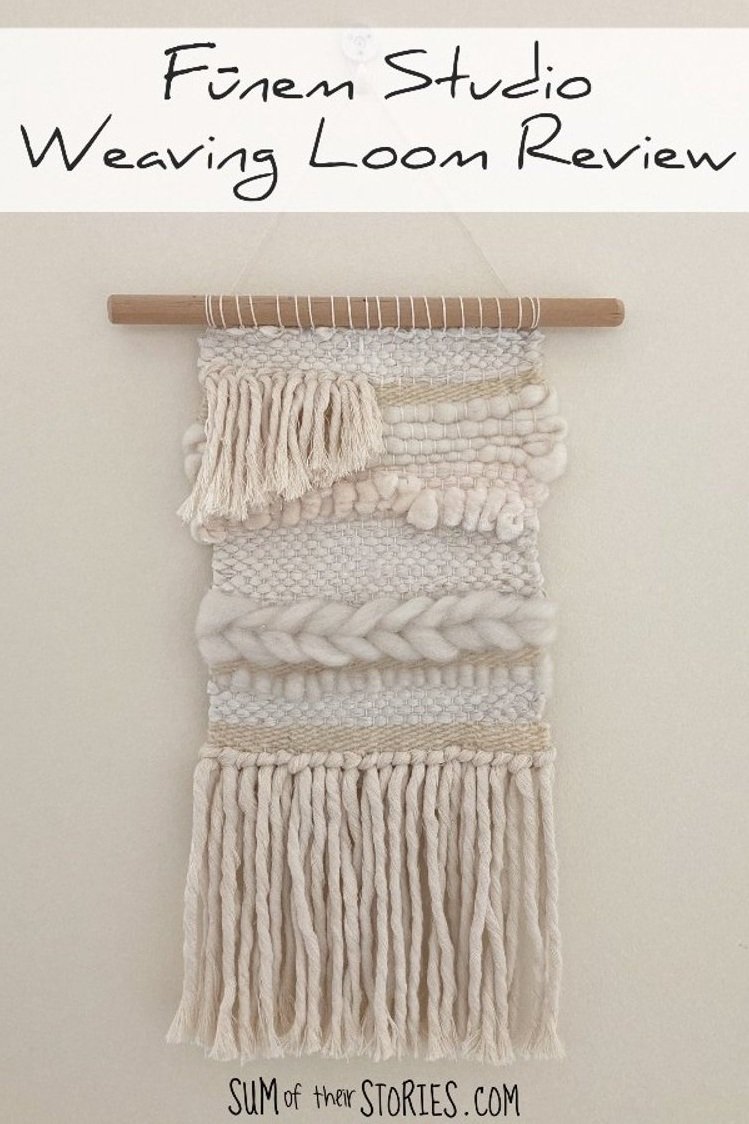
Here is my finished wall hanging. To say I’m pleased with it is an understatement. I believe it to be a thing of great beauty!
I’ve hung it in our bedroom as that is decorated in natural colours, creams and whites with a touch of gold. The only problem with placing it here is that not many people will get to see it! I might move it to the hallway for a while so all visitors get to admire it - ha ha!
I’m assuming I’m going to need to brush or vacuum it now and again to keep it clean. I’ve also seen textured weavings like this displayed in box frames, behind glass. That seems like a really good idea, I might try that next time too.

These looms from Fūnem are not cheap but are really excellent quality, my loom is beautifully made and I can imagine it lasting a lifetime. They would make a fantastic gift for someone who you know is going to love weaving, or someone who has maybe had a go on a cheaper quality or homemade loom and wants to take their weaving to the next level.
The yarns are beautiful, a lovely mix of textures and you can tell it’s all top quality. There is plenty in the kit. Just to give you an idea, this is what I had left after I’d finished my wall hanging.
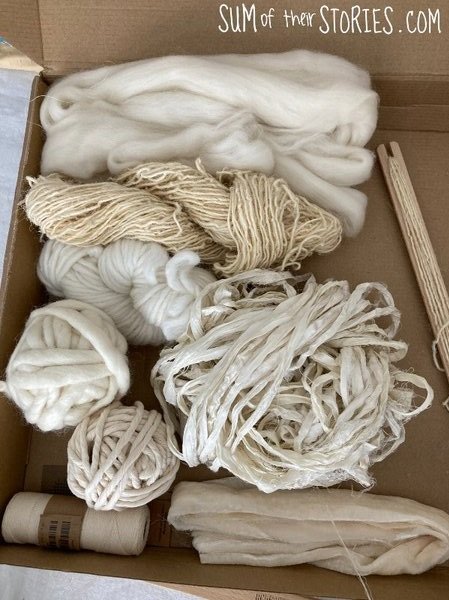
There is enough to make at least another 3 similar sized wall hangings, probably more.
The only thing I had to provide to finish my wall hanging was the length of dowel, I got lucky and just happened to have a piece in my craft stash that was just right. I’ve seen people attach their weavings to more natural looking twigs/sticks too which can look amazing.
So, in conclusion, if you are looking for a top quality table top weaving loom then these Fūnem looms are definitely worth a look. Probably not an item you would just treat yourself too on a whim but a beautiful gift idea. They would be ideal for someone thinking of starting a small business making hand woven items too, they are easily sturdy enough for daily use. Fūnem Studio is based in Belgium and ship worldwide.

The only thing I would do differently now I’m such an experienced weaver (with my one completed woven project!) is to watch more You Tube videos about how to weave BEFORE I started instead of as I went along! I was just so excited to get started but I might have avoided a couple of minor issues if I had watched more tutorials first.
Thank you Fūnem Studio for my beautiful weaving loom kit, it’s been a joy to try weaving and my loom will be well used for many many years I’m sure.
Have you ever done any weaving? Is it something on your “to try one day” list?
Update:
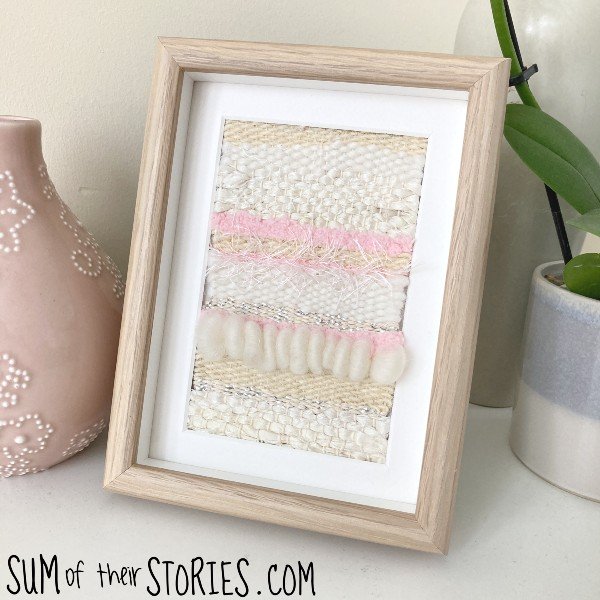
I’ve made a second, smaller weave and I’m just as pleased with this one as the first!
I strung the loom up with a narrower band of warp threads and started weaving. I used yarn from the kit again, but also some fluffy pink and some eyelash yarn from my stash. I also incorporated some twine that had some silvery foil round it. I rescued this from a gift wrapped parcel last Christmas! Waste not want not!
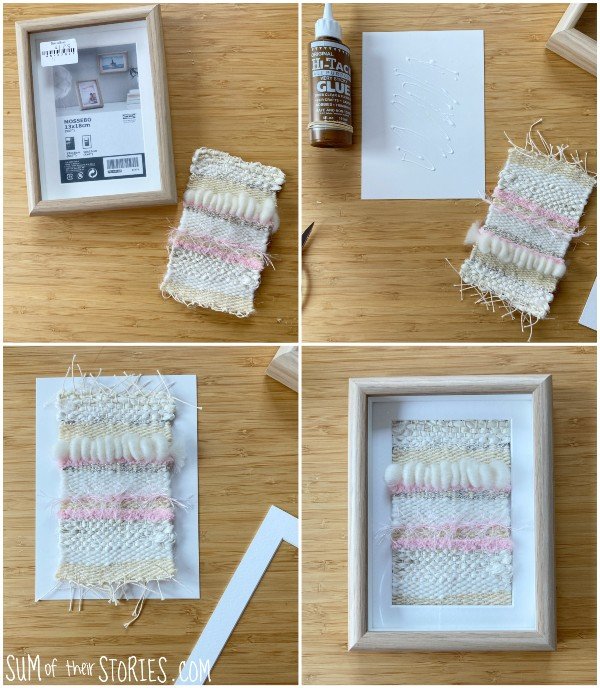
Once the weave was finish I cut and tied the warp threads but didn’t wave them in as the frame I had picked up from a charity shop had a mount so it would all be covered.
I just glued the weave to some acid free card, cut to size and popped it in the frame.
Julie