2 Ways to Make Tote Bags with Scrap Fabric and Net
/I’ve been experimenting, making unique tote bags from tiny scraps of fabric using nylon net. This is such a fun way to make a bag and is a great way to use even the teeny, tiniest scraps of fabric.

In episode 4 (Reduce, reuse, recycle week) of the 2024 series of The Great British Sewing Bee the contestants made handbags by making a pocket from organza fabric, stuffing it with fabric scraps which was quilted and turned into a handbag.

© The Great British Sewing Bee, Love Productions
Earlier in 2024 I had made some fabric from tiny scraps or fabric crumbs as they are sometimes called; you can read all about that here: How to make beautiful useable cloth from tiny scraps of fabric. This made a small dent in my scrap fabric tub but it was still pretty full - I swear they multiple overnight in there!
The Sewing Bee Bag challenge inspired me to have another go at using my tiny fabric scraps and adding a mesh or net over the top to make some strong and useful tote bags. I started experimenting and now have the results ready to share with you.

I’ve made 2 tote bags using 2 different methods and so am splitting the tutorials into 2 parts. I took almost 90 photos altogether as I made these 2 bags so it definitely needs splitting into 2 to make it manageable! This is version 1 and you can find version 2 here: Scrappy Tote Bag Tutorial take 2
What kind of fabric scraps can be used to make your tote bag?
I don’t know about you but I’m someone who hates waste so I find it difficult to throw away even really quite teeny tiny scraps of fabric. I tend to keep them in a tub in the hopes I will use them one day. Most of the pieces I used for these bags are between 1 and 2 inches in any direction. If your scraps are larger then cut them up into smaller pieces. I cut the long thin strips you can see here into smaller, more manageable pieces.

On Sewing Bee the contestants did appear to be shredding up really quite large scraps to make their bags. I prefer to keep my larger scraps for other projects, but then I’m lucky to have my tub of teeny bits of course. You do whatever works for you but remember this is a great way to use those tiny odd shaped little bits!
What kind of net fabric can you use?
I found some fairly stiff pale pink net fabric in my fabric stash which worked well to make strong durable tote bags. It’s the kind of net that would be used to make sticky out petticoats or a tutu. The inexpensive nylon net is fine for this kind of project, just remember to keep it away from your iron!
You could use any kind of net, mesh or organza though, even an old plain net curtain would work. Personally I wouldn’t waste a beautiful soft silk tulle on this kind of project but you use what you can find.

Version 1 - Net and Scrap Fabric Tote Bag
This bag is made with tiny fabric scraps in a net “pocket” without a lining. The seams are all covered with a patchwork bias binding so there are no raw edges. This tutorial makes a really fun quirky and unique bag.
It is a pretty long tutorial with lots of steps. Please don’t let that put you off having a go. Nothing here is very difficult, I promise! You are making your bag fabric as well as the bag so of course there are more steps. The stiffness and springiness of the net also means that some bag making techniques we might normally use won’t really work so this bag’s construction is a little different.
You will need:
4 squares of net fabric 17” x 17” (43cm x 43cm)
LOTS of tiny scraps of fabric
Larger scrap fabric pieces for the handles and edging
Sewing thread
Sewing machine
Water erasable fabric pen and ruler
Bias binding making gadget and iron

Layer 1 square of net on top of another and stitch around 3 sides, remember to do a few backstitches at the beginning and end to secure the seams.
Repeat for the other 2 squares of net.

Lay the net squares on a flat surface and mark a 2” (5cm) grid with the water erasable pen.

Stuff the net “pockets” with fabric scraps. You can just stuff them in willy nilly or take your time arranging them nicely.
I found it best to take a bit of time to arrange the scraps a little, smoothing them out as much as I could. I added a layer of scraps face down and then another face up, so that my scrap net fabric would look good on both sides.
The scraps do move about a bit but it wasn’t too difficult to get the whole square covered with 2 or 3 layers of fabric, there is a lot of overlapping going on.

Once you are happy with the fabric scrap arrangement then pin it all over. Use lots of pins to hold the fabric scraps in place as best you can. I found they gripped the nylon net fairly well but some did shift a little. I chose not to worry about that, but if you like precision this project might not be for you.

Roll your net pocket up to move it to your sewing machine, that will help prevent the scraps moving too much.
Starting at the open edge, stitch the grid you marked earlier. Work across in one direction and then turn the fabric and stitch the other way. You can use a white thread like I did or something bright. You could even see this as a chance to use up little bits of thread spools and use several different colours.
Then repeat for your other net “pocket”.
Spray with water to erase the marking and leave to dry.

Make the patchwork bias binding

Take your slightly larger scraps of fabric and trim them into pieces that are 2” wide.
Stitch these pieces together to form a long strip at least 66” (170cm)
Turn the long strip into bias binding. You can use a bias binging making gadget as I have here. If you don’t have this handy gadget you can just iron it, folding the long edges in.
Prepare the bag handles and top edge binding

Take some fabric scraps, trim them to 3” (8cm) wide and start joining them as you did for the binding. You need 4 lengths in total; 2 lengths each 26” (99cm) for the handles and 2 lengths each 17” (43cm) for the top edging.
Make the handles

Fold the 26” long handle strips in half, right sides together and stitch along the length to form a tube.
Turn the handle right sides out using a safety pin.
Press and then top stitch down each side of the handle for added strength.
You are now ready to assemble the bag.
Assembling the net and scrap fabric bag

Check both sides of your net pieces and pick your favourites to be the outside of your tote bag, you might want to mark them with a safety pin so you don’t loose track. Lay the pieces onto a flat surface right sides up and overlap them about 1/2” along one side. Stitch the pieces together using a wide zig zag stitch.
Cut a 17” lengths of your patchwork bias binding and lay it over the join you have just stitched and pin in place.
Turn the fabric over and lay another 17” length of bias binding over the join on the other side. Take a few minutes to make sure the binding is lined up on both sides using plenty of pins.
Stitch this bias binding in place, along each side.

You now have a beautiful long rectangle of scrappy fabric. You might be wondering why we didn’t just make a large rectangle in the first place, I did try that but it was just too difficult to spread the fabric scraps nicely.
Adding the handles

Place the handles, 4” in from the edges on the short sides of your rectangle and pin in place. Use 2 pins on each handle so they don’t slip around. Make sure the handle is not twisted.
Place one of your top edging patchwork strips face down on top of the handles, repeat on the other end of the rectangle and then stitch across.

Neaten the top edge

Open the patchwork top edging strip out then turn the whole thing over.
Fold the patchwork edging strip over and then over again, covering the top edge. Pin in place.
Flip the handles up, pinning them so they don’t get caught in your stitching, and then stitch across the top edge binding. Repeat another line of stitching closer to the top edge.

You can see how the 2 lines of stitching go across the bag handles, holding them up and also making them more secure.
Closing the side seams and forming a bottom gusset

Fold your bag in half, so the handles are together at the top.
You could just bind the sides as they are and have a flat bag. I wanted my bag to have a bit of a gusset, I find that useful especially when I want a tote bag that I can just bung a load of things in. Normally I would box the corners, if you’ve seen any of the other bag tutorials you’ll see how I would normally do that (like this contrast handle bag & easy knot bag) This stuffed net fabric was too stiff and springy to make that work, plus I didn’t want any raw edges on the inside so I tried a folding method which is hard to explain but really easy to do.

Clip or pin the sides of the bag together. When you get to the bottom push the bottom 4” up inside the bag. You are making a W shape. Use the photos to guide you, like I said it’s easy to do but hard to describe in words!
Clip or pin the folds you’ve made while you prepare the bias binding. The net is springy and don’t forget, you can’t iron it or it will melt!

Cut a length of the patchwork bias binding you made earlier that is just a little longer than the side of the bag.
Open out the bias binding and lay it along a side seam and stitch.

Fold in the ends of the binding and then fold the binding over the edge. Clip or pin and then stitch again to secure in place.

Whoop Whoop! You’ve made it to the end! The bag is finished, isn’t it beautiful?

You can see that although the bag is not lined it is pretty on the inside too.
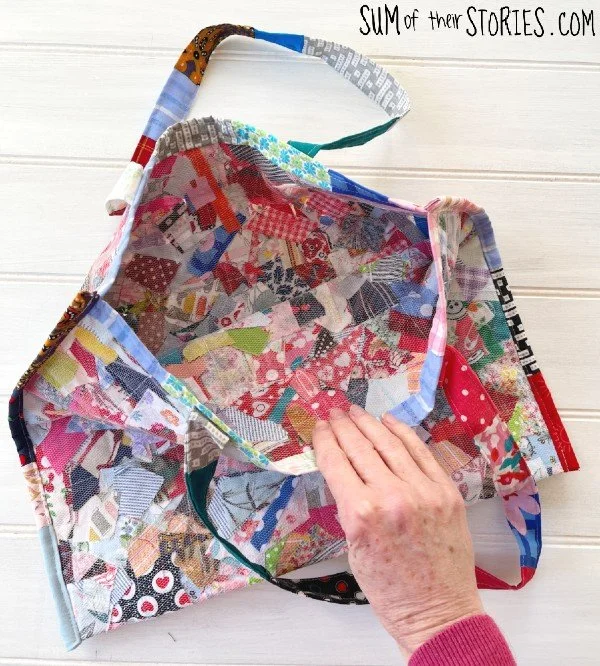
You can see how the fold at the bottom of the bag forms a gusset, giving you extra space for all your stuff.


Here you can see how this bag opens out differently than the other style of bag I’ve made with a more conventional boxed corner. The other version can be found here: Scrappy fabric tote bag.


Have I tempted you to grab some nylon net and put those tiny scraps of fabric you might normally throw away to good use?

The main issue I found making this scrappy fabric tote was spreading the fabric scraps out evenly. Maybe I should have stuffed it with more? Now the bag is finished I can see that there are a few places where either I missed a bit or the fabric scraps slipped as I was sewing. I held it up to the light here to show you the tiny gaps where you can see right through.
I also found it took some thinking about to avoid raw edges inside the bag. The nylon net is quite stiff, which makes a great sturdy bag but it could be a little scratchy if there were raw edges. Here I solved that potential problem by using the bias binding so everything in nice, smooth and enclosed.
Version 2 of the scrappy fabric tote handles both of these issues in a different way.
I have promised you 2 ways to make a tote bag with fabric scraps. The second method I tried will be here on the blog next week, I’ll link it up here as soon as it’s ready is now available so you can compare the two methods and see which you prefer. You can find it here: Scrappy Fabric Tote Bag Tutorial take 2.
Julie
I’ll be sharing this tutorial at some of these link ups