

How to make a Mini Felt Robin - Festive Sew a Softie
/
It’s no secret that I love the Sew-a-Softie movement!

Sew-a-Softie is an initiative to get kids sewing, it was started a few years ago by the wonderful Trixie from Sew a Softie as a little blog hop and has grown into so much more. There is a facebook group with lots of ideas and a chance to share your softies, children’s ambassadors who get together with their friends to teach them to sew plus #sewasoftie on Instagram. So many ways to get involved!
Festive Sew A Softie is running from the 23rd November to 17th December with a different creative blogger sharing a Christmas themed tutorial each day, all designed to be easy enough for beginner sewists of all ages.

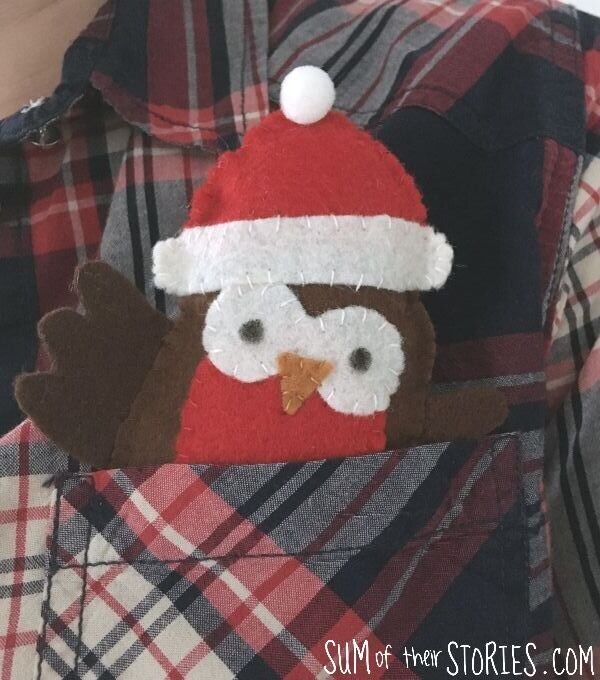
Today is my day and I’m bringing you a pocket robin. Originally he was going to be a slightly bigger robin but we have a lockdown here in the UK right now with shops shut so when I discovered last minute that my stash of felt was a tad smaller than I thought it meant a quick change of plan. So a cute little pocket robin it is! He doesn’t have to go in your pocket, he could hang on your tree or sit on a shelf but he is a great size to fit in your pocket and keep you company.
To make a mini felt robin soft toy you will need:
Brown and Red Felt
Tiny scraps of white and yellow/light brown felt
Sewing thread to match all the felt - brown, red, white and yellow/light brown
Scissors - small sharp scissors are best for cutting out small pieces of felt
A small amount of fibre fill
A black sharpie
A mini pom pom
PVA Glue

From brown felt cut out; 2 x body, 2 x wings, 2 x feet
From red felt cut out; 1 x belly, 2 x hat
From white felt; 2 x hat brim, 1 x eyes
From the yellow or light brown felt; cut 1 x beak
Start by attaching the red belly to one of the body pieces, just a little lower than the centre - use the photos to guide you. Use a red sewing thread. I did a simple oversew stitch which worked great. You could use a running stitch or blanket stitch if you prefer.

Next attach the white eyes, use a white thread for this. Position the eyes so they just overlap the top of the red belly.

Sew the beak in place, use a thread that matches the colour of your beak.

Now it’s time to get the hat ready. Using white thread sew a white brim to a red hat piece, just overlap it a little.
Then sew the hat to the body. I put mine on at a jaunty angle but you can do yours straight if you prefer.

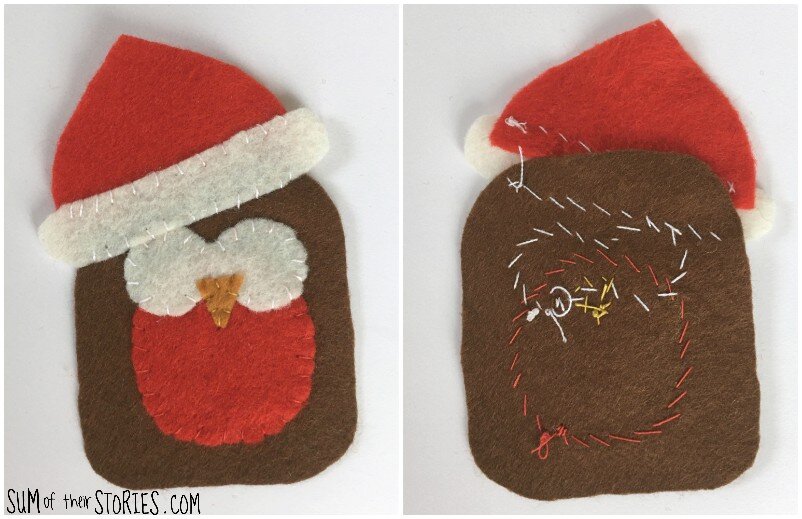
At this point your robin will look a bit like this, front and back. See how the back is a bit messy? That’s ok, because no one will ever see the back!
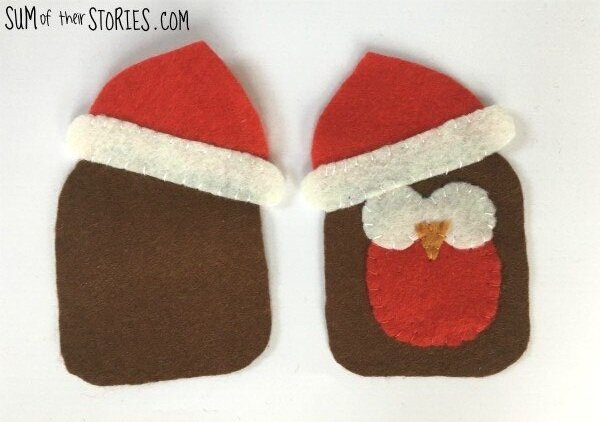
Repeat for the other hat pieces, sew them together in the same way but attach them to the other body piece of felt. Remember you want the hat at the opposite angle if you’ve done a jaunty angle like me. To get this positioning right, lay the second body piece on top of the back of the decorated piece, then lay the hat piece on top, lining it up. Once you’ve got that lined up nicely you can sew the hat to the body piece.

You’ll have 2 pieces, that should look a bit like this:
Phew, you’re nearly there!
Now you are going to sew these 2 body pieces together and whilst you are doing that you’ll sandwich the wings and feet between the front and back body pieces.
Lay the front body, face down. Position the wings and feet on top, again use this photo to guide you.

Place the back body on top, right side up.

You’ll probably want to pop a few pins in to hold the feet and wings in place as you sew around.
You are going to over sew around the whole robin. I changed my thread colour to match the felt, so I sewed the body with brown thread, the hat with red and then just a little bit of white thread for the brim of the hat. It’s a bit of a faff to keep changing thread but I thought it was worth it.
Start just under the hat and stitch all around the body. When you get to the wings you can’t just carry on with an oversewing stitch, the wings are in the way! Instead you need to stab the needle straight through to the back and then back through to the front again. The picture below shows you what I mean. Just use a running stitch if you prefer.

You’ll find the same when you get to the feet.
When you get to the hat stop and add fibre fill to the robins body, then carry on round, sewing the hat up.


Draw black dots for the eyes using a black sharpie and add a pom pom to the top of the hat with a dab of pva glue.

Ta dah! Your little pocket sized robin is finished.

Have fun making a festive softie this Christmas. Check out #sewasoftie on Instagram to see lots more ideas, with new festive softies everyday for the next month. Don’t forget to use #sewasoftie if you share photos of your makes on Instagram too so we can all see them. The Sew-a-softie facebook page will have the links to all the tutorials too.

I’ll be sharing this tutorial at these link ups


