Recycled Foil Valentine Cards
/
Use the foil from empty pie and flan dishes to make an embossed card this Valentine’s Day.
What kind of foil is suitable for embossing?
You want a fairly thick foil to use for embossing. The usual stuff that you get on a roll just won’t work for this. The kind of dish that you get a pie, tart, quiche or ready meal from a supermarket in is usually a good thickness. Sometimes a take away will come in a suitable container.

How to make an embossed foil Greeting Card
For this Valentine card idea you will need:
A thick foil pie dish - washed obviously!
A bone folder or old (and washed) wooden lolly/popsicle stick
An embossing tool (or a blunt pencil)
Card Blanks and envelopes
Scraps of card and paper
Scissors, glue
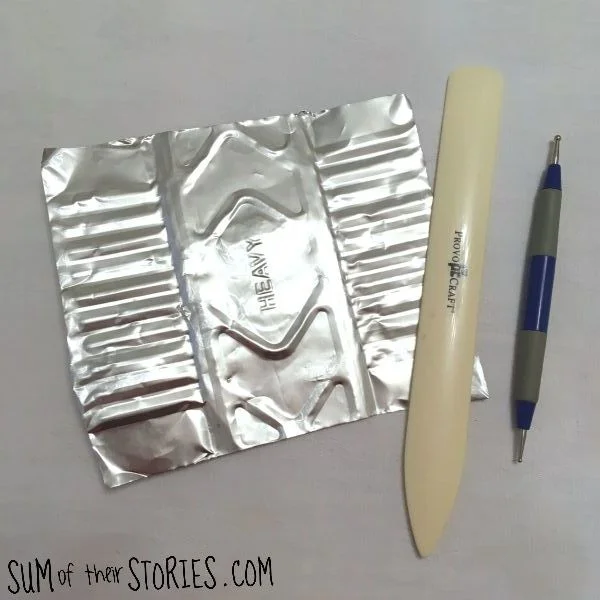
Prepare the foil for embossing
The first thing you want to do is use the scissors to remove the top crimped edge of the foil dish. Then cut the short ends right off, so you have a rectangle you can work with.
Use the bone folder or lolly/popsicle stick to smooth the foil into a useable sheet. You want to get rid of any creases, wiggles, patterns or words. This will take a few minutes. Go in one direction and then another, turn the foil over as it starts to curl and repeat until it is smooth. This took me about 5 minutes altogether.

Create your embossed design
Once your foil is nice and smooth you are ready to draw your design.
I used a paper crafting embossing tool but if you don’t have one you can use a blunt pencil - just don’t press too hard with it.
You need to lay your foil on a soft surface, not a hard wooden table. I usually do all my paper crafting on a cutting board but for this I just popped the foil onto a lightly padded cloth place mat. A sheet of craft foam would be ideal, or even a folded tea towel.
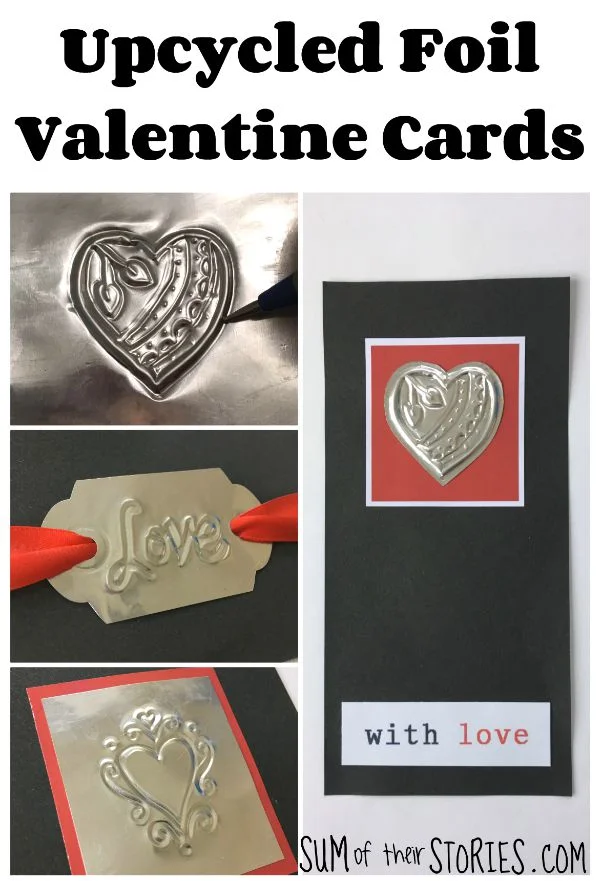
Just draw a simple design onto the foil using the embossing tool.

Once the design is done on one side, I found it stood out better if I turned it over and used the tool to outline the design again, just go round either side of the lines you’ve already done. It works best if you don’t press quite so hard as you did on the other side. This is not an essential step but it does make the design ‘pop’
Keep your design simple, you don’t need to be a great artist. Here’s a few ideas:

If you are not confident drawing straight onto your foil with the embossing tool you can draw on paper first, or even print out a suitable design, cut it out and tape it onto the foil. The just follow the lines pressing through the paper and onto the foil below. Remove the paper when you are finished to reveal the embossed design.
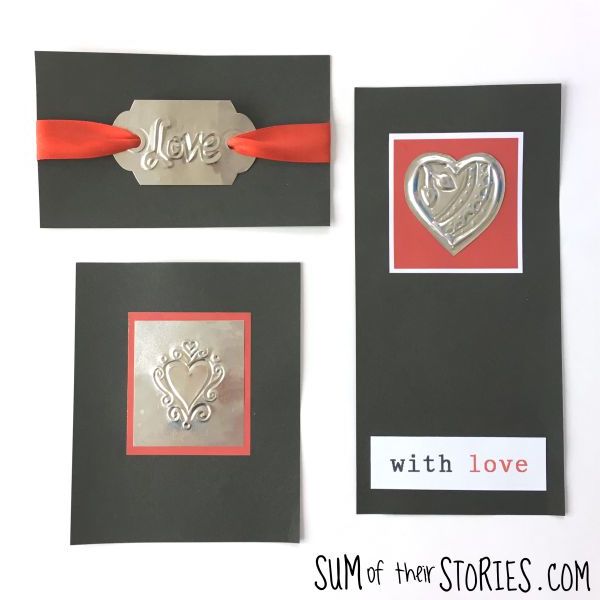
Creating your Valentine Card
When your design is finished you have a few options:
You can cut it out close the the design, like I have below, or cut the foil in a square or rectangle with the design centrally.
To make the cards just mount the foil motif onto card. A regular paper stick glue like a pritt stick is good. A PVA glue with a fine nozzle would work well too. Normally the side with the design sticking up will be the right side - that means you drew the original design on the wrong side, however if you prefer it the other way up that’s just fine too.

You can layer it up like I have here and add a sentiment if you fancy. I took this sentiment from an old Valentine card.

I had plenty of smooth upcycled foil left so I played with this idea a little more and made some other cards too.

For this one I used a tag punch to make a double ended tag shape from a strip of the foil and then wrote Love with my best fancy writing. I can’t write back to front so for this embossing the right side is the side I drew on. I attached the tag to the card with a length of ribbon - easy peasy!

These cards were such fun to make and really very simple too. I don’t think you’d guess they used to be a pie dish would you?
Julie
I’ll be sharing this project at these link ups