

Summer Napkin Decoupage Lantern DIY
/
How to make a summery lantern for your garden by upcycling an old food tin and a pretty paper napkin.
It’s time for me to join the Do It Over Designer team and bring you a DIY project with a recycled or repurposed vibe. Organised by Ann from The Apple Street Cottage, I join a group of my creative blogging friends and each of us “Do Over” something old and give it a new life. This month we have a theme - LIGHTING.
I decided to upcycle an old food tin to make a pretty lantern so I can burn insect repelling citronella candles on warm evenings when we are out enjoying our outside space.
I made a similar lantern a few years ago with a Christmas theme but wanted to experiment with a different decorating technique this time.
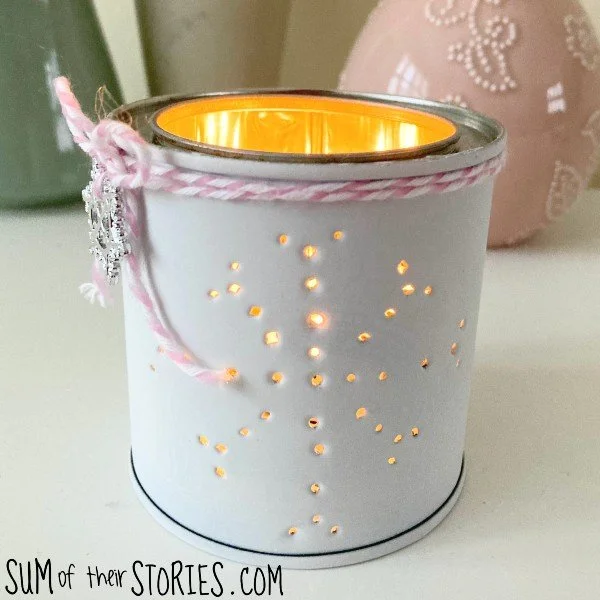
When I made my Christmas lantern I did it in the traditional way - You fill your tin with water, freeze it and then you can easily use a nail and hammer to punch holes in the tin without it getting dented or losing its shape. Then you can paint or decorate the tin however you like.
This time I had this idea to cover the tin with a pretty flowery paper napkin and have the holes punched in the flower centres. Nice idea eh?
However for this to work I need to know where the flower centres are going to be, which means I need to decoupage the tin BEFORE making the holes, which means I can’t freeze the tin full of water because the decoupage will go soggy and fall off.
So let’s see if it’s possible to successfully punch holes in an old food tin without freezing it full of water first. Spoiler alert - the answer is yes, sort of!
I don’t know about you but I enjoy seeing real life craft tutorials. We all know that in life not everything always goes smoothly so rather than pretending all my crafty endeavors work out perfectly I like to share the mishaps and challenges too.
Plus I have ended up with a pretty and useable lantern, so that’s a win.
I seem to have once again picked a project where my british english is evident - I really don’t do this on purpose, I promise!
Here in the UK a sealed metal container of food is generally called a tin. A tin of soup, tin of cat food, tin of beans etc. In the US I believe you are more likely to say can, right? We use “can” for fizzy pop - a can of coke for example but not generally food. Although people will say both “can opener” or “tin opener” which I guess is a bit weird - sorry about that! I’m not sure what word you use in your part of the world but for the purposes of this tutorial I’m going to let my Britishness show and say tin.
How to make a summery lantern from an old food tin
I started with a golden syrup tin for my lantern or luminary but you can use any metal food tin. I don’t think golden syrup is a product available all around the world but I imagine you can find something is sold in this kind of tin with a removable lid.

I like this kind of container for my crafting because it doesn’t have any sharp edges on the inside where the top has been removed with a tin opener. You can use any kind of old empty food tin or can for this project but if you do use a normal tin just be very careful not to cut yourself if the top is sharp. You might want to use pliers to pinch the metal and smooth any sharp bits before you start.
Anyway, enough chit chat and backstory, let’s get on with making a pretty upcycled summery lantern.
What you need to make a decoupages lantern
An clean, empty food tin
Primer spray paint - ideally white but pale grey can work in a pinch
A pretty floral paper napkin, you want something with lots of flowers
Mod Podge
A small nail and hammer or Awl
Prepare the tin
If your tin has writing of print on it like mine then you’ll need to start by giving your tin a coat of spray paint. Ideally you’ll use white paint which will help the colours of the paper napkin really pop. I didn’t have any white spray paint so I used a pale grey. This is an upcycling project for the Do It Over Challenge so I try to use what I have instead of always buying more.

This paint layer doesn’t have to be perfect, you just want to cover any printing on the tin. If you tin is plain or has a removable paper label then you can skip this step.
Apply the decoupage napkin
Cut a rectangle from your pretty floral napkin to fit your tin. Just use the tin to measure by laying it onto the napkin and your finger nail to mark where you need to cut.


Seperate the layers of the napkin so you just have the very thin top layer. Do this carefully so it doesn’t tear.
Apply a layer of Mod Podge all over the outside of the tin then apply the thin piece of paper napkin.

DO not fuss the paper napkin, just let it stick to the glue and leave it. Don’t try to move it, press it or smooth any wrinkles. It’s delicate and will tear or wrinkle worse than before. Honestly the less you fuss it the better the finished results will be.
I found it helpful to raise my tin up on top of the handy Mod Podge container so I could apply the paper napkin easily.
Let that dry completely then apply another layer of Mod Podge to seal the napkin, let it dry again.
Punching the holes

Now comes the experimental bit, could I make the holes where I wanted them without denting the tin?
I experimented and tried punching the holes with a small tack type nail and hammer and also just piecing it with an awl. Both worked but with the golden syrup tin I used I found the awl easier. It needed a twisting movement and it pierced the metal pretty easily.
Pierce the tin in the centre of each flower for a pretty effect when the lantern is lit.

Let’s be totally honest - The tin does dent a little without the ice inside to hold its shape. I don’t think it’s TOO bad, but I can’t pretend it didn’t dent at all. I haven’t worked out a way to knock the little dents back out so on my lantern they are staying.
Just pop a citronella tealight candle into your lantern and it’s ready to deter the bugs when you are eating outside this summer.
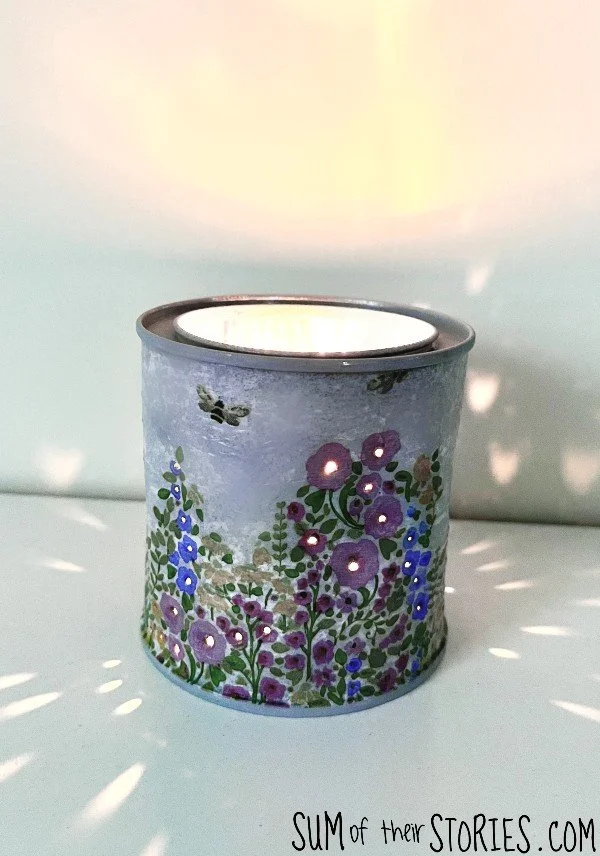
I do love the effect of the flower centres “lighting up”, it is exactly what I had in mind when I first envisioned this project. Is it worth the inevitable dents in the tin? Possibly not.
I think if I tried this idea again I would be tempted to abandon the decoupage napkin idea and just paint my own flower design with paint pens. I could freeze the tin full of water, punch holes randomly all over then decorate the tin afterwards. That way I would still have the flower centres lit up when the candle is lit in the evenings but without any dents. If I give it a try I will update here of course. To be honest we have quite a few nice lanterns and candle holders that I’ve made a few over the years, including this new pretty decoupaged lantern so I probably don’t need any more just now!


Now it’s time to check out what other fun LIGHTING themed crafts are on offer in the Do It Over Designers Challenge:


Click through to see each of the lighting themed upcycles:
Unique Creations by Anita: Mixed Media Lantern
Vintage Style Gal: 3 creative ways to upcycle lamps
The Apple Street Cottage: Upcycled lighting 2 ways
Birdz of a Feather: Featherweight Sewing machine
Exquisitely Unremarkable: Make a Vintage Lamp Cordless
Pandora’s Box: Updated lampshade
Purple Hues and Me: Lotus Flower Style Veneer Lamp


