

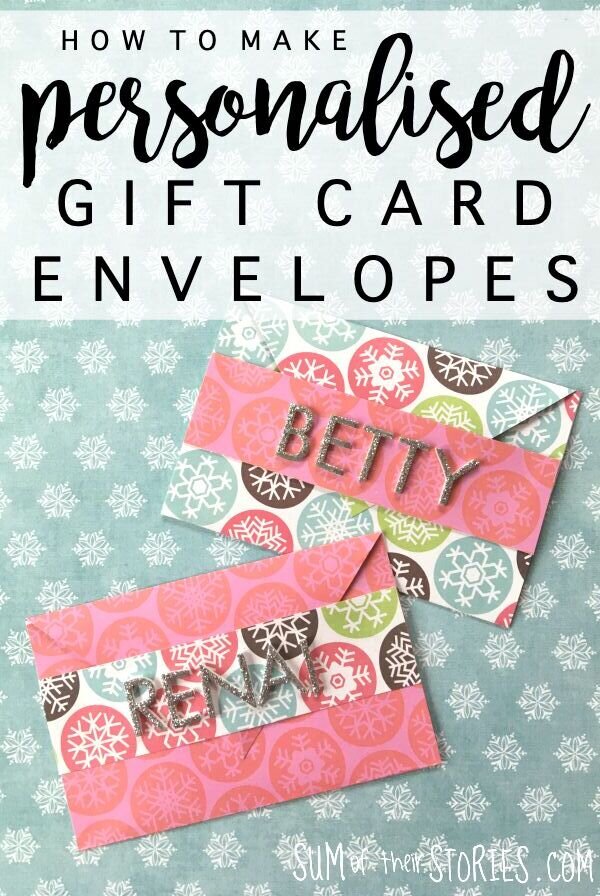
How to make a Personalised Gift Card Envelope
/

The glue strips I used in this project were provided for me by All things Sticky.
I’ve always thought that giving a gift card or even cash is a little bit boring. That said I always enjoy receiving one, so I think they make a great gift. I know that makes no sense - it’s an enigma!!
It’s easy to create a special envelope to transform a gift card into a more personal gift, make it look like you’ve put some thought into it (which you have of course!)
How to make a simple Personalised Gift Card Wallet
To make a personalised gift card wallet you will need:
Double sided tape - I used glue strips from All things sticky
Alphabet Stickers - mine came from Poundland, these from amazon are similar
A ruler and pencil
Scissors
I also used a bone folder to smooth folds and score my paper. If you don’t have one you can smooth the paper with your fingers and score with the blunt side of your scissors

Any patterned book paper will work for these gift card wallets. Scrapbook paper tends to be a nice weight, not too thick but substantial enough. The only thing that won’t work is very thick card or something with a directional print. I have some cute paper with snowmen but they would end up upside down on parts of the envelope!
I had a selection of Christmas scrapbook papers in my stash, I’m afraid I have no idea where they are from. I like the modern Christmas colours of bright pink. blue and lime green as well as more traditional reds and darker greens. My local pound shop did have lots of nice Christmassy papers too but I knew I had plenty at home and it’s good to use up what you have.
I found the lovely glitter alphabet stickers in Poundland. They are foam and glitter so probably not great for the environment but they are ‘oh so sparkly’ and perfect for a little Christmas crafting.
Cut the paper to size

Cut a piece of patterned paper 8.5” x 4.5” (21.5cm x 11.5cm)
Cut a piece of contrasting paper 1.25” x 4.5” (3cm x 11.5cm)
Take the larger piece and mark at 3” intervals along each side. Score between these points.

The section on the right end will be shorter than the other 2, just 2.5” rather than 3. Mark the centre point on that end. Draw a line from that centre point to the line you scored and the cut away to leave a point.

Assemble the envelope
Apply double sided tape on both edges, on the bottom section and then fold up to seal the envelope.

Pop a little double sided tape at either end of the smaller strip of paper and fix that onto the front of envelope about half way up.

Personalise the gift card envelope
Now for the personalisation. I wanted the names centrally so I placed the ruler underneath and worked from the centre. You could have the name off to one side and it would look just as good if you prefer.

And that’s it, the personalised envelope is all done. It is a perfect fit for a gift card but would also fit cold hard cash if that’s what you’re giving.


A few years ago I made a felt version of the same style of gift card envelope which you might like to check out too. Just as simple to make but a little stitching instead of glueing.

There are lots more fun gift card giving ideas here.
Julie
I’ll be sharing this idea at these link ups


