

Christmas Gift Bag Mini Shoppers Tutorial
/

Making fabric gift bags is a great way to use up any scraps of Christmassy fabric you might have in your stash. Christmas prints can be mixed with plain fabrics too to make them go much further too.
Fabric gift bags are reusable, if they are just used to hold a gift once a year they will last forever! Wouldn’t that be great, to have a gift bag passed along from person to person, year after year through the generations! Think of all that wrapping paper that would be saved!
This sweet little mini shopping bag that is just perfect to give a small gift this Christmas. I also have a tutorial to make a simpler reusable fabric gift bag if you are looking for something quick and easy to mass produce.
The fabrics I used for these bags comes from Minerva Crafts and my rather extensive fabric stash! A bundle of fat quarters is another great way to get some festive fabric relatively inexpensively.
To make a Christmas gift bag mini shopper you will need:
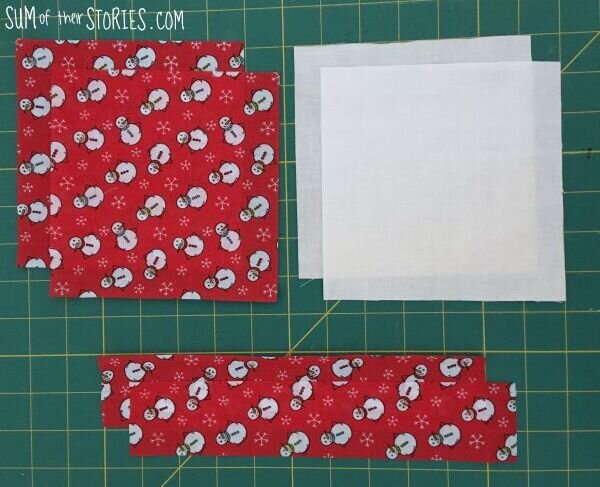
2 pieces of patterned fabric 6’x6’ (15cm x 15cm)
2 pieces of lining fabric 6’x6’ (15cm x 15cm) - mine was some old curtain lining
2 pieces of patterned fabric 10” x 2” (25cm x 5cm) for the handles
a length of thin ribbon about 4” (10cm) is plenty
a button - I’ve found these gorgeous Christmas buttons which would be fabulous for little bags like this.
Start by making the handles. turn the 2 long edges in to the middle of the fabric and press, then fold the fabric in half and press again. Kind of like bias binding.
Top stitch the open edge.

Now make the bag, Place the patterned pieces right sides together, pin then stitch 3 sides thinking about where the top is if you have a directional print.
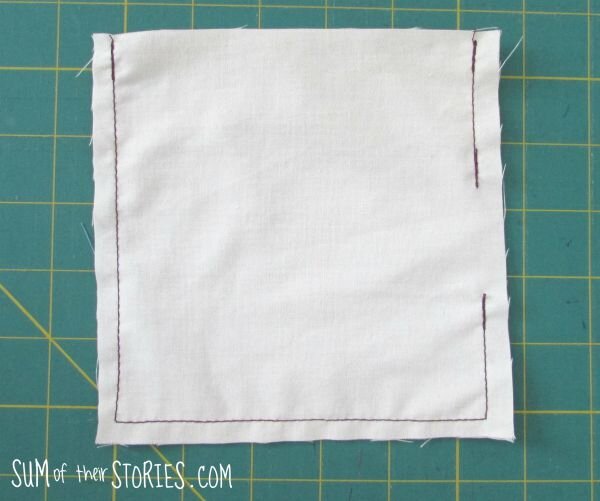
Repeat this process with the lining pieces but make sure you leave a 2” gap along one side for turning. I’ve used a bright thread here so you can see it, but normally you would use a matching thread of course.
Now we are going to box the corners:
Push your finger into one of the corners and then flatten the corner, lining up the seams. measure and then stitch across 1” (2.5cm) from the point. trim off the corner.

Repeat on the other corner of the lining and then do the same on both corners of the outer fabric too.
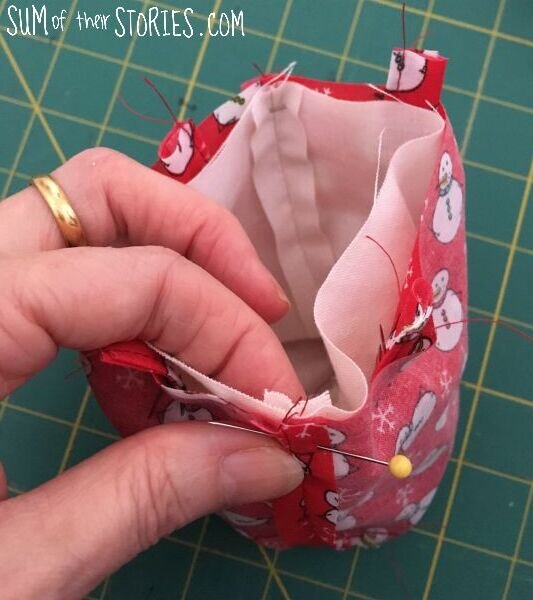
Position the handles 1 inch (2.5cm) from the side seams, use 2 pins to secure them. Using 2 pins tends to help stop them from sliding to the side. Check they are not twisted.

Turn the lining right side out and place it inside the patterned bag lining up the side seams. Fold the ribbon in half and position it at the halfway point along one side of the mini bag, loop inwards between the layers.
Stitch all the way round the edge. To fit these little bags on your machine you’ll have to remove the cover to reveal the free arm so the bag can just slip on - it was a snug fit on my machine, I would struggle to make these bags any smaller!

Turn the bag out through the gap in the lining then stitch the gap closed.
Push the lining into the bag and press.
Add a button to finish.

This is a fun and practical way to use up little scraps of festive fabric. You can make a 6” square with patchwork like I have here, to use up even smaller scraps:
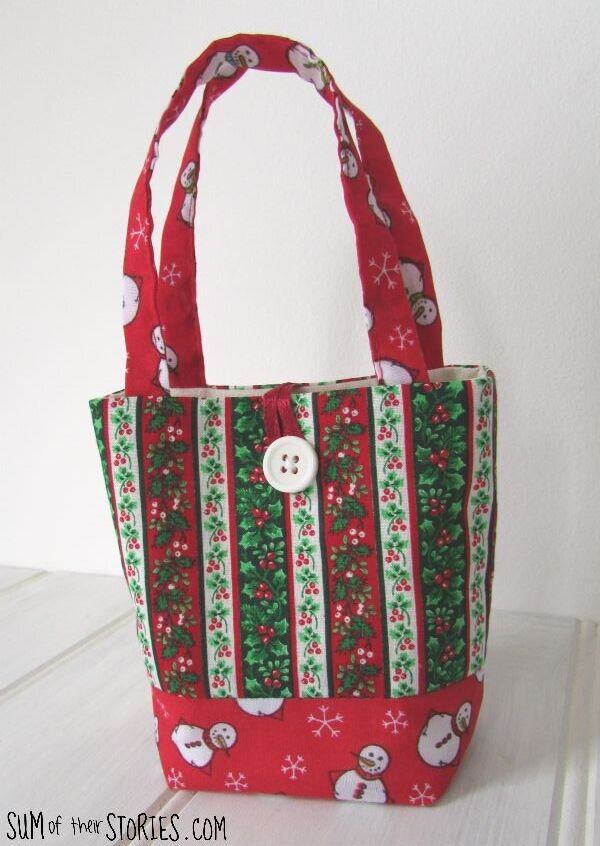

They are nice and neat inside, because the bags are lined. I do like a nice tidy inside!


Use them for small gifts, or add a few sweets and pop them on the tree. You could even make 24, add numbers and turn them into an advent calendar.

If you don’t want to make little bags like these yourself I do have some listed in my Etsy shop.
Julie
I’ll be sharing this project at these link ups


