How to make a quick Halloween Wreath
/

Make a quick and easy wreath for Halloween with fabric scraps and an old cardboard box.
We don’t do a whole lot of decorating around here in the UK for Halloween, but if you get sweets(candy) in for Trick or Treaters you do need to put something out otherwise no one will ring your doorbell! When the kids were younger it was easy, they would carve pumpkins so we had a ready made decoration to pop out by the front door. Once the kids were all grown up I needed to think of something else. For a couple of years I just used wipe clean marker pens to draw on the windows, just simple things like pumpkins and spider webs.
This year I’ve made a quick, easy and cheap wreath. I plan for this to go up on the front door on 31st October for quite a few years!
I originally came up with this wreath to give another use for the gift bag toppers that I made a few weeks ago.

Quick and Easy recycled Halloween Wreath
To make a quick Halloween wreath you will need:
An old cardboard box
Scraps of fabric in Halloweeny colours; eg black, orange, green, purple
A dinner plate and a bowl
A black marker pen
Plastic spiders, monsters etc - optional
Prepare the cardboard wreath base
Draw round the dinner plate and bowl on the cardboard and then cut them out to make a cardboard ring.

Wrap with fabric scraps
I had some scraps of black, orange and green lining fabric in my fabric stash, perfect for this quick wreath. You could use old t-shirts, bed linen, old shirts, old tea towels; any fabric that is past it’s best, ideally in dark or halloweeny colours.
Rip the fabric into strips, some 2 inch and some 1 inch.

Pick up one of the 2” strips and using the glue gun attach one end of the fabric to the cardboard ring. Wrap it round securing with a blob of glue every now and again. When you reach the end, grab another fabric strip and carry on.
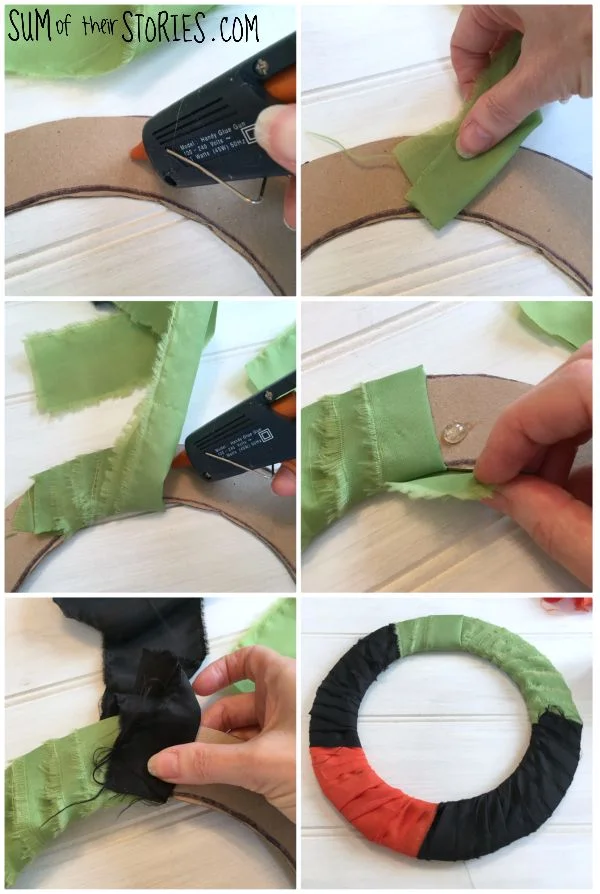
Next, using the 1” strips wrap a second round of fabric, over the top of the first round. Spread this wrapping out a bit, so the colours from underneath show.

You can add as many layers as you like, just keep going until you are happy or you’ve run out of fabric!
Decorating the wreath
Add a bow made from a 2” strip, secure it with a blob of hot glue. Then attach a way to hang it to your door.

I have a hook upside down on the inside so always use a long ribbon or strip of fabric to hang a wreath. If you have a door knocker or hook then you’ll need to do something different.
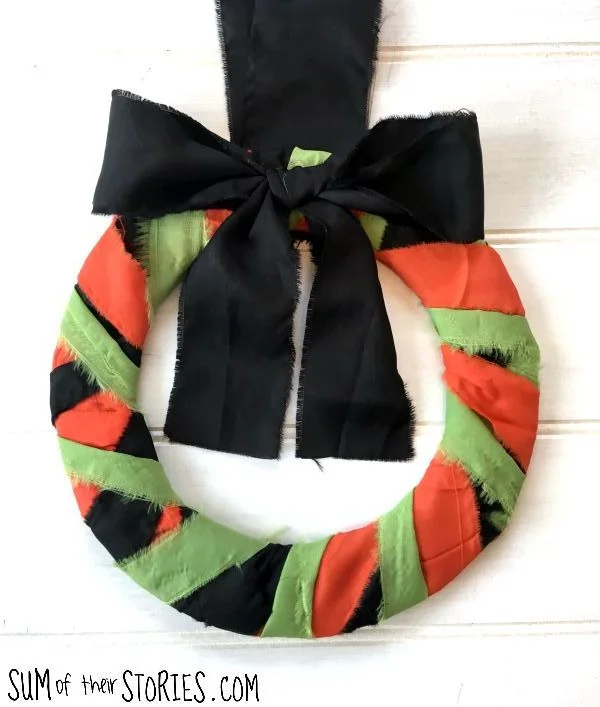
You could hang the wreath just like this but I think it needs a little something more.
Glue on a couple of toy plastic spiders, a ‘Happy Halloween’ motif or banner, some of that fake spider web stuff that people spread all over their hedges or any halloween decorations you have lying around.

Here I’ve attached a couple of glow in the dark spiders and some monster finger puppets that the kids got in party bags years ago. The idea is to use what you have knocking around if possible rather than buying lots of new stuff.
As an alternative idea I tried using some of the cute little Halloween treat bag toppers that I made a few weeks ago. The pegs just clip on to the strips of fabric so you can move them around, mix and match, pop them on and off.


I already had the lining fabric in suitable colours so this wreath cost me nothing; the best price for a decoration! If you don’t have a stash of fabric or anything suitable then crepe paper would make a good substitute.
This wreath is not suitable to be out in the rain for long obviously, as the core is just cardboard. We don’t have a porch so our front door gets all weathers directly on it. I put this wreath out for just a few hours on the 31st October each year, just for the trick or treaters to see, even if there is a little rain or drizzle and it’s been fine. I just make sure I dry it completely before it gets put away.

Julie
I’ll be sharing this project at these link ups