Men's shirt to fitted blouse refashion
/

How to turn an old men’s shirt into a fitted blouse.
I love a good clothing refashion, probably about 40% of my wardrobe is clothes that I’ve had for years and changed up after a while or garments I’ve bought in charity shops especially for their refashion possibilities.
Most of the refashions I do are more of a tweak than a complete refashion. Not today though! Today I’m going all out with a men’s shirt transformation and honestly, I couldn’t be happier with the results.
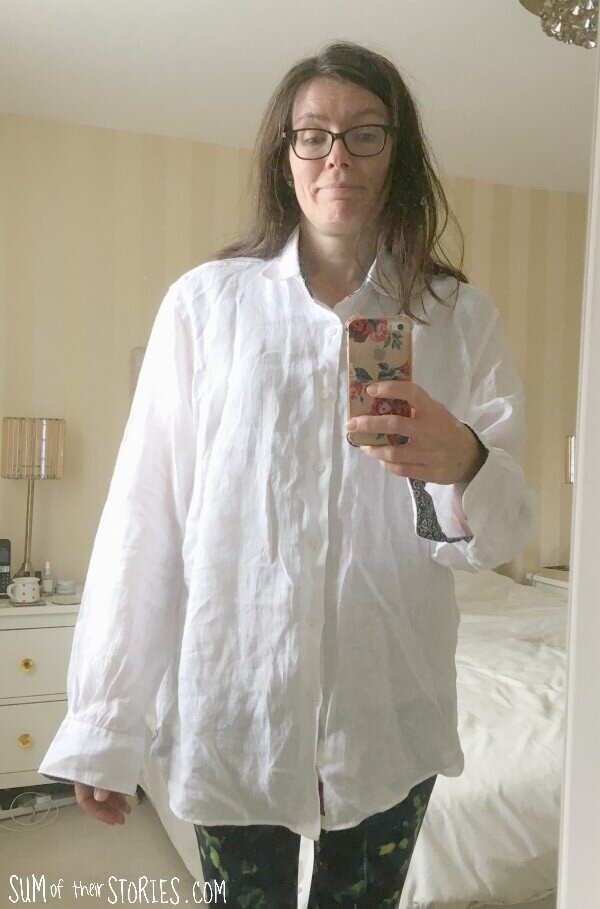
I should have taken more photos of the shirt before. I don’t know why I didn’t, too eager to get started I suppose. This is what I started with, a large white linen men’s shirt. What this photo doesn’t show off very well is that is has some lovely details in a patterned navy Liberty print; inside the collar, inside the cuffs and at the bottom hem on the seam. My husband bought it, wore it three times and decided it just wrinkled too much for his liking. I was very happy to take it off his hands!
What to do something similar with a men’s shirt? Let’s get started!
The first thing to do is to make a mark at your natural waist, do this while you are wearing it. I used an air soluble fabric pen but you could use a pencil or fabric chalk or even a safety pin.
Cut the shirt straight across about a cm below the mark. It doesn’t look like I cut very straight here but I really did - honest! The linen is thin and slid around a bit as I moved the ruler to take the photo!

Cut off the cuff part of the sleeves including the placket.

Mark a new side seam. How far in this comes depends on how baggy the shirt was for you originally. You don’t want it too tight, even after you’ve taken the side seam in, we are going to add some darts too. I’d recommend marking it with safety pins, trying it on and then adjusting it if necessary. You can see I took mine in just over an inch on each side and then tapered it off on the sleeves.

Because this linen shirt is thin I did my seams as French seams. This means that I stitched with WRONG sides together first and then turned the shirt inside out and stitched them again, so the raw edges are all enclosed.
If you are using a regular men’s shirt you probably won’t need to do French seams, ordinary seams with right sides together will be fine.
Whichever seam method you use, trim off any excess and tidy the fabric edge with a zig zag stitch or pinking scissors as necessary.
If you try your shirt on now you’ll probably find it’s ok but a bit baggy around the back and not much room for your bust. At least I did! The solution for this is darts.
With the shirt inside out, measure and then mark the back into thirds and then pin and stitch long narrow darts. Mine were 1cm x 20cm (just under 0.5” x 8”)

Next mark the centre of each shirt front and pin then sew shorter darts on the front in the same way.
My darts on the front were 1cm wide and 6cm long (just under 0.5” x 2.5”)

I’d recommend trying your shirt on at every stage and adjusting as necessary. You are aiming for a shirt that feels more fitted but not necessarily super tight (unless that is the look you are going for of course!)
Now we are going to make the gathered “peplum” type section.
Take the bottom part of the shirt that you removed at the beginning. Stitch 2 rows of stitching across the top edge using the longest stitch your machine does. These are gathering stitches.

Pull the top 2 threads gently to gather this section of the shirt to the same width as the new narrower top part. Take your time as you do this, gently ease the gathers along so they are even.
Once both sections are the same length and the gathers are even, attach the top to the bottom. Match up the ends as carefully as you can, you don’t want a step on that front edge. Match the side seams too. Ease the gathers as necessary and pin lots. When you are happy sew the pieces together. I like to have the ‘gathers’ side face up as I stitch so I can keep an eye on them, make sure they are not pushed to the side.

My shirt had a lovely bit of patterned detail on the inside of the collar stand, the collar was also a little bit stiff for the rest of the shirt so I decided to remove the collar. This is not complicated but it can be a bit fiddly.
To do this use a seam ripper to remove the top stitching at the top of the collar stand and then to remove the second row of stitches hidden underneath.

The collar should then just slide out. Remove any loose threads and then top stitch across the top of the collar stand.

To finish the edge of the sleeves I tried to use the last of the pretty Liberty fabric. I cut the cuff lining from each of the cuffs.

I was hoping to edge the bottom of the sleeve with the patterned fabric and make a casing for some elastic but there wasn’t quite enough. I added just a small amount of plain navy fabric from my stash to the print fabric to make 2 loops of fabric, 5cm (2”) wide and long enough to go all the way round the sleeve ends.
Slip a loop over the end of the sleeve, right sides together and pin then sew all the way round.

Press a narrow hem on the raw edge and the turn over and top stitch to form a channel. Leave a gap so you can thread a 26cm (10”) length of elastic through the channel sew it closed and then stitch the gap closed.


The last thing to sort out was the buttons. Men’s shirts generally have much bigger gaps between the buttons than women’s shirts and I had some gapping issues around the bust and the new waist seam.
I didn’t have enough of the same buttons to replace all the buttons and add new ones, I considered adding some contrast buttons but in the end I added a Kam snap between each existing button hole and button which worked really well.

That’s it, my men’s shirt refashion is complete.


And just because it always happens, here are a few out take photos from our photo shoot. My husband was the photographer this time and he always tells me to pose! This modelling thing is much more difficult than it looks!!!


I’ll be sharing this tutorial at these links ups