Fabric Stash Buster Playmat
/

Some friends of ours had a baby recently and I wanted to make something practical for her. When our kids were little one of the most useful things that I made was a play mat, We'd been given a shop bought one too but a second is SO useful. I was completely paranoid about our babies rolling off anywhere high when they were little so putting them on the floor always seemed like a good option. They spent a lot of time on a play mat, under the baby gym. And of course, babies throw up, dribble and leak in various ways so a play mat needs to be bunged in the wash often!
I wanted to use some of my fabric stash to, so the 'Fabric Stash Buster Playmat' was born!
To make one you will need:
Fabric - if you don't have a stash you can buy new fabric or pop in to a charity or thrift shop for mens shirts or larger ladies dresses and skirts
Wadding or batting. just something thick enough to make the mat comfy for baby to lie on
Thread, Scissors and a Sewing Machine
Bias Binding or a Bias Binding maker
Bits of Ribbon and a couple of inches of hook and loop fastening.

If you are using new fabric just wash everything first, you want the playmat to be machine washable, so pre wash everything just incase any colours run or the fabric shrinks a little.
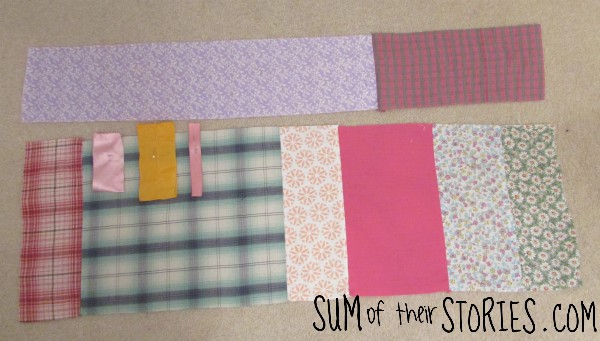
You are creating 2 pieces of patchwork approx 65cm (25") square. Exactly how you do this will depend on what fabric you have. I'll explain what I did and you can just adapt it to suit.
For the front of the mat:
Create strips of patchwork in any width you like, all 65cm (25") long. I made 5 in all of varying widths.
You'll join them to create a square, but before you join them you can add some fun elements in to make the mat more interesting.
Ribbon Loops and Tags:
Ribbon loops and tags are popular as babies like to fiddle with them, chew on them and rub them between their fingers like clothes tags. I read somewhere that if the loops are left open then babies can get their fingers caught so I took 2 16 cm (6.5") lengths of wide ribbon from my stash and sewed them up. One in the middle and one at the side. They can still be rubbed together but no caught fingers. For the last tag I cut an 8cm (3") length of thinner ribbon
Sandwich the ribbon tags between two of your patchwork strips as you join them.
Peek-a-bo flap:
The other fun element I created was a little peekaboo type flap. You'll need a square of some cute fabric to be the peek-a-boo, I used some fabric I had with little rabbits and owls. Some thing with a big bold face would be more suitable but at the time I didn't have anything like that. I still think it could be fun to look for the owls and rabbits!
Take 2 squares of fabric, mine were about 10cm (4") and stitch them together round 3 sides, trim the corners and then turn the square out. Top stitch round the three sides.
Lay the flap on top of a slightly larger square of your cute peek-a-bo fabric with the open side level with one edge. Lay another square of fabric on top and stitch the side with the open flap edge. Much easier to do than describe. The photos show it much better!

Add more fabric to this strip to make it 65cm (25") and join it to your previous strips.
A Toy Loop:
You can also create a hook and loop fastening so a toy can be attached.
Cut 2 strips of fabric about 8cm (3") x 16cm (6"). Press a little hem on all 4 sides and fold in half and stitch round.
Add a length of Hook and loop fastening to each end.

Join the two strips via the Hook and Loop fastening in one long line, then lay one end on one of your patchwork strips. Fold the toy loop back up and lay another strip of patchwork (show as a big ol' piece of purple in my photos) on top and stitch. The toy loop will now be caught between the patchwork fabric strips. Cut off any excess from the loop sticking out on the inside.
When you've joined all your patchwork pieces, adding whatever extra fun extras you want, you should end up with 2 squares, both 65cm (25") square. You can see that for the back I just joined larger pieces of fabric from my stash.

After the photo I trimmed my pieces just to square everything off a bit.
Now you are ready to layer the play mat up.
Place the playmat back wrong side up, cover with a piece of wadding (or batting) then add the top of the playmat right side up. Pin carefully all over to hold it all in place. top, then quilt however you like. I have a lovely new walking foot for my sewing machine now but I made the playmat a few weeks ago and was 'walking footless' at that time. I opted for a hand tied method instead. I basically did just a couple of stitches on top of each other at strategic points across the playmat and finished them super securely with no ends left dangling.

To bind the playmat I used my most favourite sewing gadget, my bias binding maker. I love this little doobry so much. Mine is from Clover but other brands are available and I assume they are all pretty much the same.


I had bought a bias cut rainbow shirt dress from the charity shop a while ago because the fabric was beautiful but it was just too gappy at the front and a little bit short. It hung around in my 'to do' pile for a while waiting to be transformed but it actually made perfect bias binding for the playmat so now it has fulfilled it's reusing destiny.
I bound the quilt using this method from Merriment Designs, there is even a video to watch to get your mitred corners looking pretty! The only thing I did differently was that I hand stitched the binding down on the wrong side, mainly because this was still in my 'walking foot free' days. I think another time I would do it all on the machine.

That's it, finished.


The most important thing to remember when making a babies play mat is safety.
All the fabrics I used were pre washed and fully machine washable
The ribbon loops were sewed up so no tiny fingers can get caught
I did think a fake fur fabric would be fun but then I imagined that getting in baby's mouth - best not!
No buttons or poppers that could come off and into baby's mouth
No zips or lumpy hard bits that baby could bump their face down on during tummy time
I also read up about how to add a crinkly plastic bit inside fabric to add a crinkly element but then I had concerns about how I'd know it was safe at washing machine temperature - again I decided best not as I wasn't sure
I'd say the best rule is: if you're not sure don't put it in, it's just not worth it.

I feel like this is prettier in real life than I've been able to capture in the photos here. I think the randomness of the patchwork is better close up than from a distance!! It's been given now and is on the other side of the world so I can't do a photo re shoot!
Your's will be different anyway because your fabric stash will have different fabrics in it. I'm just looking at these photos and wondering why I put 2 checks together and 2 florals instead of mixing it up a little better. Too late now :-)
Update: I was sent a photo of the playmat in use the other day - so lovely to see :-)


I'll be linking this project up at these link ups