Denim Jacket Makeover with Floral Brocade Fabric
/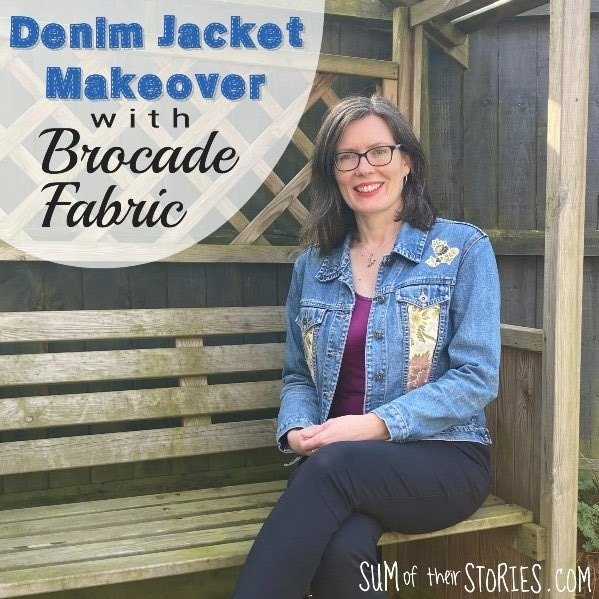

How to give an old denim jacket a whole new look with brocade upholstery fabric sample.

I’m joining the “Do It Over” Designers who bring a selection of creative ideas to upcycle, recycle and breathe new life into something old and tired. More details on that at the end of this tutorial.
Back in the summer last year I was giving my wardrobe a bit of a clear out and tidy up and discovered that I own 2 denim jackets. I had no idea! I remember buying one about 20, maybe even 25 years ago and I know I wore it a lot. The other one I don’t remember at all! Maybe someone gave it to me, or perhaps I picked it up in a charity shop and then forgot it?
Anyway. I was thinking of giving one of these denim jackets a bit of a makeover and I asked on Instagram which one people thought would be best to jazz up.
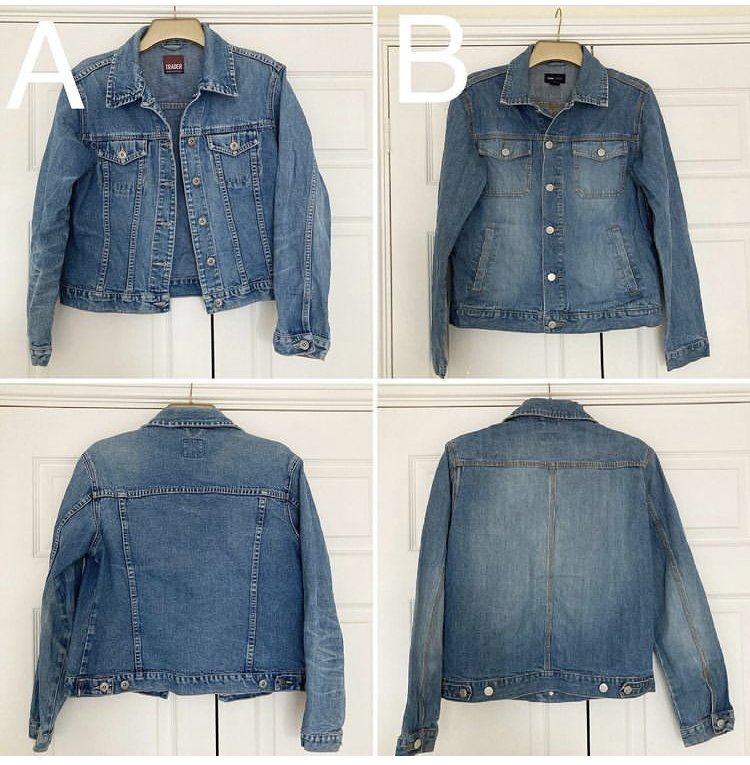
It got a mixed response. Lots of people commented that Jacket B has less going on already, it’s a bit plainer which will make it good for a upgrade. But Jacket A has that nice big panel in the back middle which is just crying out for something! I’ve actually decided to give both a makeover! Jacket A I’m sharing today, with some brocade upholstery fabric scraps and Jacket B is going to have something with fabric paint and embroidery but this is on my “to do” list. (update: it’s done now - fabric paint and embroidery denim jacket update)
I warn you now, this has not been a quick project. Not because it was especially difficult to do, but because I’ve been such a procrastinator with it. I’m still not completely sure that I’m finish with it, but I’ve worn it a few times now which is a good sign.
To make something similar you will need:
A denim jacket
A piece of brocade upholstery fabric
Fray Stop or something similar (Something like an ordinary PVA glue would be ok but maybe not ideal if you are going to be washing your jacket a lot. If your fabric doesn’t fray too much you’ll be ok not to seal the edges at all)
Sewing machine and thread
Scrap paper

I only had this small piece of this beautiful brocade fabric but I absolutely love it and think it’s perfect with the slightly faded denim. (Remember this jacket is older than one of my children so it is a bit worn now!)

First make a template for the panels on your jacket that you want to cover with fabric. I just taped some scrap paper together and lay it onto the jacket then traced it with pencil and cut it out. This way I could adjust it slightly, trimming a little more where necessary to get a good fit.

Then cut the shape from your fabric. If your fabric doesn’t fray very much you can move straight on to the sewing. My brocade was super fray-ey so I sealed the edges with Fray Stop and then left it to dry. You apply the fray stop to the back of the fabric, I found I needed to spread it to the edges with a small paintbrush.

I just had enough fabric to squeeze out the centre back panel and the 2 narrow front panels.

Once any fray stop is dry, pin the panels in place and then stitch all around the edges using a short wide zig zag stitch. I used my machines widest setting, 5 and a stitch length of about 1.5 or 2. I confess I started just stitching round with a straight stitch but wasn’t happy with the finish so I ended up going round each panel twice, once with the straight stitch and second time with the zig zag. You can see what I mean in the close up here.

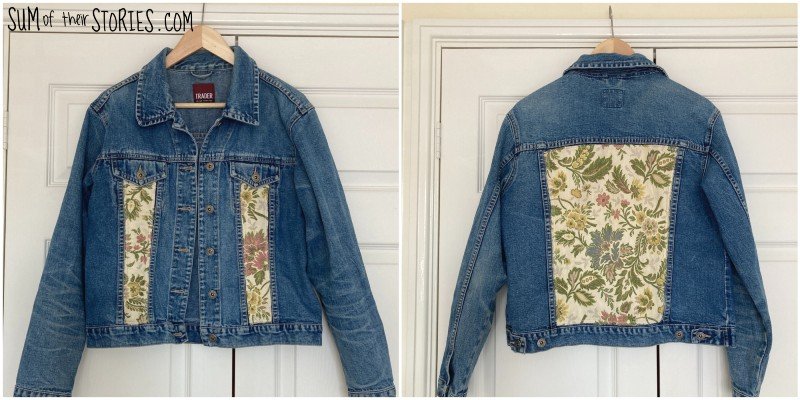
This is what my jacket looked like at this point. I liked it but I didn’t love it. I thought it needed more but I wasn’t sure what. I didn’t have any more of this particular fabric either so that limited my options.
This is where my project stalled. This was all back in July last year!! I left the jacket hanging up where I could see it so I could think about what to do next. I often do this with project that aren’t quite right. Let them marinate for a bit until inspiration strikes. Sometimes it’s only a matter of days, but sometimes it’s months!!

When I upcycled this plain black tote bag a few weeks ago with floral patches cut from upholstery fabric I made WAY too many patches and I finally had the answer for my denim jacket.


I started by pinning on ALL the floral patches that I had left over from my tote bag. Again I left it hanging up in sight so I could think about it. My husband gave his considered artistic opinion and said he thought it was all a bit much.

I settled on just adding a couple of my favourite floral patches. One on the front of the jacket and one on the back. I thought about adding one on the sleeve too but it was too difficult to get it under the sewing machine so I decided against that. I just stitched around them with a wide zig zag, I go into more detail about how to make and sew on the flowers in the Upcycled Bag Tutorial here.


This is what I’ve ended up with. As I said at the beginning, I have worn it a few times now but I’m not ruling out adding a little something more to it at some point in the future. That’s the nice thing about DIY though isn’t it? You can add more, take something away, change your mind etc whenever you like.


Update October 2023: I’ve added a bit more to my jacket! I kind of knew I would eventually, it just wasn’t as embellished as I wanted. I’ve just sewn on a few more of my floral cut out “patches” so this is what it looks like now. I can’t promise that it won’t get another update at some point in the future though, a bit of an ongoing project.
Sometimes when I’m wearing it I add an extra brooch as well.

At this point I also took a photo of the slight fraying at the edge of some of the stitched brocade so you can see how it’s holding up. Obviously I’ve been wearing and washing this denim jacket quite a bit since it’s original makeover and although the brocade fabric has frayed a little more it is still secure, no need for any further patching or repairs yet.
Now let’s check out what the other creative designers have “done over” for this month’s challenge.
Purple Hues & Me - Upcycled Coffee Can Wall Pocket
Birdz of a Feather - How to use Gemstone Mousse
Unique Creations by Anita - Leather Belt wall Hanging
Interior Frugalista - Easy Oak End Table Update
Sum of Their Stories - Denim Jacket Makeover (that’s this project!)
Exquisitely Unremarkable - Thrift Store Clip Frame Makeover
Little Vintage Cottage - Repurposed Wood Shim Carrots
Modern on Monticello - Remaking our Modern House Number Sign
Pandora’s Box - Egg Carton Herb Garden
Julie
I’ll be sharing this idea at some of these link ups