How to make a top from fabric scraps
/

Today I’m joining the Craft Room De-stash Challenge with this top made from scraps from my rather large fabric stash which is threatening to take over my craft space.

This top has been on my to do list ever since I saw this beautiful top by my super talented sewing friend Vicky from Vicky Myers Creations.

I’ve known ever since I saw it a couple of years ago that I NEEDED to make one for myself, it’s just been in the back of my mind as a “when I get round to it” project. The craft room destash challenge made me finally get my act together and get it done. Whoop whoop!
Vicky made her top from a pattern from a sewing magazine, I mixed it up a little and did what I would love to call self drafting but that sounds WAY to grand for what I actually did. I simply drew round one of my favourite existing tops to make a new one. As long as the style is loose and baggy, a similar fabric to what you intend to use for the new top and it’s a simple shape you can’t really go wrong.
I had a piece of navy fabric 77cm x 122cm (30” x 48”) that was part of an old bed sheet, and scraps of bright fabric. You really just need to be sure your fabrics are all of similar weight, and that they can all be washed in the same way.
If you don’t have fabric as large as my navy piece you can join several pieces of different fabrics to make a larger piece in any layout you like.
First I’m going to have to apologise for the colour balance in these “step by step’ photos, the weather was terrible, it gets dark at 4pm in the winter here and I didn’t have access to my daylight lamp! I’ve done what I can with them, but it’s not great :-(

Using an old top to make a pattern for a new top
I turned my existing top inside out and folded it in half.
I cut the navy blue sheeting in half, so I had 2 pieces 77cm x 61cm (30” x 24”).
I lay the 2 pieces on top of each other to double them up then folded it in half.
I laid it out flat and the laid my peach coloured top on top. I lined up the fold of the fabric with the fold of the top carefully. Then I cut around the top shape.

Remove one layer of fabric, that’s the back all ready. Refold the other piece carefully.
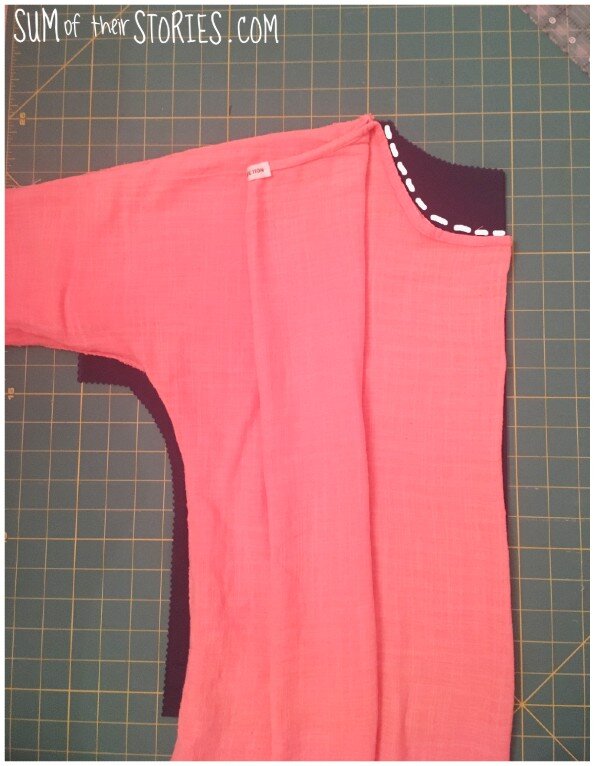
Fold the existing top so that it’s folded along the centre front and smooth the rest of the top as carefully as possible. You are trying to get to see the front neckline. Lay it on top of the folded fabric again, lining up the folded edges carefully. Fold the back neck away so it’s not in your way. This is not very easy to describe, use the photo to guide you. Then just cut away the extra fabric to create a lower front neckline.
Creating a patchwork border
Now to add the fun pretty extra bits.
I trimmed my pretty scrap pieces so they were all 13cm (5”) tall. They can be any width, a bit random is nice. Then just start joining them in pairs. Next you just join the pairs to form longer strips.

Attach the patchwork strips to the bottom and sleeves of the top front and the back. Press all the seams and then trim off any excess.

Assembling the top
Place the front and back pieces right sides together and sew the shoulder and side seams. I apparently forgot to take a photo of this so I’ve drawn you a little picture. (Blimey, it’s been a while since I did this, back in my early blogging days I was forever having to draw little pictures to make up for forgotten photos!)

Hem the sleeves and the bottom hem. I did this just by turning a narrow double hem.

Nearly there! Just the neck edge to tidy up. For her top it looks like Vicky had a facing from the navy fabric. I didn’t have enough for that, even from the off cuts so I made a length of bias binding from more fabric scraps.
I have a great little bias binding making gadget which I love, such a useful little thing! You can make your own bias binding without a gadget like this but this makes it SO much easier.
You can see my recovered mini ironing board here in this photo too!

I attached the bias binding using what I believe is called the traditional method but I hand stitched the binding on the inside.


I’ve gone for the “gazing wistfully into the distance” look in this photo! I also seemed to have bumped my hip to the side which is making the hemline look asymmetric. It’s not, it’s just the weird way I’m standing. But of course, if you wanted an asymmetric hemline you could totally do that.

See how nicely this top goes with my denim tassel earrings.


I do still have a rather substantial fabric stash but I have made a teeny tiny dent in it plus I have a lovely new top too. Win win!
Julie
Update: This top has had a do-over because I’m a mucky pup (!) and managed to get a grease stain on the front. Read all about how I fixed it and saved my lovely scrap fabric top here: How to save a stained top with patchwork.
I’ll be sharing this tutorial at these link ups
Now let’s look at how the other creative bloggers have got on de-stashing their craft spaces:

Stone Cottage Adventures - Decoupage Eggs
Purple Hues and Me - Faux Leather Heart
Sew Crafty Crochet - Frankinyarn Blanket
Coastal Bohemian - Mixed Media Heart Wreath
Domestic Deadlines - Photo Grid Wall
Slices of Life - Scrap Book Pages
Sum of their Stories - Top made from Fabric Scraps (that’s this tutorial!)
Cookies, Coffee and Crafts - Scrap Book Pages
You might also like to check out some of my other sewing projects: