How to make Embroidered Hanging Bird Decorations
/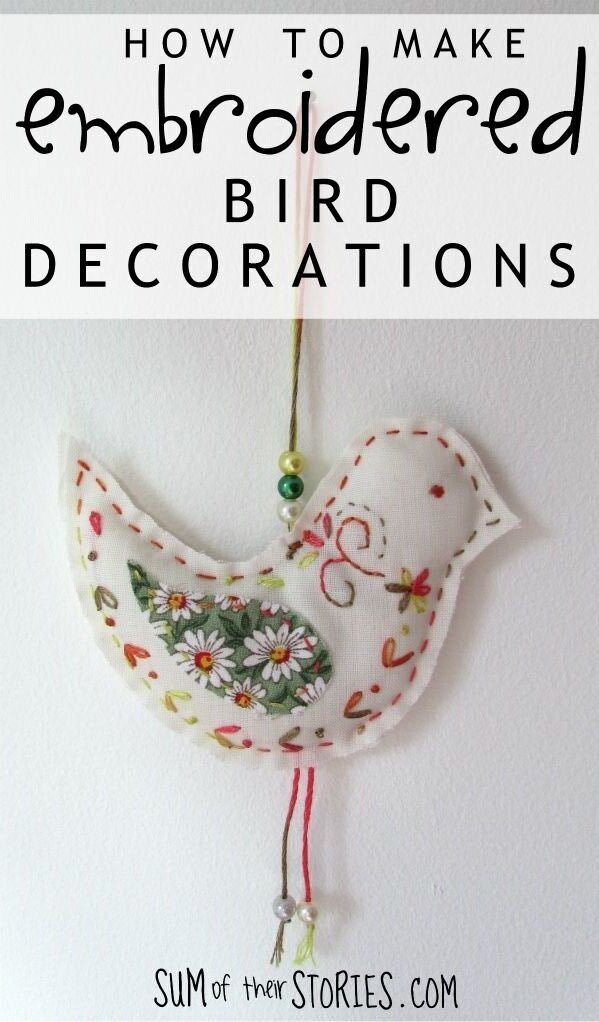

These pretty little hanging decorations are easy to make, either from pretty fabric or with some simple embroidery stitches. They can be filled with lavender or potpourri to make scented sachets to hang in your wardrobe or just with a little fiberfill to hang around the house as pretty spring decorations.
I tried a few slightly different versions, with embroidery and scraps of pretty fabric.
To make little hanging bird decorations you will need:
scraps of fabric
embroidery thread
a sharp needle
fibre fill
ribbon or twine (optional as you can use embroidery thread)
beads

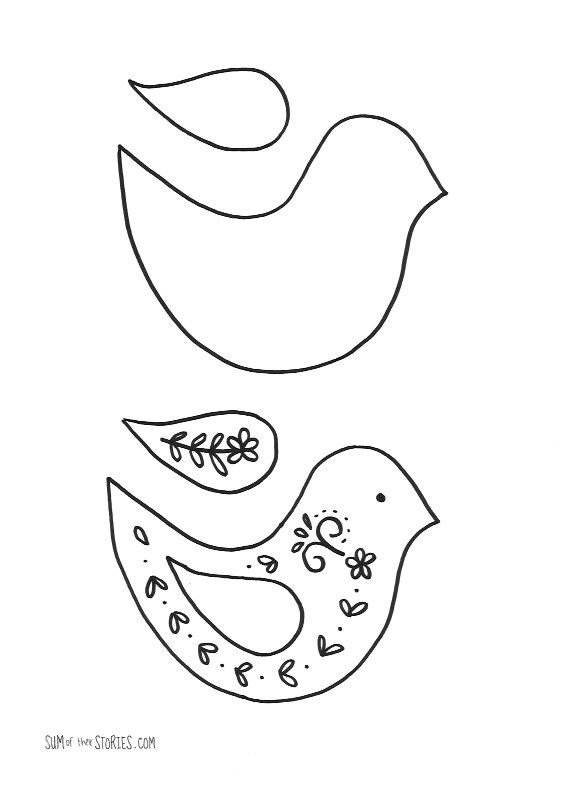
Print the pattern (you can either download it from the link above or right click on the photo and save. Then paste it into a word document and resize as you wish)
First you need to transfer to design to the fabric. The easiest method is to tape it to a window, you can find more details on how here - How to transfer an embroidery design onto fabric - tracing the design with your erasable pen.
UPDATE: I used a prym erasable pen for these tutorial photos but more recently I’ve started using one from Leonis which I prefer. The lines are finer and the nib seems more durable. You could also consider a Frixion pen for marking fabric. The line is very fine which makes it easier to stitch more neatly and to remove it you use heat, so you iron your fabric and it’s gone. The main drawback with the frixion pens is that they are not suitable is if you put your embroidery somewhere where the temperature gets really cold as that can make the lines reappear!

Pop the fabric into an embroidery hoop. I love my spring tension hoop for something quick like this. They don’t hold the fabric quite as taut as a traditional hoop but they are ideal for small projects as it is so quick to move the hoop around.

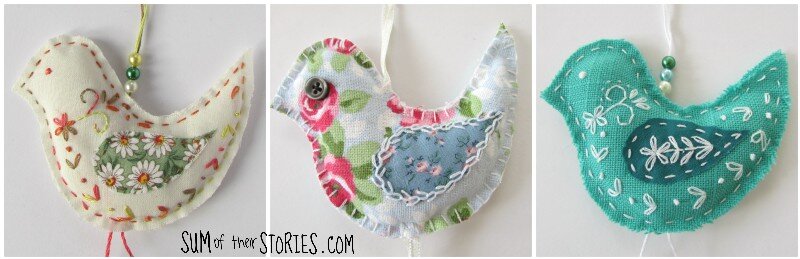
I’ve got a guide to some basic embroidery stitches which you might find helpful if you’ve not embroidered much before. Use lazy daisy stitch for the loops and flower, french knots for the dots and back stitch for the swirls. I chose a variegated embroidery thread from my stash (DMC Coloris 4510) and used 2 of the 6 strands. I like variegated embroidery threads so the colours change but you don’t have to worry about stopping and starting, very lazy!
Cut 2 of the wing shapes from patterned fabric and then secure them in position using a running stitch. Once the embellishment is complete you can cut out the bird shape.
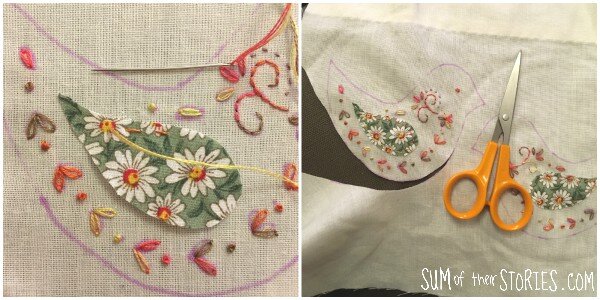
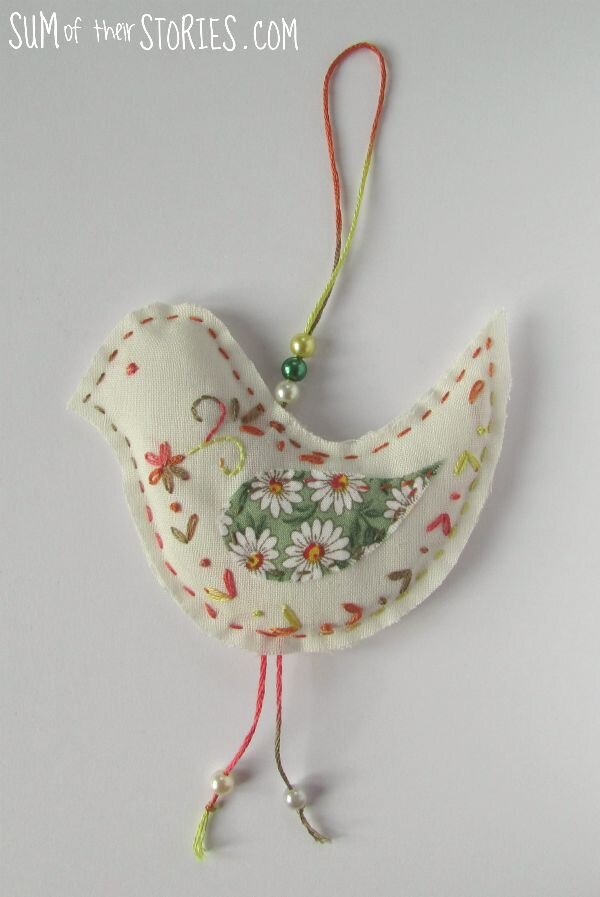
Take a length of embroidery thread and fold it in half. Tie a knot about 1/2 way along and then sandwich it between the bird pieces. Note the positioning of the hanging loop, it’s over toward the birds neck, NOT centrally on the back. This makes the bird hang properly. If you have the thread coming from the middle of the back the bird will lean forwards when you hang it! (just scroll down for photos to show what I mean) Secure the hanging thread, just above the knot with a few stitches and then continue around with a running stitch to join the pieces together.

When you get to the underneath, just check that you are securing the birds legs (the other end of the hanging loop) in a sensible position as you stitch around. Stop just before the end and stuff a little fibre fill into the gap, then finish stitching around the bird.

To finish, thread a few beads onto the hanging loop and onto the legs. Knot the legs a few times to stop the beads falling off.
To make the patterned fabric bird just cut out the shapes from your patterned fabric. Sew the wings to the body, I used an embroidery stitch called feather stitch for this and 2 strands of embroidery thread.
You could use a running stitch, backstitch, blanket stitch, herringbone stitch or even chain stitch. Whatever takes your fancy.

Now join the 2 body pieces. I used a blanket stitch, just to mix things up and make a change. A running stitch as before would work too.
For this bird I used a length of ribbon to form the hanging loop. On reflection I’d probably make it just a little longer another time. Again, note the fact that the hanging loop is off centre, you really do need to do this if you want the bird to hang straight. I did it wrong to start with (so you don’t have to!) see what I mean?
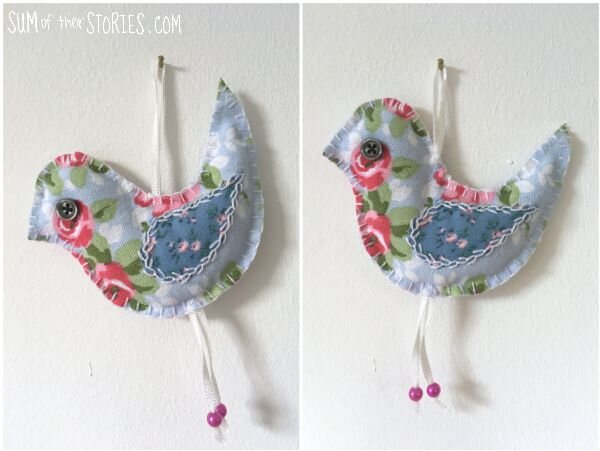

I sewed small buttons on for eyes for this one, just to make them stand out on the floral fabric.

I made this turquoise bird with a linen type fabric, it frays a little more but still worked just fine. If you look carefully you can see I did the embroidery slightly differently too, the lazy daisy stitches on the back are up close to the tail instead of the neck. I sewed the wings on first with this one and that was just where the space ended up. The wings have some embroidery on them too.

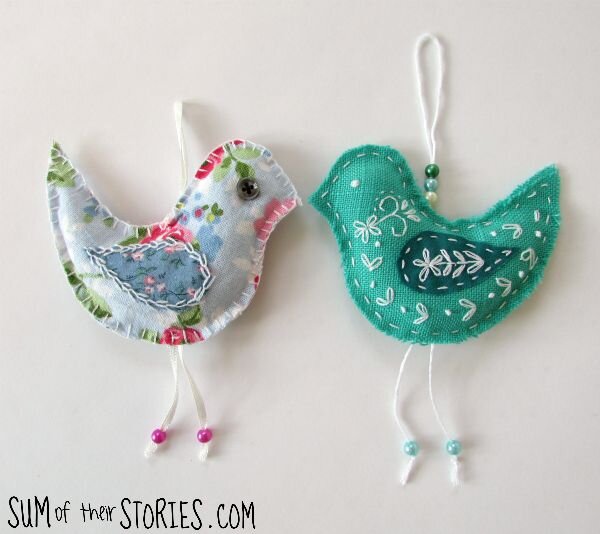
These little hanging birds are loads of fun to make and are great to use up small scraps of fabric. I think the turquoise one is my favourite, what about you?

They’d be ideal to decorate an Easter tree, I know quite a few people do these nowadays with a vase filled with long twigs and various things hanging from the branches like eggs, birds, little rabbits etc.
If they are scented they could hang in a wardrobe or beside the bed. Why not make one to send to a special friend to let them know you are thinking about them?
Julie
I’ll be sharing this project at these link ups
You might also be interested in: