Make Quilt Block Coasters with Pyrography
/

On a trip to Ikea a while ago one of the things from the marketplace that just happened to ‘fall’ into my yellow bag was an inexpensive set of 4 square wooden coasters.
I knew they would be a fun blank to try out some more pyrography or wood burning.
I’ve had my wood burning tool for a little over a year now and I’ve tried a few projects with it. Pyrography is definitely one of those ‘a minute to learn a lifetime to master’ type crafts! For me the key is to enjoy creating and not to worry if the results are not perfect. Handmade is best made!


Quilt Block Design Wooden Coasters
To make Quilt Block Wooden Coasters you will need:
Wooden Coasters - mine came from IKEA but I found some similar ones on Amazon here
A ruler and pencil
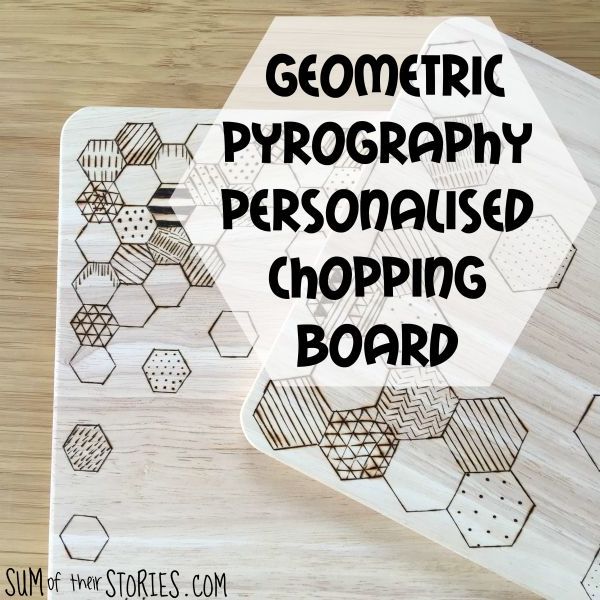
For these wooden coasters I decided on a quilt block design. Similar to the chopping board I’d done before I thought maybe I could burn different patterns into the wooden coaster that could look like different fabric prints.
I went for quilt block designs that were based on 16 squares rather than 9 squares. This was because my coaster are 4 inch square. The measuring was just much much easier.
Design on your quilt design
This is so simple. First draw the designs onto the wooden coasters in pencil.

Transfer the design to the coasters
Transfer the design to your coaster with pencil and a ruler.


Go over the pencil lines with your wood burning pyrography tool.

I used a chisel tip on the pyrography tool as that’s the easiest for straight lines. If you do all the lines in one direction and then turn the coaster so you are always working away from you it’s much easier. I’ve popped a video on my Instagram stories to show what I mean.
Once the quilt design outlines are done you can fill the shapes in with patterns to give the impression of fabric patterns. A mix of dots, lines, zig zags, whatever takes your fancy is just fine.


You can leave it at that and your coasters are done.


Adding colour to your wooden coasters
I thought a bit of colour might be nice so I tried colouring my wooden coasters in.
I’m in two minds about the results. I don’t love them as much as I thought I would! I took plenty of photos before I coloured them and nearly didn’t share the colourful version but then I thought you might like to see both so you can make up your own mind.
To colour my coasters I used Promarker pens and then a clear spray sealant. The Promarkers say they are suitable for a variety of surfaces including wood and I didn’t want to use a thick paint that would cover the pyrography.
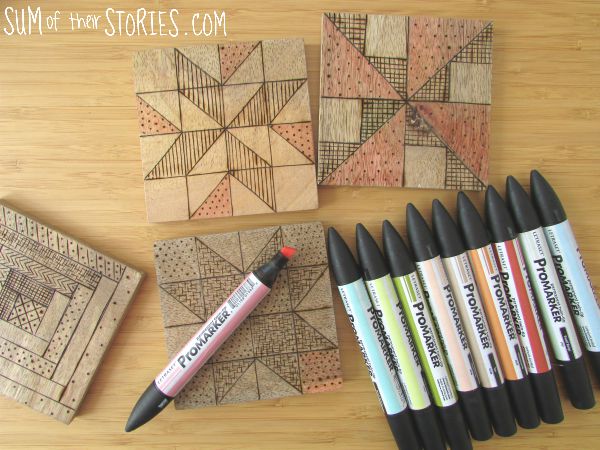
The colours of the pens came out quite differently on the wood than they do on paper so it was a bit hit and miss. I don’t mind a bit of hit and miss generally, sometimes it can end in nice surprise.

Once they were coloured I gave them a coat of clear spray sealant just to make sure the colours don’t come off on the bottom of a mug!
I like the effect on the log cabin one, but I’m not convinced by the star one, top right.
The blue shades really didn’t show very well but the pinks and oranges worked much better.


What do you think? Better in colour or just the wood burning? The coasters were only £3.50 so I could always get another set for some more experimenting. I think they’d make a great gift for a friend who sews or quilts.
Julie