Book Page and Paper Napkin Clock Makeover
/

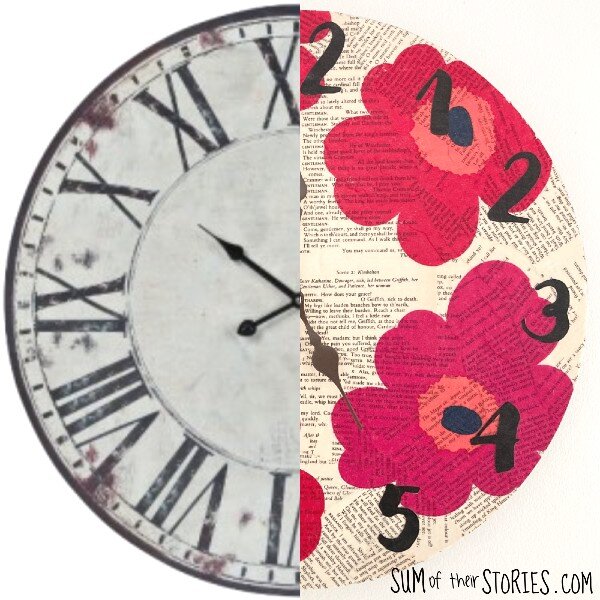
I am SO SO excited to share this clock makeover with you today. To say I love how this turned out would be a massive understatement!
I had a damaged clock hanging about waiting for its makeover for several years, I just wasn’t quite sure what I wanted to do with it. The clock had been drawn on with a permanent marker by an elderly person who was having problems reading the time on it correctly. We replaced it with a digital display clock, one of those super clear ones that says the day, the date and if it’s morning, afternoon, evening or night time as well as the time in nice bold type. This clock wasn’t very old when it was drawn on so still in great working order and perfect for a makeover.
Emboldened and inspired by the success I had with updating this old clock I decided the time was right for this other clock to get it’s upgrade too.

To make a similar updated clock you will need:
A clock in need of a makeover
A few pages from an old book
A Paper Napkin, mine was one of these from Marimekko
Number stickers OR paper and a printer
The paper napkin I used is from Marimekko, you can of course use any napkin you like. I am just very much in love with the big bold Marimekko poppies, you should use whatever suits your decor.
I’m kicking myself because I don’t have any photos of the clock before I started. I’ve no idea why! In fact I was sure I had taken quite a few “before” pictures but right now as I’m writing this tutorial I discover no “before” photos at all. Sorry about that. It looked quite a bit like this one except with some damage to it with some numbers written on it with a permanent marker pen.

Prepping a clock for a decoupage makeover
Start by removing the clock mechanism and storing all the pieces in a zip lock bag. Depending on your clock there might be a lot of little bits and you are going to need ALL the bits to put it back together again!
Next give the clock face a couple of coats of spray undercoat just to give it a nice plain base to work on. On reflection the painting step might not have been completely necessary for me as my book pages were pretty thick but it doesn’t hurt to err on the safe side sometimes.

Decoupage with old book pages
You can see from the photo here the clock is not completely covered in paint but enough that nothing is going to show through the book pages. Take your old book pages and tear them into pieces. Working in sections on the clock face, apply a layer of Mod Podge with a brush, lay a piece of book page on top and the apply another layer of the Mod Podge over the paper. Continue all the way over the clock face until it’s all covered.
Leave this to dry completely.

Once the book pages are completely dry use a craft knife or scissors to trim the excess off.

Paper napkin decoupage technique
Take your paper napkin and seperate the layers so you just have the thin top printed layer. Double check you have just that top layer and not two layers together, it should be super see through. Cut out the design you want to use.

Apply the cut out tissue paper shapes to the clock face. The tissue single layer is very delicate so you do need to be a little careful as you glue it down. Brush on a layer of Mod Podge as before and then carefully lay the tissue shape on top. Very gently smooth with the plastic bag under your fingers. Go gently, the tissue can rip or bunch up easily, but having the smooth plastic between your hands and the paper really does seem to help.

Apply as many flowers (or whatever motif you are using) as you like and leave it to dry again. Trim any overhang after it’s completely dry as before.
Now and only now you can apply another coat of Mod Podge to seal it all in. Whatever you do NOT try to paint Mod Podge on top of the tissue layer whilst it is still wet. I speak from experience! Trust me!
Applying new numbers to a clock upcycle
Now you need to prepare and apply your numbers. I printed mine on a regular home Ink Jet printer. I thought the ink might run when I glued it and so I tested it first but it was fine. If you have a cutting machine you could cut numbers from vinyl or you could use stickers.

The size you want will depend on the size of your clock. I printed my numbers using Word and a font on my computer called Modern Love, size 120. I had to use the narrow margins option to get all the number on one page. Remember you need 1 2 3 4 5 6 7 8 9 10 11 and 12 so five 1s, two 2s and one each of everything else.
I printed my number and then cut them out with a craft knife.
Glue them to the clock face in exactly the same way as all the other layers. Mod Podge underneath and then on top. Position the 12, 3, 6 and 9 first and then the other numbers evenly in between.
Once everything is completely dry reattach the clock mechanism and your made over clock is finished.


Next time you come across an old clock that is in good working order but has some damage or is just not to your taste or home decor look, don’t forget you can always give it an easy and inexpensive makeover with book pages and paper napkins.
Of course you might just like the book page look, or just the paper napkins, you can easily do an either/or clock makeover. I love the way the book print shows through the colour of the paper napkin.

Julie
I’ll be sharing this idea at these link ups
If you like craft projects with old books you might also like to see these ideas: