How to Make an Upcycled Scarflette
/
This time of the year, those of us in the northern hemisphere start thinking of autumn, misty mornings, a chill in the air etc and so it’s a great time to make something cosy.
I’m going to show you how easy it is to make a cosy, snuggly scarflette from an old wool jumper.
I have a bit of a history of inadvertently shrinking and felting wool garments. Honesty, if I ever buy a wool jumper in a charity shop especially to felt you can be sure it barely moves on a boil wash. A nice jumper, one of my husbands favourites though will behave in quite the opposite way! This grey jumper was one of the latter; one of my husbands favourites. 100% wool but the label said machine washable at 30 degrees c. I swear I washed it as directed but it bloomin’ well shrank up to half its previous size. I brought him a replacement and stuffed this sad little shrunken thing into a bag along with my previous laundry mishaps.
But now, like a caterpillar to a beautiful butterfly, it has been transformed!
This is a quick and simple make, it took me about 40 minutes from start to finish. The only slightly tricky bit is the giant “buttonhole” but if you don’t fancy tackling that there are other options!
How to make a scarflette from an old sweater
To make an upcycled scarflette like this one you will need:
A felted jumper / sweater - it needs to have been an adult size originally so the pieces are big enough post shrinking!
Coordinating fabric, I used cotton but a flannel would be lovely and cosy too
Sewing machine and matching thread

Prepare the felted wool pieces
Lay your felted jumper out flat and cut off the sleeves
Cut the seams off the sleeves so they can open out flat.
Trim one sleeve centrally so it’s an 8” wide strip, then taper off the cuff ends slightly. Use the photo to guide you.

When you are happy with the shape, lay this piece over the other sleeve and cut it to the same size.
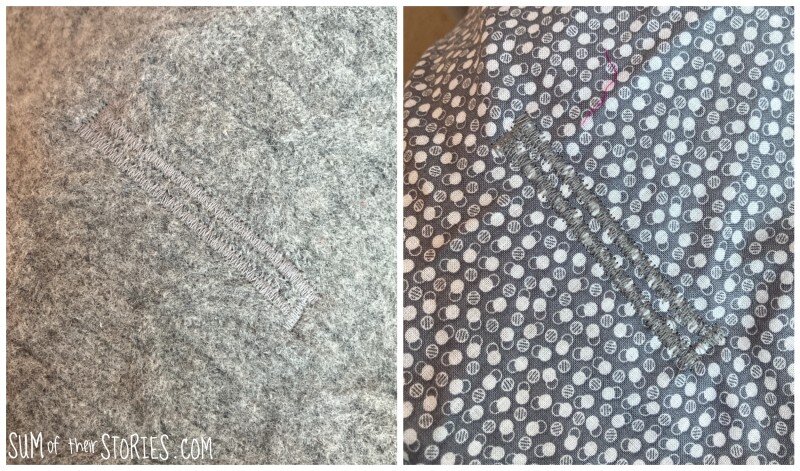
Lay the 2 pieces so the straight ends overlap by about 1cm (just under 1/2“) and pin well. Use plenty of pins as 2 thick layers like this can slip around a bit.

Stitch over this layer with a wide zig zag stitch. I used the stepped zig zag stitch on my machine. I set the width to 5, as wide as it will go and the stitch length to 2. If you are not sure it’s a good idea to practice this on some of your off cuts, play with different stitch lengths etc until you get one you are happy with.

I ended up zig zagging over my join twice, which made it lie nice and flat. You can see from the photos that the inside is not perfect, but the right side laid nice and flat.
Lay out your lining fabric right side up and place the scarf, right side down on top. Pin all around and then cut the lining to the same shape.

Stitch the lining to the scarf
Stitch all around the outside leaving a gap of about 10cm / 4”.

Turn right sides out through the gap and press lightly. Top stitch all around the edge, this will make it lie nice and flat and close the gap at the same time. If you prefer you can just hand stitch the gap closed, but I like the top stitched look.

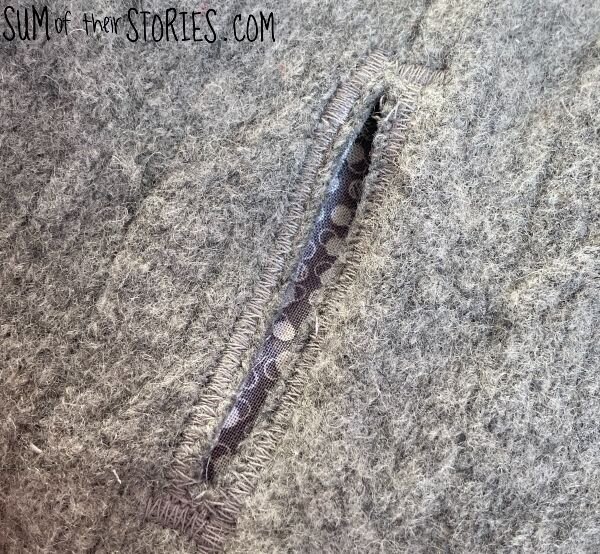
Mark a 7 cm line, 14 cm up from one end. That’s a 2.5” line, 5.5” up from the end if inches are your thing. You are going to stitch all around it, like a giant buttonhole. Obviously your normal button hole stitch and gadget on your sewing machine will not work for this! Set your machine to a wide and very close zig zag stitch. Width 5 and length .25. Start at one end of the line, stitch a close, wide zig zag stitch along the line, just to the right side.
At the end, leaving the needle in the fabric, lift the foot and turn the scarf 90 degrees. Zig Zag across the bottom of the line. Turn again and zig zag back up the line, this time to the left side. You want a gap of about 1/2 cm between your 2 lines of zig zag.
When you get back to the top, zig zag across the top of the line and voila! You’ve made a giant button hole.
Using some really sharp pointy scissors cut along the line, being as careful as you can not to catch the stitches. You might find it easier to use a seam ripper to get it started.
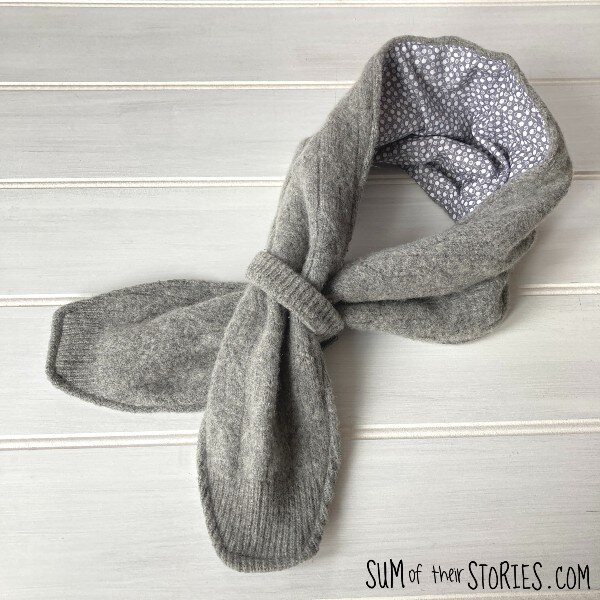
That’s it! Your scarflette is finished. You just tuck one end through the giant button hole to secure it round your neck.
Is it even a button hole if you don’t use it for a button? I’ve no idea! I’ve no better word to describe it.

If you don’t want to do the giant button hole idea you could fasten your scarflette using a fabulous scarf pin or you can make a soft scarf ring like this one. To make this, just cut the neck ribbing from the jumper and stitch it into a ring. You can then just slide this over the ends of your scarflette to secure it.

An easy scarflette made from a laundry disaster. And I still have the rest of the shrunken jumper to make something else with another day - bonus!
A little scarflette like this is ideal to keep the chill away on autumn and milder winter days, when you don’t need a great big super warm scarf yet.
Do you have any shrunken woolens that you could convert into a mini scarf like this one?
More ideas to use old felted sweaters


Julie
I’ll be sharing this idea at these link ups
You might like to check out these garment refashioning and upcycling ideas too: