Quilted Ruffle Bag Tutorial
/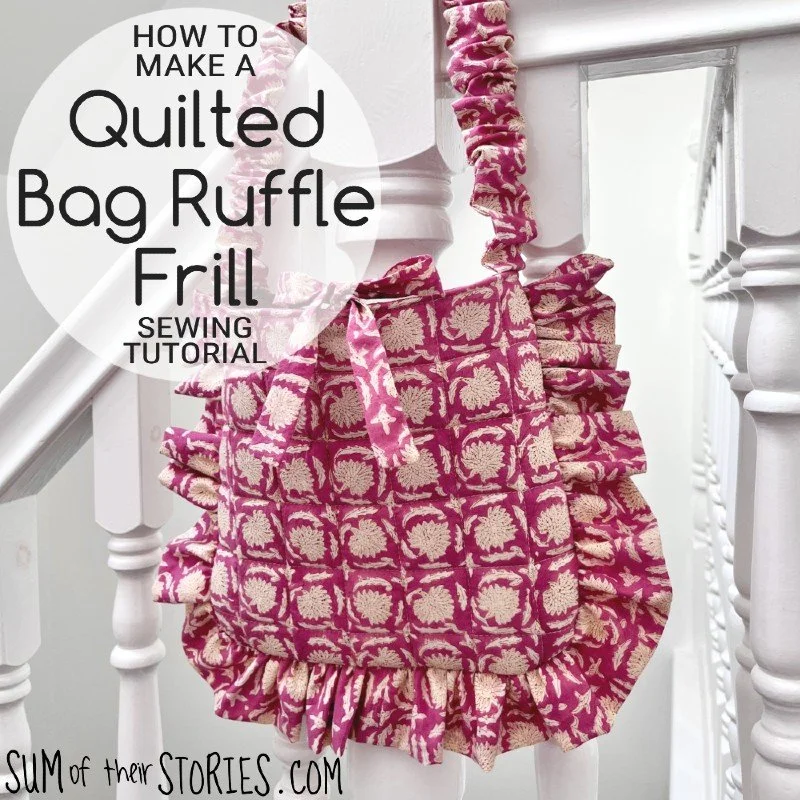
Ruffles and frills are definitely having a bit of a fashion moment just now so let me show you how to make a pretty quilted bag with gorgeous ruffle and gathered handle.
If you follow me over on Instagram you will know that in February I participated in a sewing upcycling challenge called #ReFebruary. Throughout February participants take an old garment and then make something new, sharing the process a little each week with a reveal at the end of the month.

This year I turned a tunic top that I’d bought in a charity shop into a cute frilled bag. I picked up the top because it was a lovely block print and it seemed roughly my size. Sadly when I got it home I found that although I could get it on I couldn’t lift my arms while wearing it. I don’t know about you but I do find being able to lift my arms pretty handy so I set about a refashion and my quilted ruffle bag was born.
How to make a quilted ruffle bag
Brace yourself for quite a long tutorial. Sorry about that, but all these cute elements take time and lots of explaining!
I’ve included as many photos as I can so you’ll be able to understand each step. I’ll also try to explain why we are doing what we are doing which I think will help too.
Fabric choice
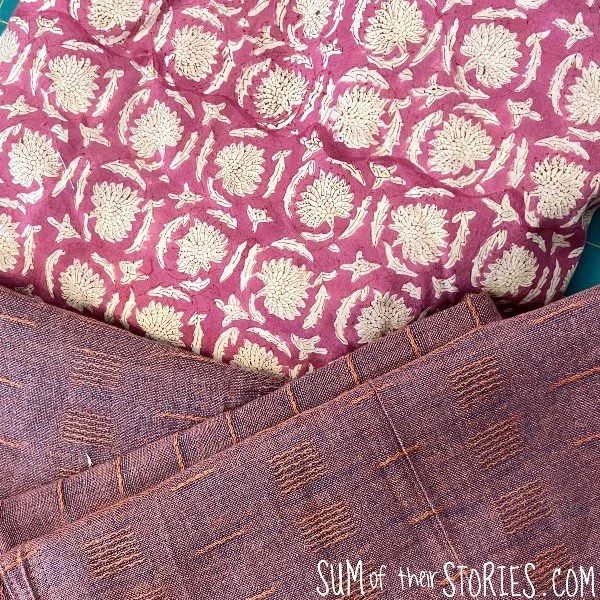
My bag was made from a tunic top made in a thin printed cotton. You could use an old garment like I did or cute duvet cover maybe. It would work in anything from a fine cotton or lawn right up to a quilting cotton weight too I think.
I wouldn’t recommend this design for something heavy weight though; a denim or upholstery fabric would be difficult to form a nice frill with. Likewise it wouldn’t really work in a very soft draping fabric like a viscose challis or floaty polyester.
It’s hard to be specific re. how much fabric you need for a bag like this. My tunic is roughly a UK size 10 and has sleeves. This gave me enough fabric to make my frilled bag. I cut the front and back pieces from the front and back of the tunic and used the sleeves plus left overs from the front and back for the frill and handle, plus the inside pocket and ties. I used pretty much every scrap of the tunic, there really wasn’t much left over.
I also used a contrast fabric for the lining, this was from another garment I’d had in my “do something with it” pile for years.
You will also need some quilting backing fabric. I used some of the edge of an old bed sheet. This fabric won’t be visible so can be anything really, a good chance to use up scraps of anything as long as it’s not too thick.
If you were using something like pillowcase to make your bag then you would need 2 for sure, maybe even a 3rd for the lining.
If you are upcycling garments to make your bag then be prepared to join pieces of fabric together to create the sizes you need. You’ll either need to:
use a print that doesn’t show joins (like I did)
accept that there will be seams in your fabric
use lots of different fabrics for a crazy patchwork effect (wouldn’t that be fab?)
I’ve written this tutorial mostly using inches. I know for european readers that seems a little old fashioned and you might need to convert it all to cm. My cutting mat and quilting ruler are all in inches so it just makes cutting out rectangles of fabric easier use inches. I’m sure my USA friends will be very happy!
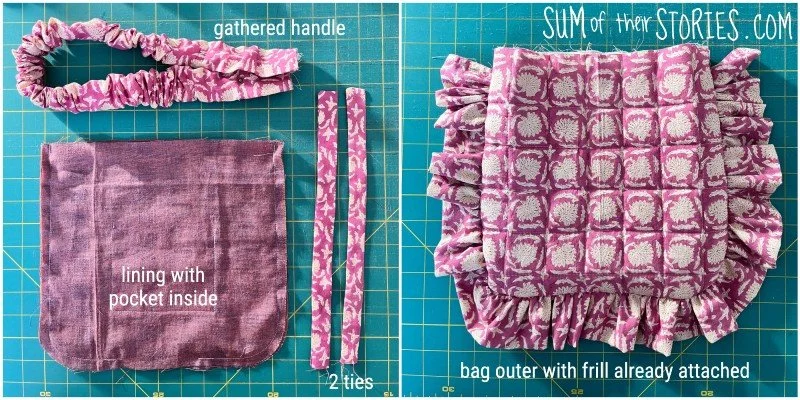
What you need to make a quilted ruffle bag
fabric - see above for details of fabric types and below for sizes of pieces to cut
a piece of wadding or batting 12” x 22” (31cm x 56cm)
25” (63cm) length of sturdy woven tape or ribbon
scrap paper to make your pattern
sewing machine and thread
scissors, pencil, sellotape/scotch tape, tape measure or ruler
small cereal bowl
safety pin
Make your pattern piece
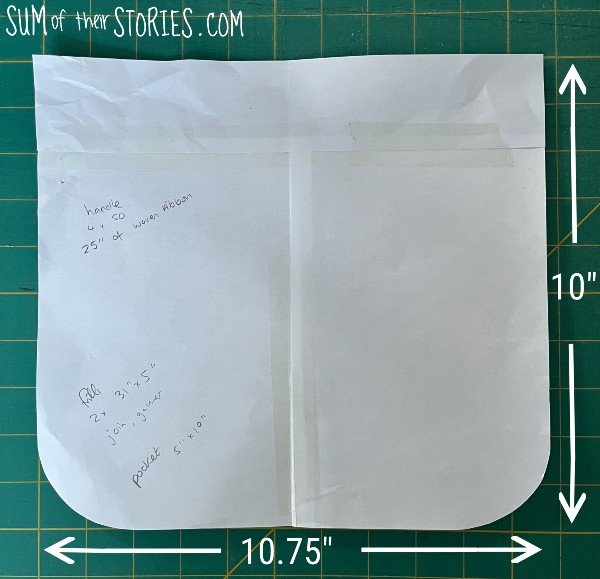
First you need to create a paper pattern template.
Join a couple of pieces of scrap paper with tape and mark a rectangle 10.75” x 10” (27cm x 25cm)
Cut this out and then fold it in half. Use a small bowl to mark rounded corners at the bottom and trim. Unfold the pattern piece and put to one side, you won’t need this until later.
All the other pieces of the bag are simple rectangles so it is not necessary to create paper pattern pieces for them unless you want to.
Cut out the bag pieces
In total you will need:
2 x main bag pieces 12” x 11”
2 x quilt backing fabric 12” x 11” (this can be any old thin fabric, see above)
2 x lining pieces 12” x 11”
2 x wadding pieces 12” x 11”
Ruffle - 1 piece 62” x 5” (you might need to join several pieces together to get a piece of fabric long enough)
Handle - 1 piece 50” x 4”
Ties - 2 pieces each 12” x 2”
Internal pocket - 1 piece 5” x 10”
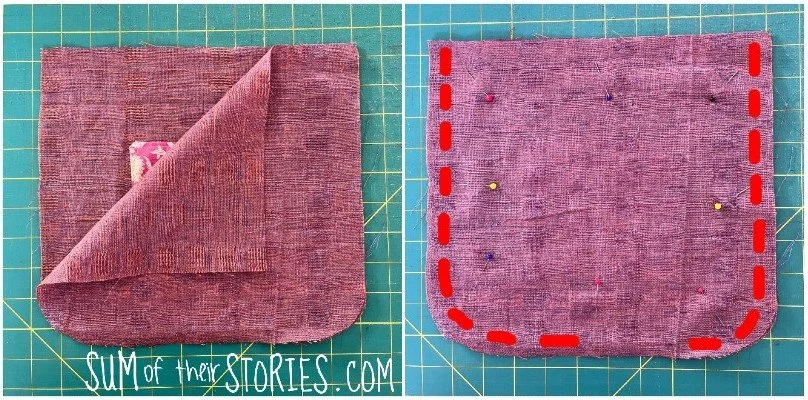
Quilting the bag pieces
Layer the 12” x 11” fabric in a sandwich ready to quilt. Quilt backing fabric, then the wadding and then finally the outer fabric face up. Secure with lots of pins all over the rectangle to keep everything in place and then quilt together.
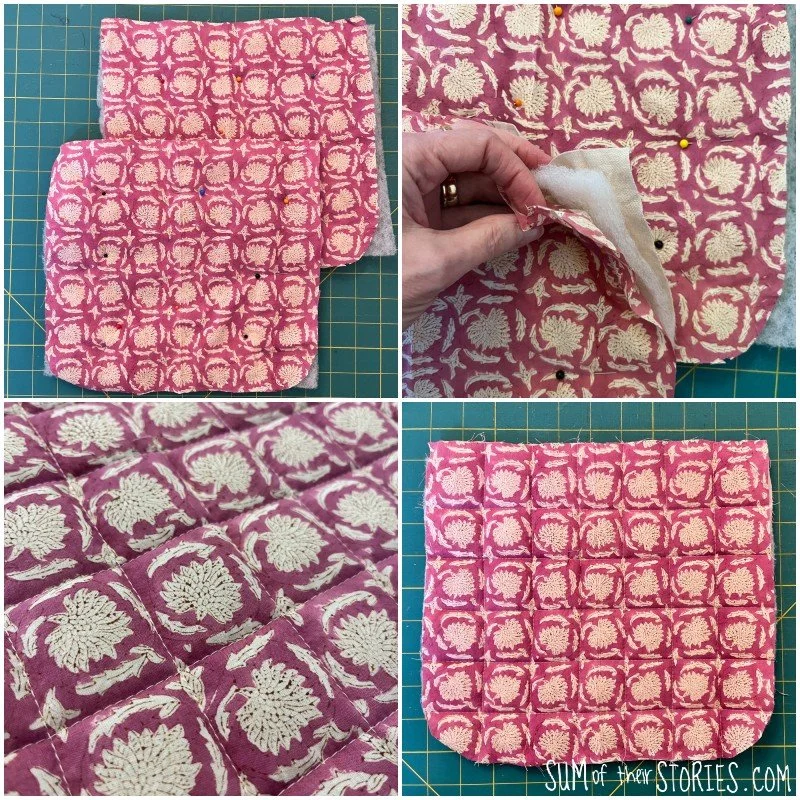
I did mine in simple vertical and horizontal rows as that fitted nicely with the print on my fabric but you could do any design you like. Just vertical lines maybe, or diagonal line to create diamond shapes. Or perhaps you fancy some wiggly lines, or free motion quilting. Whatever takes your fancy and suits your fabric choice.
Once your bag fabric is quilted then use the paper template you created earlier to cut out the bag front and back.
Making the bag pieces
Gathering the ruffle
Take your long ruffle piece and fold a double hem on each short end, stitch. (I actually pieced my ruffle fabric together from the sleeves of my tunic using the hem at the ends so I could skip this step. Whether you are able to do that depends on what fabric you are making your bag from)
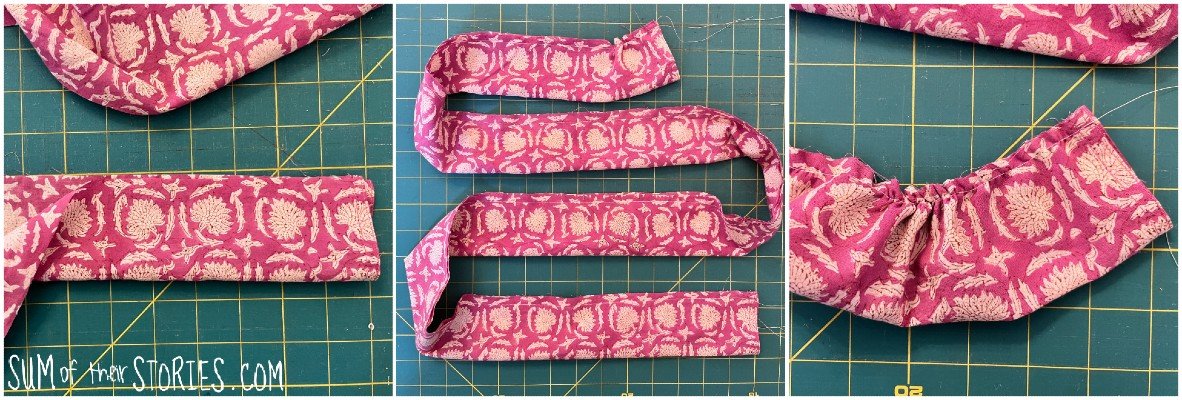
Fold the ruffle in half long edges together, right sides OUT.
Set your sewing machine to its longest stitch and stitch 2 parallel lines of stitching along the open edge.
Gently pull the threads on one side at one end to gather the ruffle. This will take a while as it’s a long length. Take your time, pull gently and ease the fabric along. You want to create a frill that is 28” long with the gathers as even as possible.
There are other ways to create gathers, some people like to zig zag over dental floss and then pull the floss up for example, but the 2 rows of large stitches is the traditional method and the one I usually turn to.
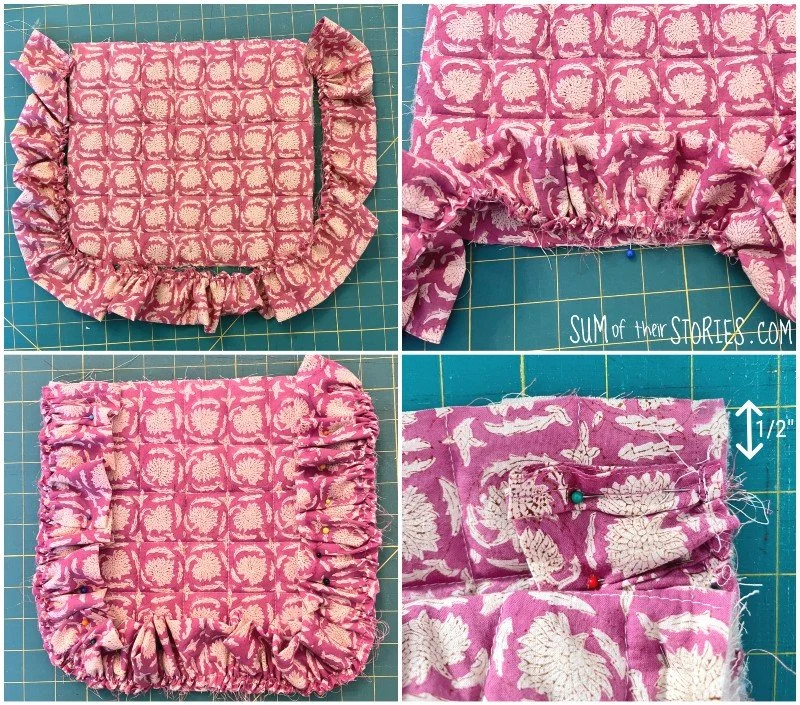
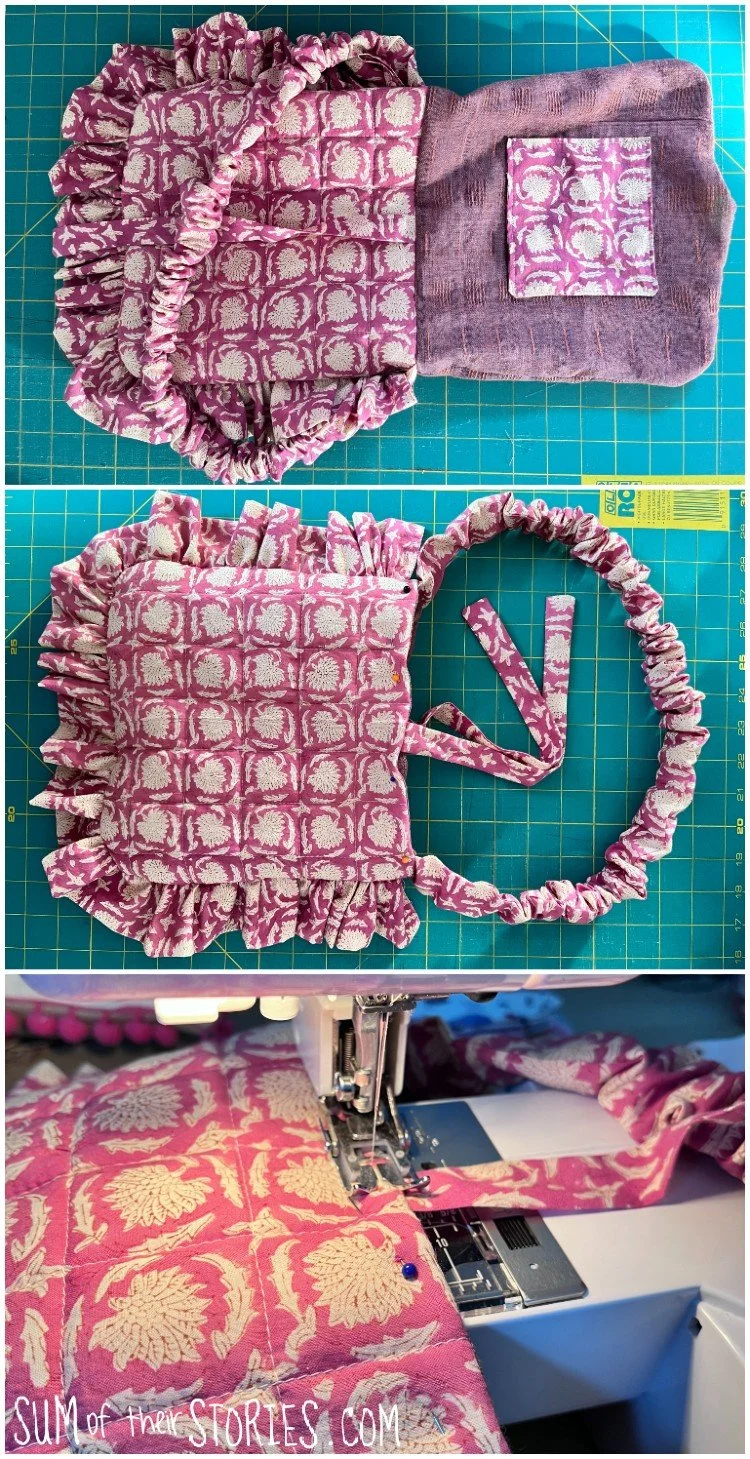
Take your bag front and lay the ruffle on top matching it on 3 sides (the side, bottom and other side) so the raw edges are together. If you find the middle centre of the bag front and the middle of the frill and secure them with pins first it’s easier to position the frill evenly.
Use a LOAD of pins to secure it in place. There will be a 1/2” gap the each top edge where there is no frill.
Lay the bag back face down on top, and pin or clip in place.
Stitch SLOWLY and CAREFULLY around the 3 edges. Take your time, there is no rush. This is the part of the bag making process which will make or break your bag. If the ruffle is caught up where it shouldn’t be, if the gathers are overlapping or uneven or if there is a gap or a raw edge showing it is really going to notice. The ruffle frill is the main focal point of the bag so it’s worth taking your time to get it right.
Don’t be afraid as you remove your clips or pins to lift that top layer a little and peek underneath to check the gathers are still sitting correctly as you are stitching and adjust them as necessary.
When that seam is stitched turn your bag right sides out and take a close look. You’ll be able to see straight away if you’ve caught anything you shouldn’t. If anything’s not right just unpick that bit and restitch it. You shouldn’t need to undo the whole thing, it should be easy enough to correct a dodgy inch or two.
When you’re happy remove all the pins, put that piece to one side and get the rest of the bag elements ready.
Internal pocket
An internal pocket is not essential, you can miss it out if you like, but it is really useful and makes your bag infinitely more practical.
Take your lining fabric and using the paper pattern cut out 2 pieces.

Fold the pocket piece in half, right sides together and stitch around the 3 open sides leaving a small gap for turning.
Clip the corners and turn right sides out. Press with the iron.
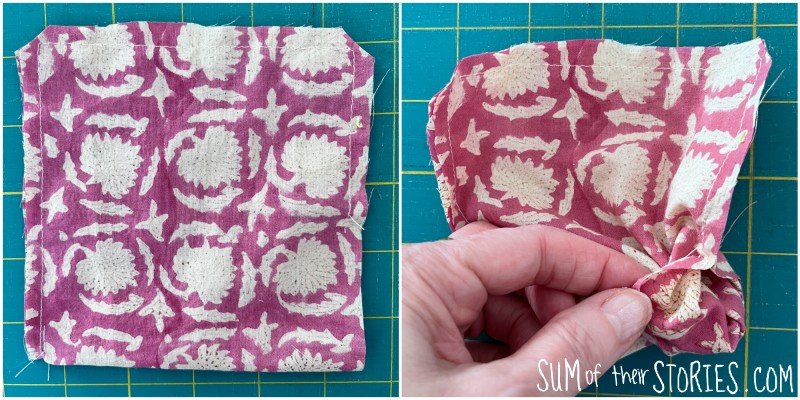
Top stitch one of the long edges if your fabric is soft. This just makes the pocket a little more sturdy.
Position the pocket in the centre of one of your lining pieces about 3 inches from the straight top edge.

Stitch around 3 edges of the pocket leaving the top open. It’s a good idea to stitch a narrow triangle at the top of the pocket on each side, as you start and stop this stitching. This makes the pocket a little stronger.
Place the 2nd lining piece on top of the 1st and stitch around the side, bottom and side leaving a 4-5” gap in the bottom edge for turning out later.
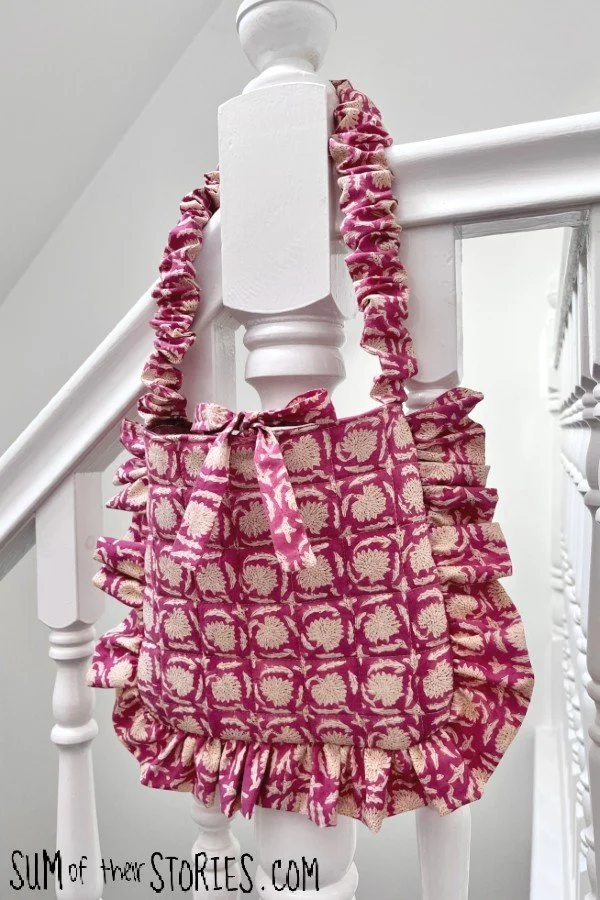
Making the gathered handle
Take your long thin handle piece of fabric and fold it in half along the long edge, right sides together. Stitch the long edge to form a really long thin tube.
Turn right side out.
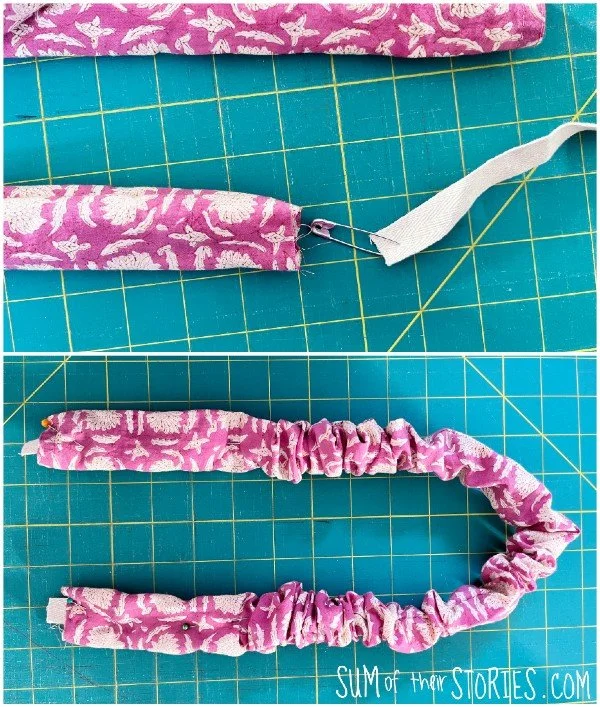
Pop a safety pin onto one end of your 25” length of sturdy twill tape and thread it through the handle tube. Use pins to secure the other end of the tape to the end of the handle tube so you don’t pull it right through by mistake. The handle tube is much longer than the twill tape so it’s easily done!
Shuffle the fabric around so most of the excess is in the centre of the tape and the ends are flat. Check the seam and the tape is not twisted. Use pins to hold it all in place.
Making the ties
My bag closes with ties. They tie in a cute bow which I think goes nicely with the fun of the ruffle. If you don’t want them you can just miss them off. You could add a ribbon loop to one side of your bag instead and add a button. Or you could use a snap fastening, or hook and loop tape, or nothing, it’s up to you.
If you want to go for the ties you’ll need 2 pieces of fabric 12” x 2”.
Fold each piece in half, right sides together then stitch across one short edge and along the longer edge.

Turn right side out and press.
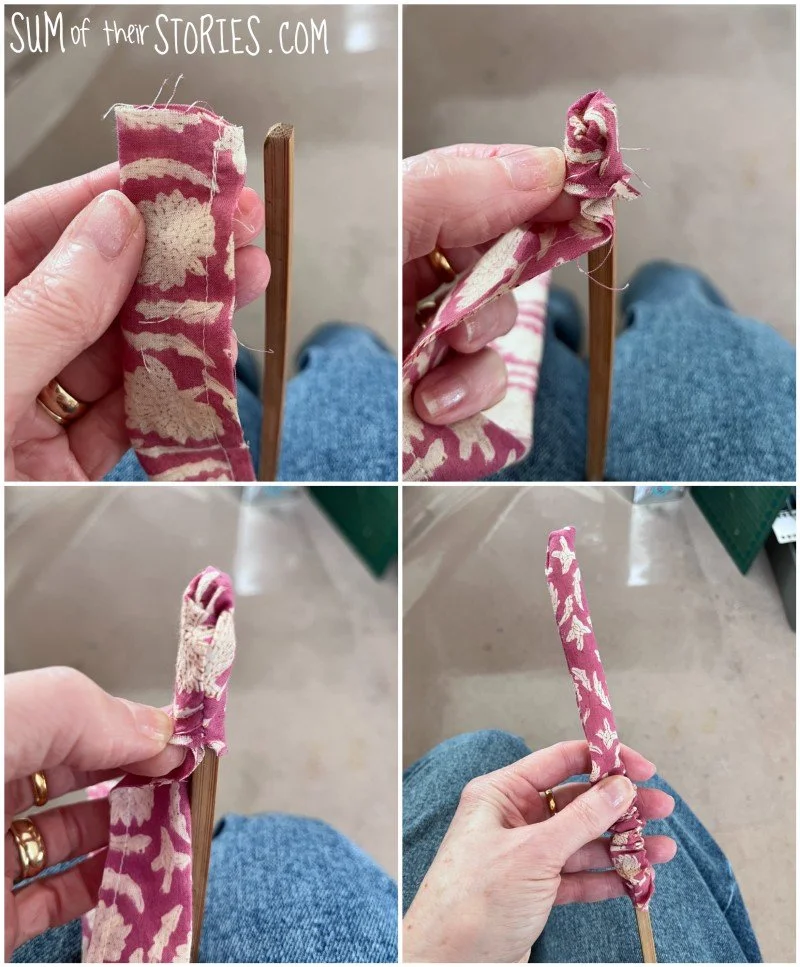
These kind of narrow tubes can be tricky to turn out. I find it easier to turn them out if you start them off as best you can just folding over the end with your fingers an inch or so. Then take an old chop stick and shove it inside. Jam the chop stick between your knees, wiggle of the fabric from side to side a little and pull it down. You should find it slides right sides out pretty easily. Admittedly this method works best on finer fabrics. If your fabric is a little thicker you may want to make your ties by folding the fabric strip like double fold bias binding.
Assembling the ruffle bag
You now have all the elements made and are ready to assemble your frilled bag.
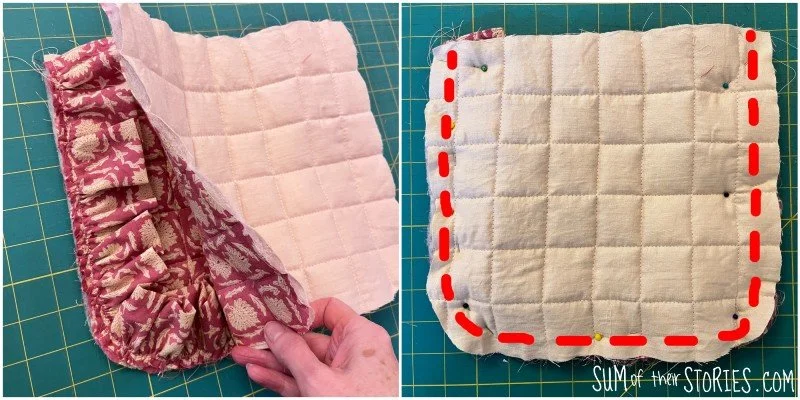
Take your quilted bag and position the ties centrally on the right side, one on the front and one on the back, use plenty of pins to hold them in place.
Position the handles centrally over the side seams, again on the right side. Just take a second to check the handle is not twisted. Again, be generous with your pins.
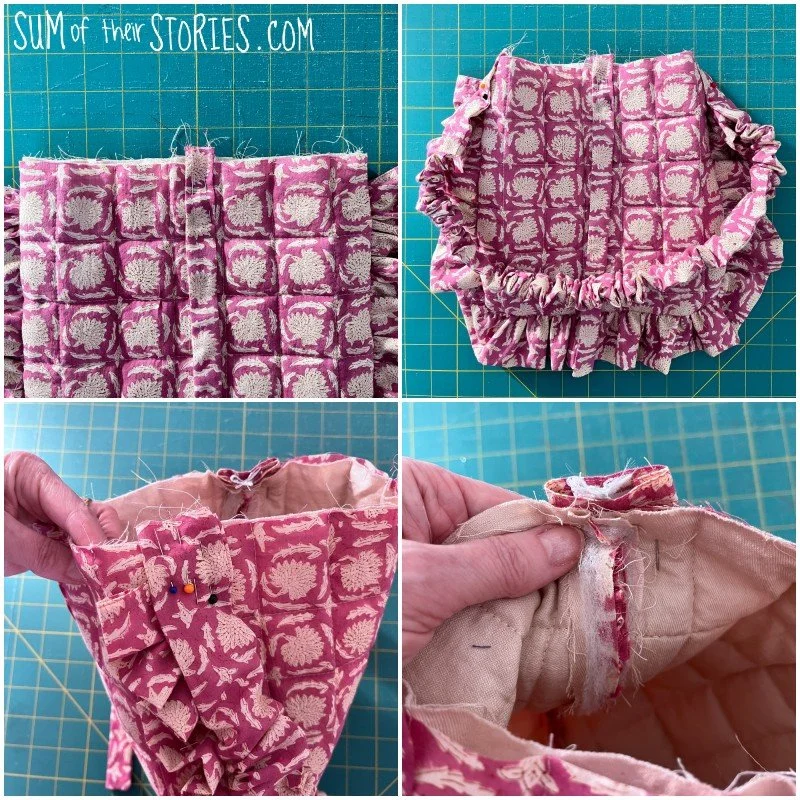
Take all of this bag/handle/ties piece and pop it inside the bag lining. Line up the side seams and spend a moment checking that the ties and handle are not caught up anywhere.
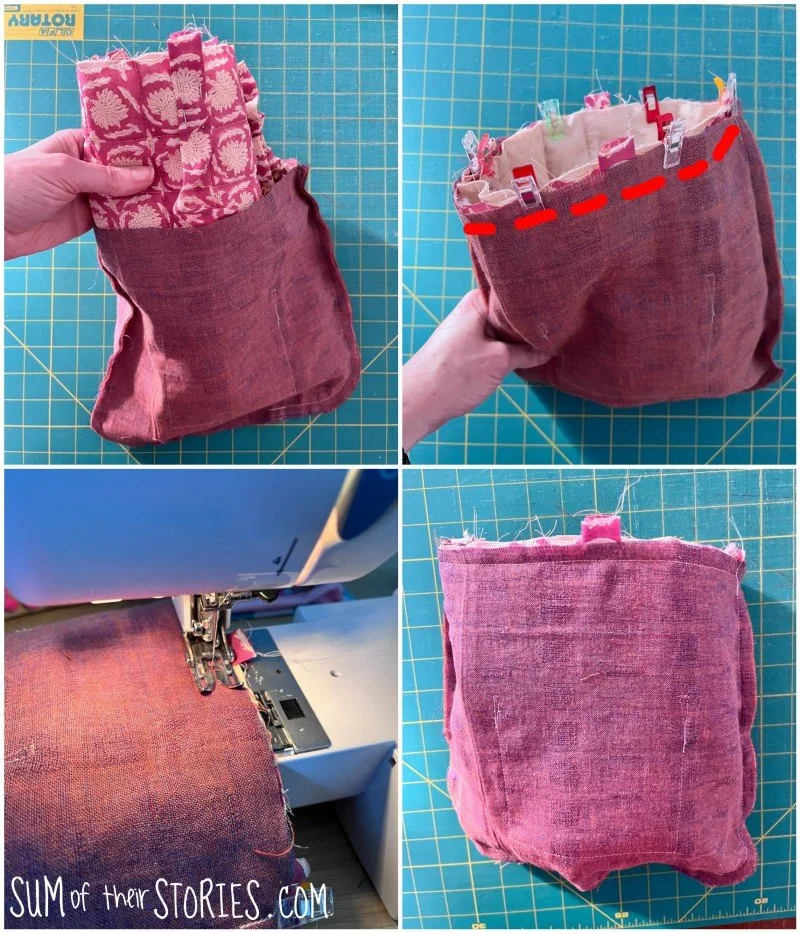
Use clips to secure the top edge and then stitch around the top. You’ll have quite a few layers to deal with at spots like the side seams so take your time and go gently. Use a walking foot if you have one.
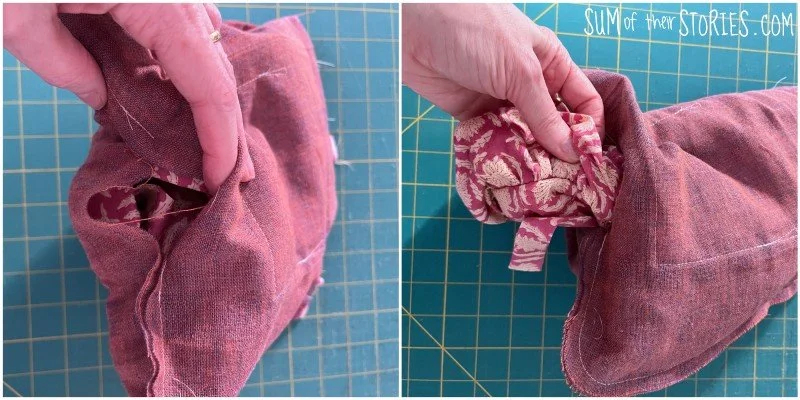
Turn the bag out through the gap you left in the lining. BE CAREFUL, remember all those pins that are still inside!
Remove any pins and stitch the gap in the lining closed.
Push the lining inside the bag, press and then top stitch all around the top edge to hold everything neatly.
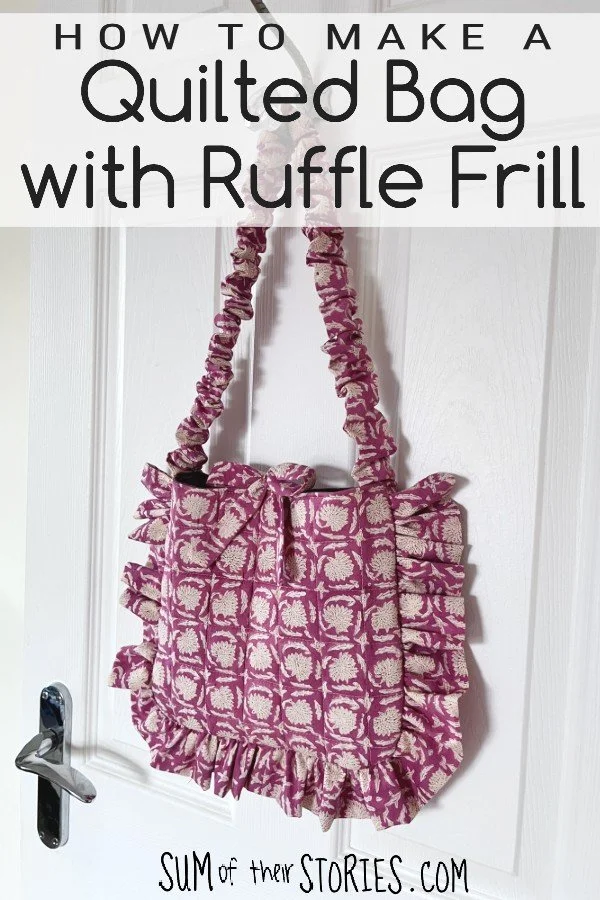
TA DAH! You’ve done it, you’ve made the cutest bag ever with an adorable ruffle, gathered handle and sweet bow closure.
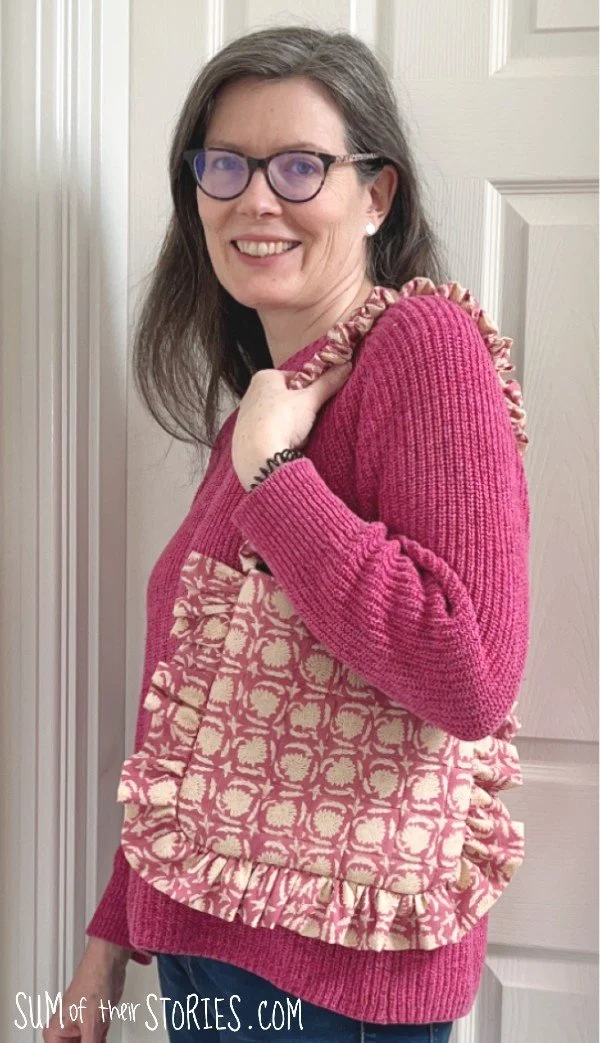
Here you can see how long the handle is when it’s over my shoulder. You can adjust the handle and make it longer or shorter if you prefer something different.
Apologies for the mammoth tutorial, it took a lot of explanation and photos but hopefully you will enjoy sewing a lovely quilted bag with a ruffle frill.
Julie
I’ll be sharing this tutorial at some of these link ups