

Easy Folded Paper Easter Treat Gift Baskets
/

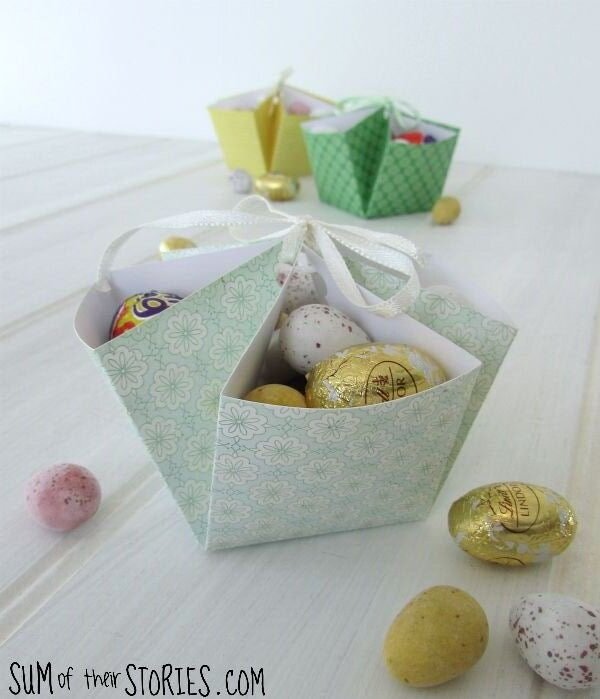
Today I’m sharing the simplest way to make a mini treat basket from paper. No cutting and no gluing required, just a little folding and hole punching.
It’s time for the Pinterest Challenge again, where each month a group of creative bloggers get together, take a pin from one of their Pinterest boards and give it a go, either just as it is or giving it a bit of a twist. This month's challenge is about Spring Projects with a focus on Easter and Gardening, so I chose to make these little Easter Treat Baskets from paper in my quite extensive papercraft stash.
I was inspired when I came across this pin for an easy fold Easter treat pouch. It’s the same fold that I used to make some card toppers at Christmas with little messages tucked inside and it got me thinking about the simple ‘no glue, no cutting’ little baskets that we used to make when we were children. I had them on my desk for holding paper clips etc back in the 80’s and I thought they would be adaptable for gifting treats instead.
You can use these little baskets for whatever you like and make them whatever size you like. They’d make great wedding favours as well as being perfect for gifting mini eggs at Easter.
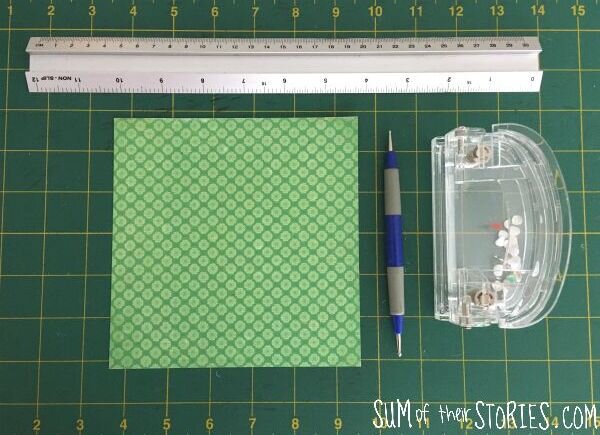
I’ve made my baskets using 6” x 6” scrapbook paper so I’m going to explain the super simple tutorial in inches. You can convert to cm if you prefer.
How to make Mini Paper Easter Treat Baskets
To make a mini Easter treat gift basket you will need:
6” x 6” scrap book paper - mine is from my stash, I’m afraid I don’t know what brand it is. I found a few similar 6 x 6 pads (aff link) here, here and here
11” or 24cm of thin ribbon or twine
A ruler
An embossing tool - you could use a pencil with the lead broken off if you don’t have an embossing tool, or the back of the scissors or even the prong of a fork (hold it sideways)
Prepare the paper
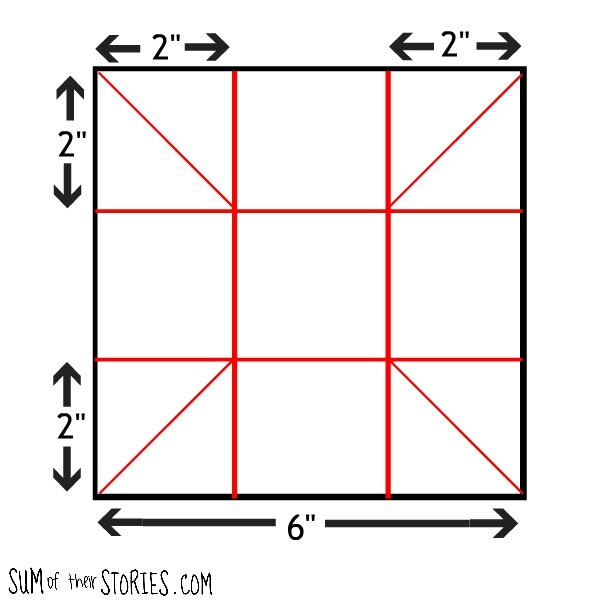
Score the paper at 2” and at 4”
Turn through 90 degrees and repeat
Then score diagonally but only from the corner to the point where the other scored lines cross.

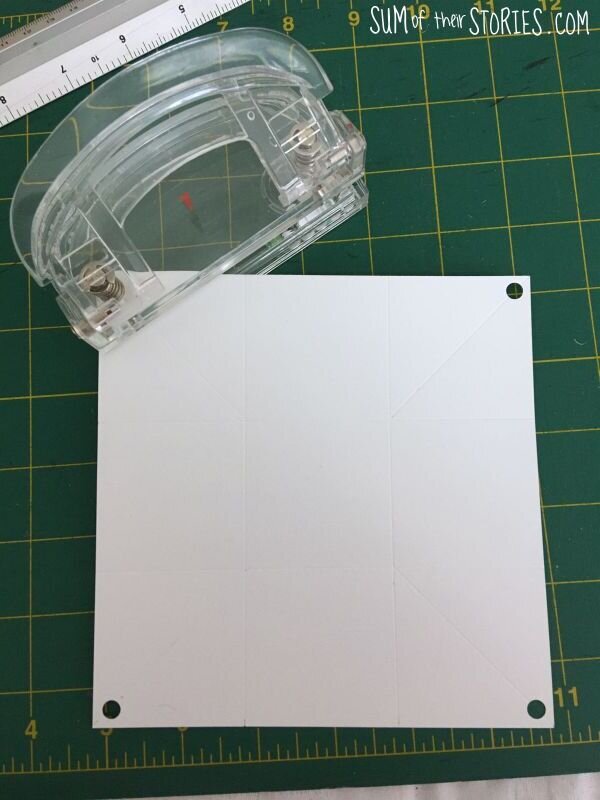
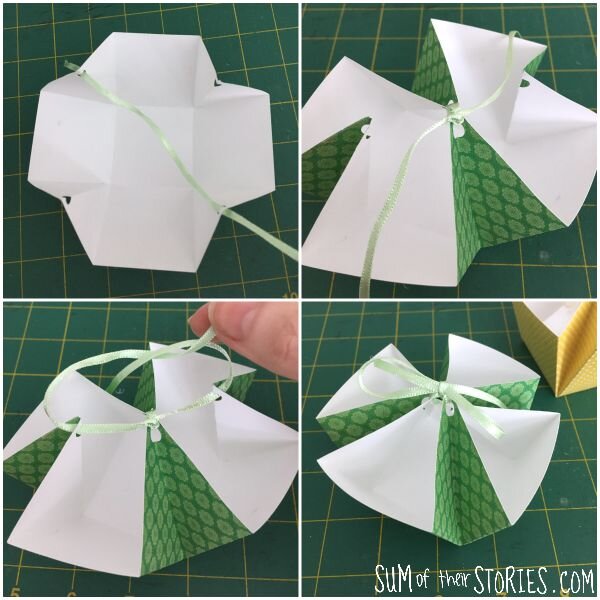
Punch a hole in each corner. My hole punch is clear which makes it really easy to position the holes. You could remove the bottom of your hole punch to help you position the holes if you need to, or use something like a Crop-A-Dile if you have one.
Fold the paper to form a basket
Fold all the lines that you have scored. Fold the main folds in towards the centre and pinch the corners in.

Secure the basket with ribbon
Thread the ribbon through 2 opposite holes and tie, you might need to do a double knot, I did.
Then thread through the other 2 holes and tie in the centre with a bow. You can thread a little gift tag on before the bow if you want to.
That’s it, how easy peasy it that?
Just fill them with treats and they are ready to give.
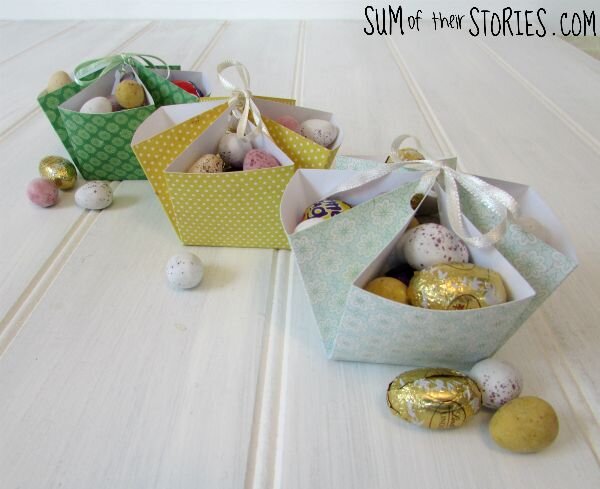
You can make these with pretty double sided papers if you like, that can look really beautiful. I used single sided here because that is what I had and it’s probably easier for you to see what’s happening in the tutorial photos anyway.

Julie
I’ll be sharing this project at these linkups.
For more Pinterest inspired projects from this month’s Pinterest Challenge hosts, check out the links below:

My Pinterventures | Sand Easter Eggs
Slices of Life | Whipped Topping Dyed Eggs
Decorate and More with Tip | Pinterest Inspired Dollar Tree DIY
Purple Hues and Me | Decoupage Egg and Stand
Sew Crafty Crochet | Crochet Carrots for the Easter Bunny
Life Beyond Kitchen | Making a Polymer Clay Medallion
Modern on Monticello | Simple Spring Floral Mantel
EyeLoveKnots | Crochet Carrot Garden Marker
Create with Cynthia | Painted Drop Cloth Bunnies
This Autoimmune Life | Crochet Easter Egg Coasters
DIY Vibes | Cotton and Lavender Wall Decor
Mom Home Guide | Hanging Towel two ways
Stone Cottage Adventures | Stop and smell the paper roses
Teadoddles | Golden Spindle Carrots
Simply Crafty Life | Simple Easter Candy Jar Craft
The Good Life | Growing Lettuce from Cuttings
You might also like to check out these Easter craft ideas:


