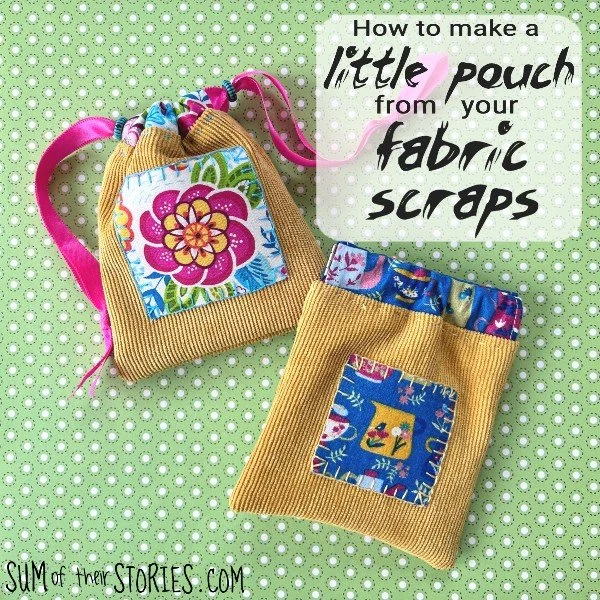
How to make a little pouch from your fabric scraps
/
What is it with fabric scraps? It makes sense that the more we sew the more scraps we get. What I can’t understand is that no matter how many fabric scrap busting projects I make my scrap tubs never get any emptier - ‘tis a mystery!
I don’t really mind at all though to be honest. I love making what feels like something out of nothing when I am able to create something cute from fabric scraps.
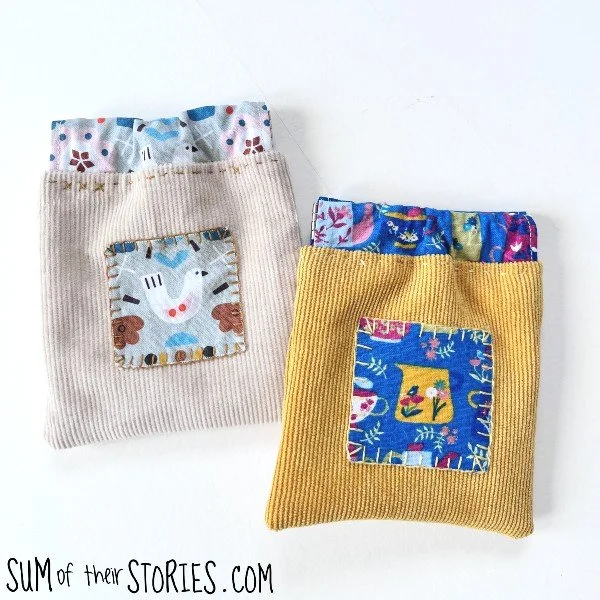
Which brings us nicely to these cute little pouches. Made entirely from bits of fabric from my scrap tubs I have enjoyed making these so much. We’re talking about those decent sized scraps here, not the teeny tiny pieces often called crumbs. You need to be able to cut 5” squares from your scraps to make these pouches. (you can find my favourite way to use fabric crumbs here)
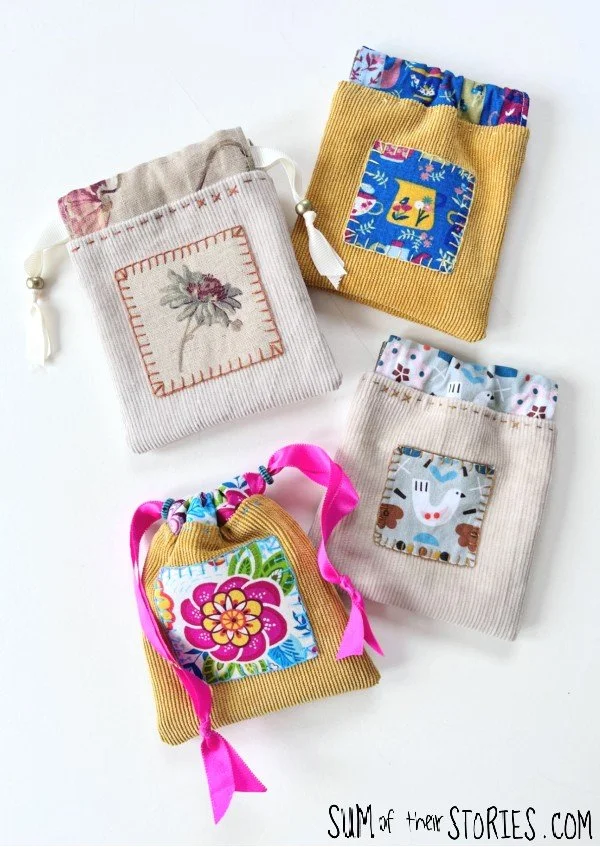
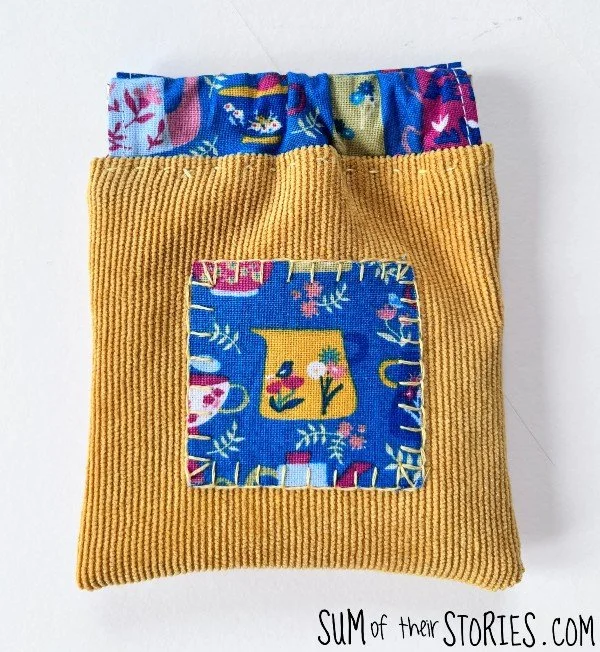
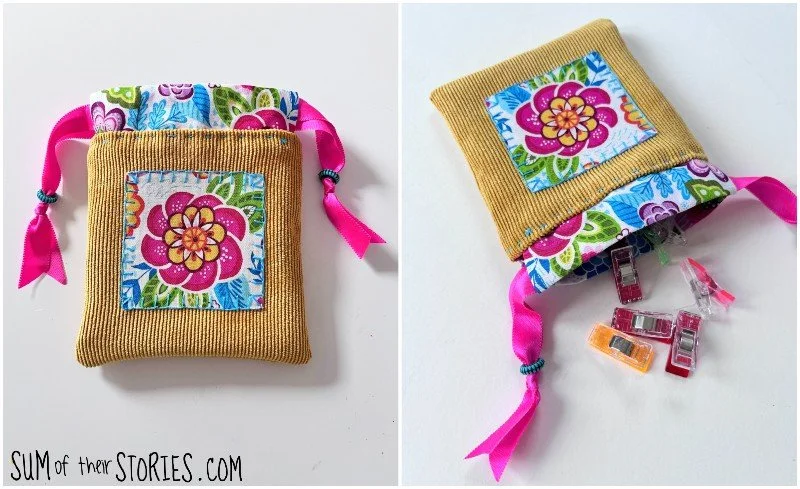
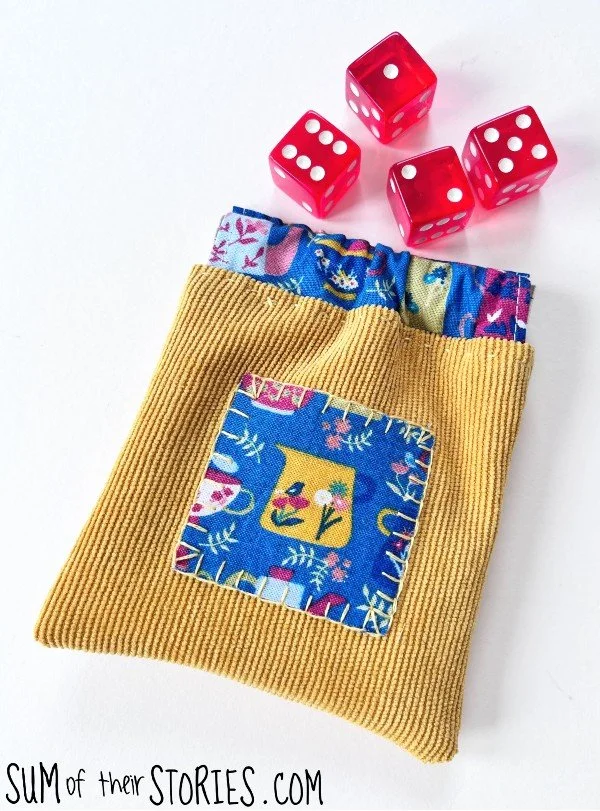
These handy pouches are perfect for corralling little things: a lip stick and small hand cream for your handbag, all your wonderclips in your sewing space, for kids to store their special treasures, for board game pieces or dice, you could use them to keep your jewellery safe when travelling or any number of other ideas that haven’t even occurred to me! The finished pouches are just over 4” square, that’s about 11cm.
These little pouches are made using a sewing machine plus a little hand sewing. You could hand sew the whole thing fairly easily as they are not large. You could just use a sewing machine although there is just one step you’d need to miss out - I’ll explain when we get to that bit.
I’ve kept the maths really simple for these little pouches, it’s all based on 5” squares. Let me show you how to make them.
How to make a tiny pouch from fabric scraps
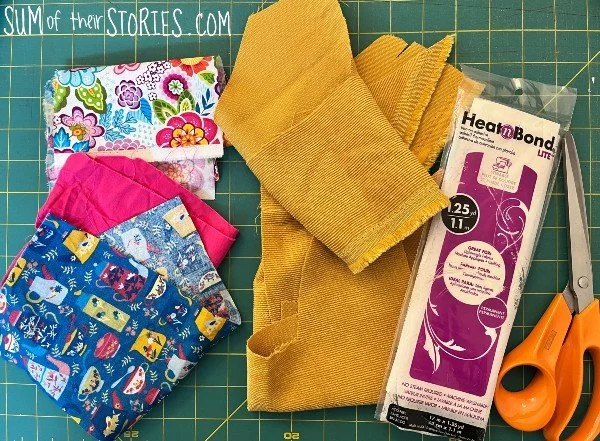
You will need:
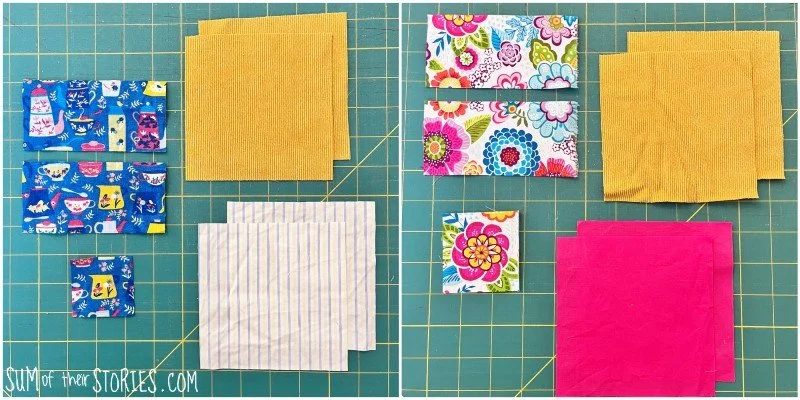
2 pieces of outer fabric 5” square
2 pieces of lining fabric 5” square
2 pieces of cute fabric for the top closure 5” x 2.5” (this is a 5” square cut in half) plus a scrap of the same cute fabric to decorate
A small piece of double sided adhesive web like Bondaweb or Heat and Bond
Embroidery thread and a sharp embroidery needle
You’ll also need a 3.5” (9cm) flex frame closure or a 39” (100cm) length of drawstring cord/ribbon* and 2 beads
Let’s go through each of those elements in a bit more detail.
Outer fabric for your pouch
Honestly you can use any fabric you like for these pouches but a mid to firm weight fabric is optimal. I used some scraps of a fine corduroy because that’s what I had but I plan to make some more with light upholstery or curtain fabric. I have some upholstery fabric squares from old sample books which I think will make perfect little pouches.
A quilting cotton would also work really well. If you want to use a very fine or even a stretch fabric you’ll want to stabilise it with iron on interfacing first.
Lining fabric for your pouch
Ideally pick something fairly lightweight for your pouch lining: sheeting, an old shirt, old pillowcase - that sort of thing. If it matches your cute fabric all the better. I think a mad pop of colour inside a pouch can be really fun but you can keep things soft and toning too if that’s the vibe you are going for.
Cute fabric for your pouch
I’m saying cute fabric because these little pouches are a fun way to use small scraps of really cute fabric. You can just as easily use a totally non-cute fabric of course.
I had several little pieces of really cute printed fabric which were just calling out to be fussy cut. If you are not familiar with the term, fussy cutting is just when you take an image on some fabric and cut it out so the image is central. It shows the cute motif on the fabric off to best effect, makes it the star of the show. It’s very common in some patchwork techniques. (Fussy cutting can also be used in other ways to create amazing kaleidoscope designs but let’s not get into that today!)
Double sided adhesive web
There are several brands of this useful stuff, what you can get will most likely depend on where you are in the world. I have a pack of Heat n Bond, Bondaweb is pretty much the same. You could use Wonderunder too if that’s what you have or even a stick glue.
If you don’t already have any of these you really don’t need to rush out and buy them unless you are planning lots of applique type projects in your future. You can use lots of pins instead and your pouch will be fine!
* Pouch closure options
I enjoyed making these little pouches so much I’ve made several which has given me to opportunity to try out a few different closure options.
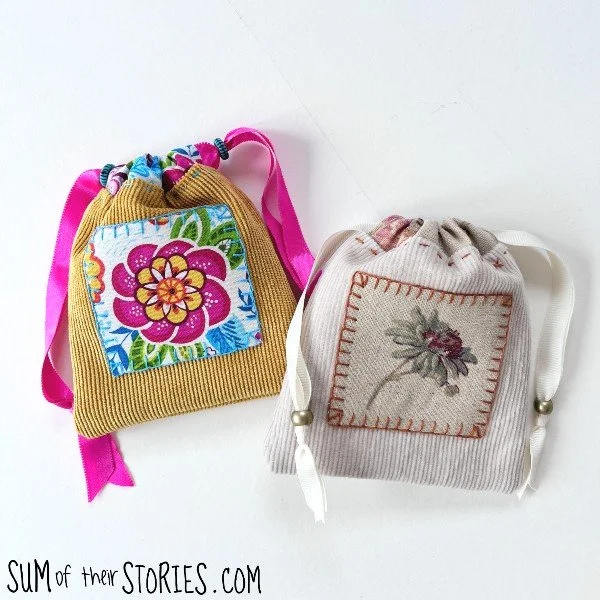
A flex frame is fun. This pouch size fits a 3.5” flex frame nicely. For me the 3.5'“ flex frame is a good size - any smaller and they can be quite stiff and difficult to open, larger and you might find your hand is not big enough to span them to squeeze which also makes them difficult to open. 3.5” and 4.25” are the only sizes I use regularly for these reason, they are the Goldilocks of the flex frame world!
It’s hard to beat a good old drawstring closure on a little pouch. All you need is some cord or ribbon and maybe a couple of beads if you want to be fancy.
Ok, let’s get started make a little pouch:
Decorating your pouch
Quite often with crafts the “decoration” stage comes at the end. For these little pouches we decorate first. It would be much too fiddly to add extra at the end.
Take your fussy cut piece of fabric with it’s cute motif and use it to cut a piece of your bondaweb just a fraction smaller. Cutting it a tiny bit smaller just avoids adhesive getting on your iron or ironing surface.
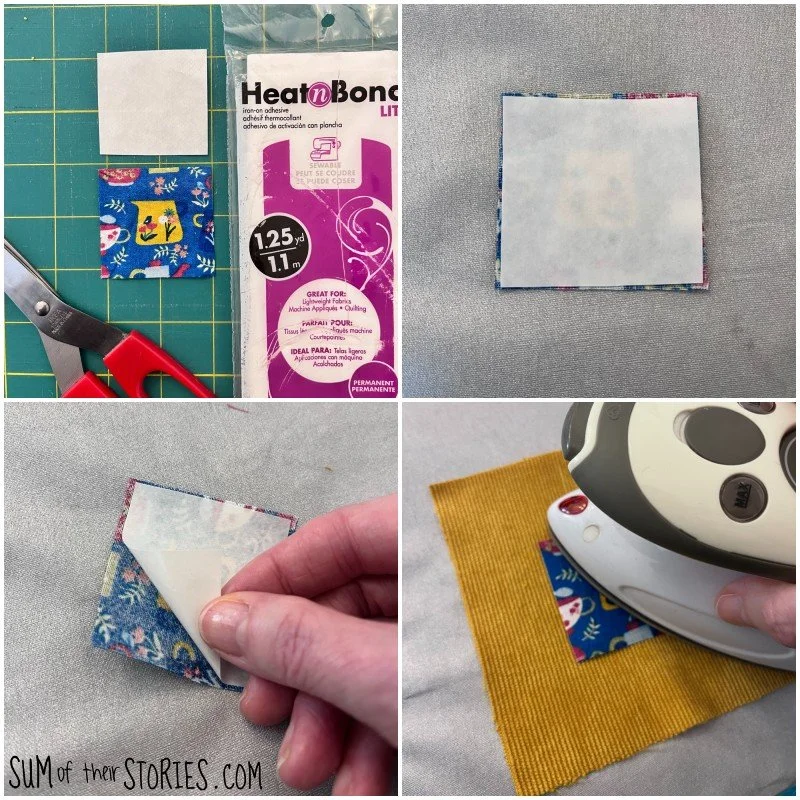
Place your cut motif on your ironing board face down and place the bondaweb on top, bobbly side down. Press with the iron, this doesn’t take long.
Peel the backing paper off and place the motif centally onto one of your outer fabric squares. Press again with the iron to secure it in place.
As I said before, if you don’t have any bondaweb type stuff you can just secure the motif with lots of pins, the bondaweb just makes it easier to avoid things slipping out of place.
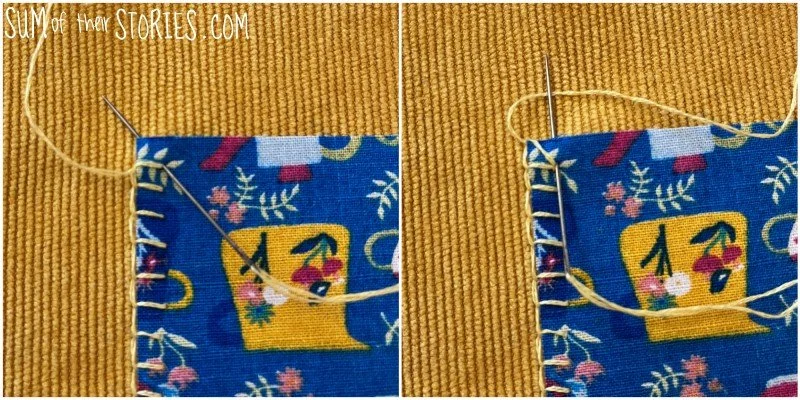
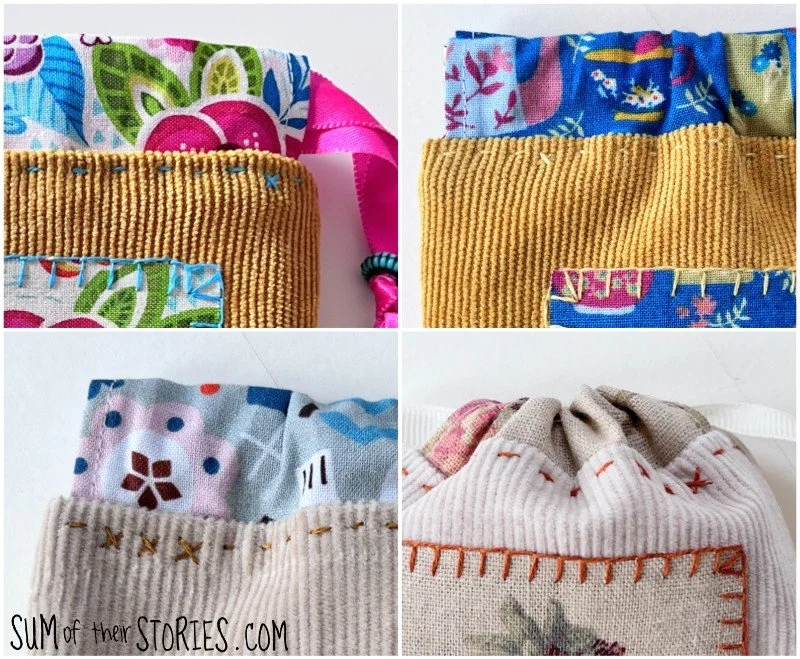
Take 2 strands of your embroidery thread, knot one end and blanket stitch all around the edge of your motif.
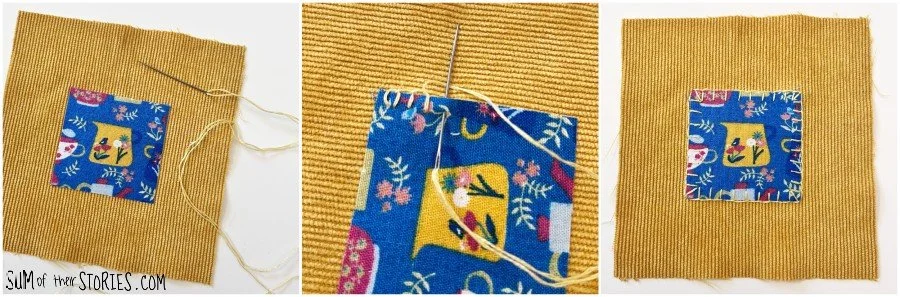
I’ve taken extra photos to show how I did the corners in an attempt to make them nice and neat.
Making the closure
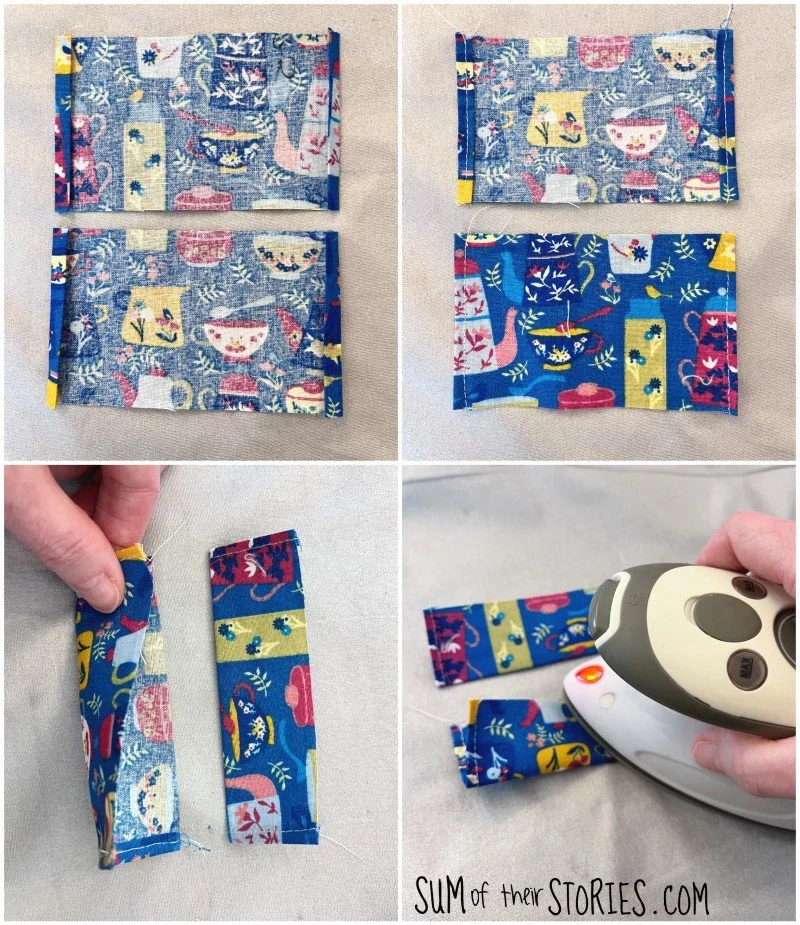
Take your two 5” x 2.5” pieces and turn a narrow double hem at each short end. Stitch.
It has only occurred to me now as I write up this tutorial, that you could cut a 5” square piece of your cute fabric, hem two opposite sides and then cut it in half and end up in the exact same position. You might find that less fiddly. Next time I make some pouches I’ll do that and take some photos to share with you.
However you got here the next thing to do is fold your 2 pieces in half lengthways and press.
Assembling the pouch
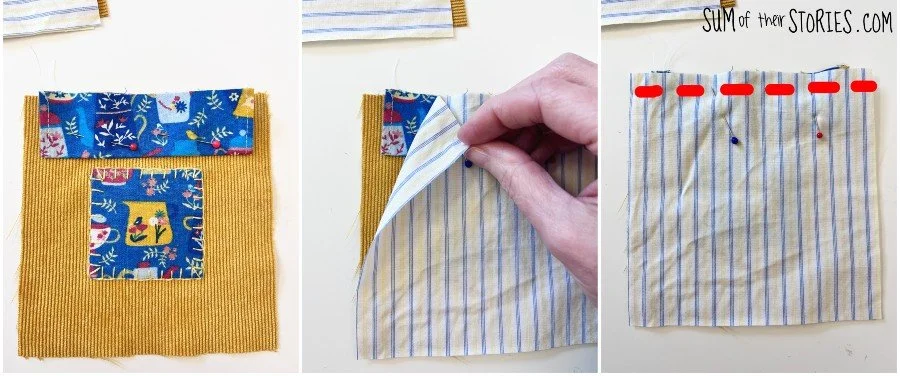
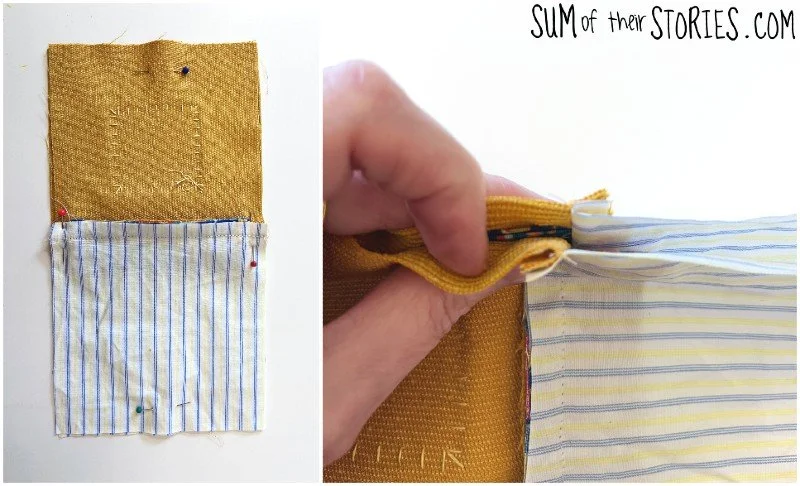
Lay your decorated outer piece face up and position one closure centrally at the top, raw edges at the top. Pin in place.
Place one lining piece on top and pin some more.
Repeat for the other outer, closure and lining pieces.
Stitch straight across the top of each. Remember to do a couple of back stitches at the beginning and end of each seam to secure your stitching.
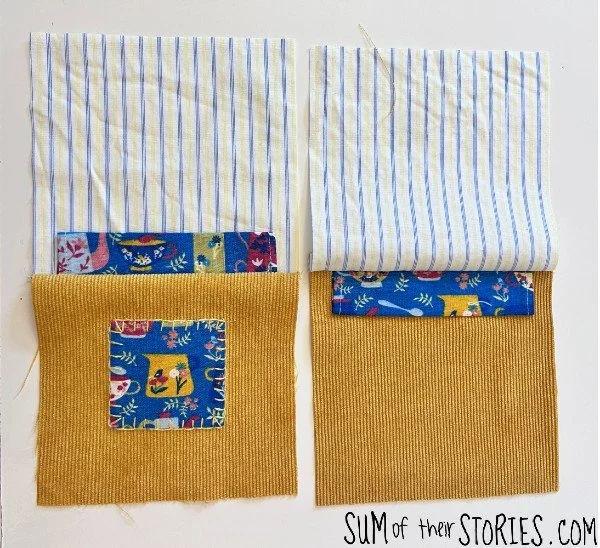
Take these two pieces and open them out. Fold the closure “flaps” in opposite directions and press. This just helps to reduce bulk at the sides and makes the next step easier.
Place the pieces right sides together, matching the central seams. The lining fabric is on top of the lining fabric, the outer fabric on top of the outer fabric. Pin to hold everything in place and then stitch around leaving a gap in the bottom of the lining.
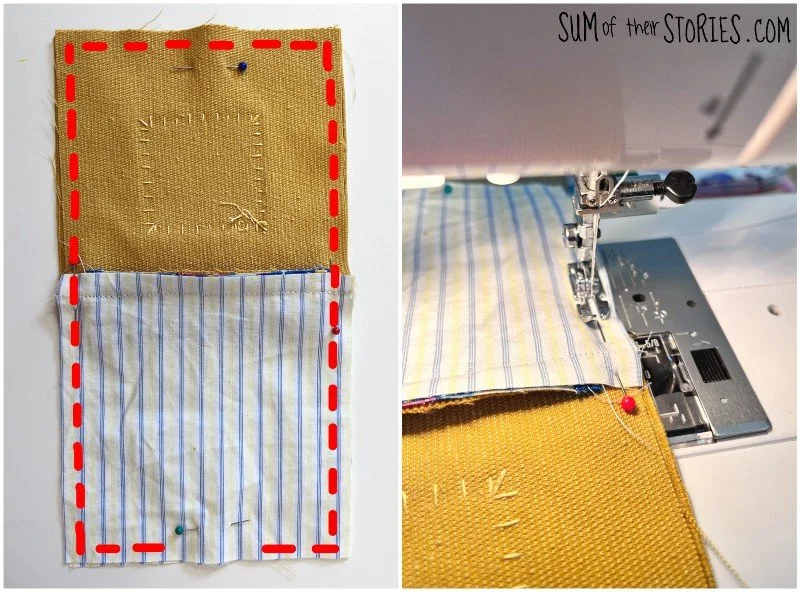
I use the zipper foot of my sewing machine when I do this, that way I can glide past the bulk of the closure pieces without any trouble. You could use a walking foot if you have one or just go slowly and take care when you are going over that central seam that your stitching stays straight and doesn’t wobble off to the side.
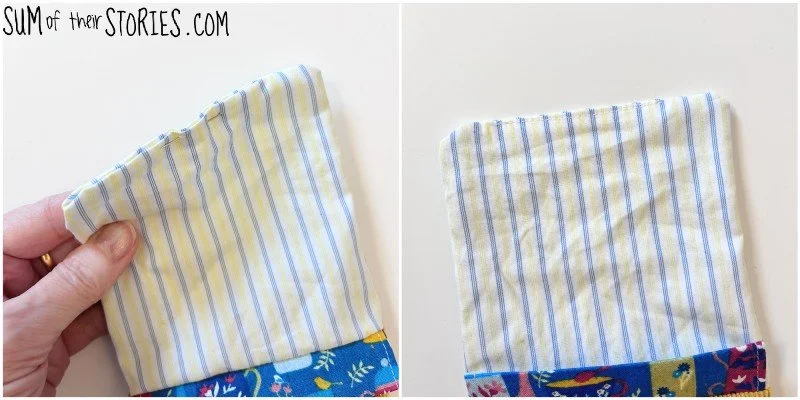
Trim the corners, making sure you don’t snip your stitches, and then turn the pouch out through that gap you left in the lining.


Push the lining into the pouch and take a few minutes to flatten the spot at the top edge seam where all the bulk is. I found it helpful to put my fingers inside through the gap in the lining to open up the seam so I could finger press everything as flat as possible. Once you are happy pin or clip to hold everything in place.
Now pull the lining back out and sew the gap up, either on the sewing machine or by hand.
Push that lining back inside the pouch and take a little time to push the corners out nicely.
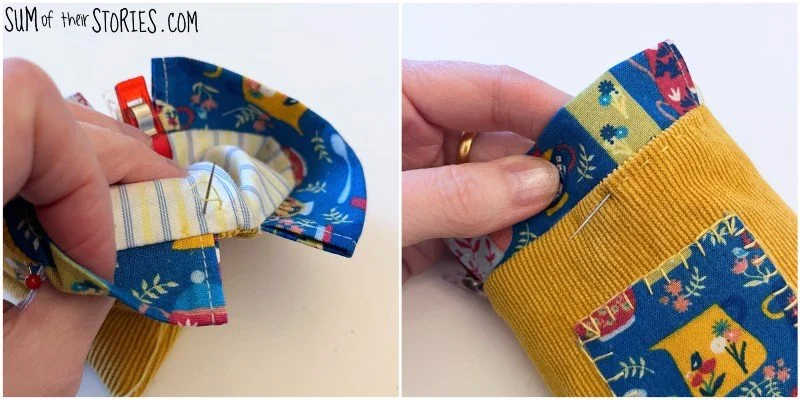
Finish stitching your pouch by stitching around the top edge by hand. You can do a running stitch, cross stitch, a mix of the 2 or any other decorative stitch that takes your fancy.
You can avoid having an unsightly knot inside your pouch by using the no knot method of casting on, I’ve explained exactly how to do that here in my beginners embroidery stitch guide.
This is the step that really does need to be stitched by hand, You’re not going to be able to get the pouch over the arm of your sewing machine to top stitch this top edge. If you really don’t enjoy hand sewing you could just miss this step out altogether. Just press your pouch with the iron and leave it as it is.
I really like that sweet hand stitched line at the top of the pouch, either in a contrast or co-ordinating colour.
The final step is to add your closure.
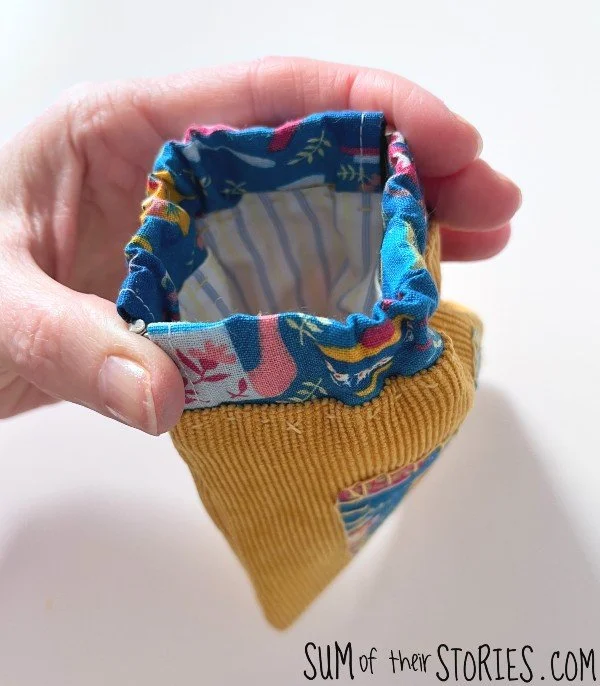
Adding a Flex frame
You can add a 3.5” (9cm) flex frame to your mini pouch. The frames come joined at one end and with a little metal stick that you use to secure the other end.
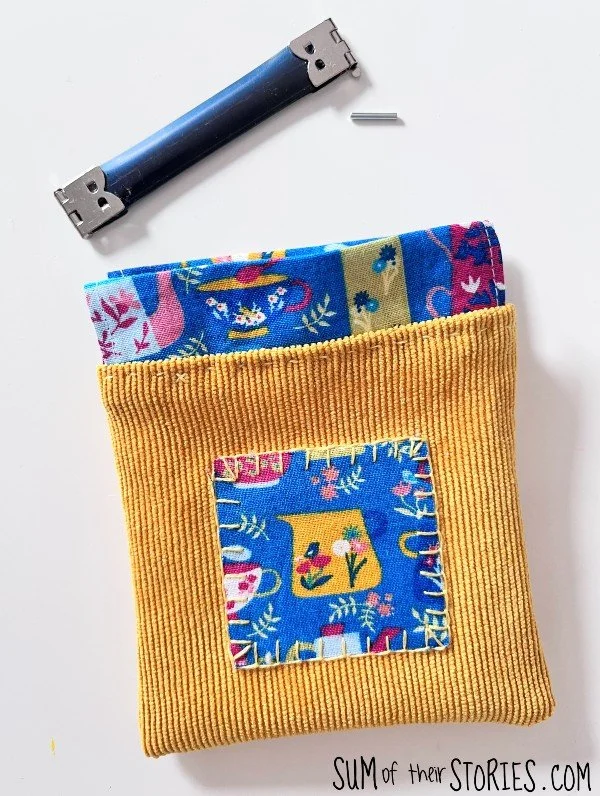
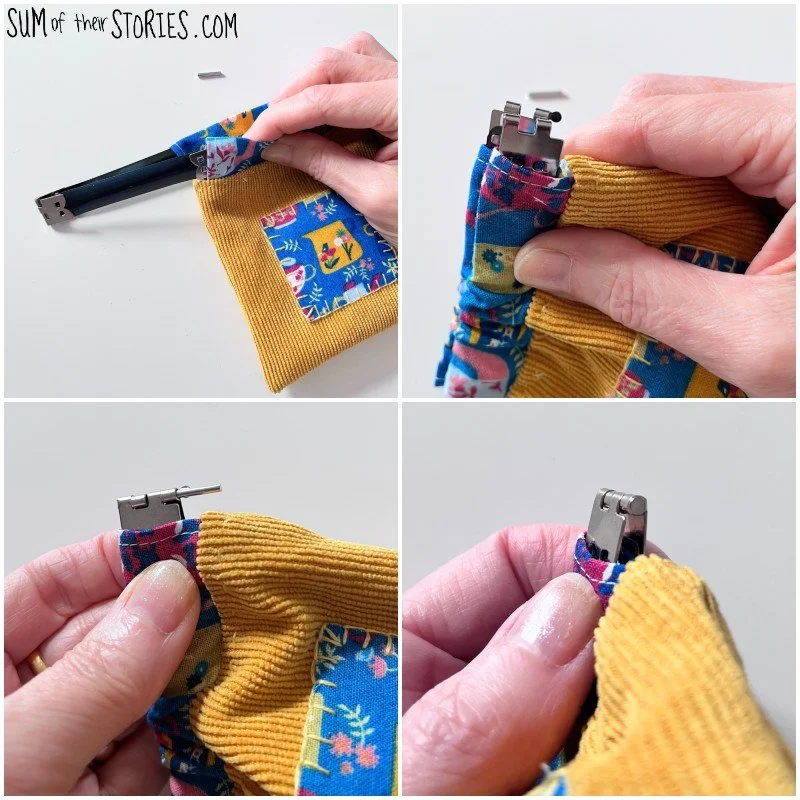
To install the flex frame you simply open it up a little and poke each end through the 2 sides of the pouch closure casing at the same time.
The closure casing is longer than the flex frame so you’ll need to shuffle the fabric down until the ends appear at the other end.
Line up the ends of the flex frame and poke the tiny metal stick into the flex frame so it secures the open end. Use pliers or the flat part of your scissors to bend the tiny circle of metal to cover the end of the metal stick and secure it in place.
A drawstring ribbon closure
Take a 39” or 1m length of ribbon or cord and cut it in half.
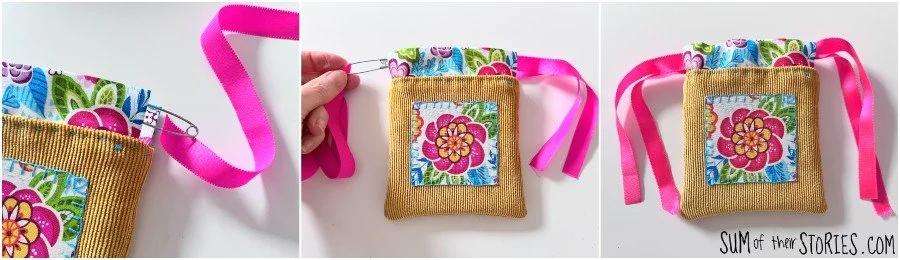
Pop a safety pin on one end of the ribbon and thread through the top closure in one direction and then back in the other direction on the other side.
Transfer the safety pin to the other ribbon and thread in the same way but starting from the opposite side.
Thread a bead onto each pair of ribbon ends if you like, the bead is optional, and then tie in a knot.
If your ribbon frays a lot then (very carefully) use a flame to seal the ends.
That’s it, your beautiful and useful little pouch is finished. Why not make them for all your friends and fill them with chocolates as a sweet gift?
More ideas for your little pouches
Swap the applique decoration for a little embroidered motif
or how about using fabric paint and a wood printing block to decorate your little pouch
Sew or iron on a patch as an alternative decoration
Use a patterned outer fabric and miss the decoration off altogether, you could even centralise a fabric motif on the 5” square and it will be central on your finished pouch
I have an idea to make the closure channels of a firmer fabric, sew them shut and use snap fastening to close the pouch. I’m pretty sure that would work, I’ll update here when I try it out!
Do you have any scraps of fabric that are just crying out to be turned into useful little mini pouches?
Have fun!
Julie
I’ll be sharing this sewing tutorial at some of these link ups
You might also be interested in some of these sewing tutorials: