

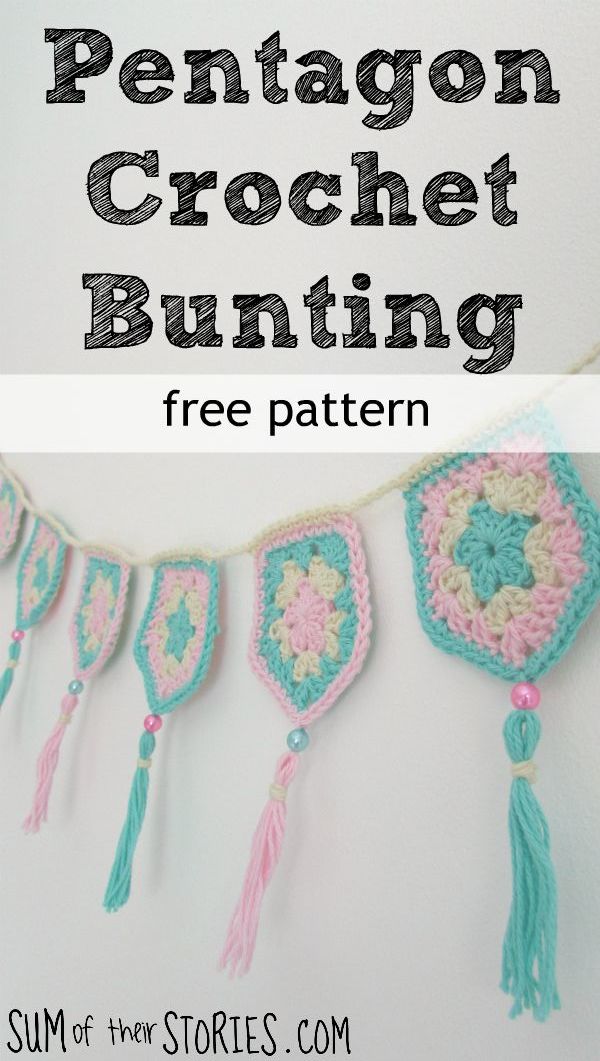
Free Pentagon Crochet Bunting Pattern
/Do you love a quick and pretty crochet project? Do you love a bit of bunting? Do you love a good granny square? If the answer is yes then this might be just the crochet project for you!

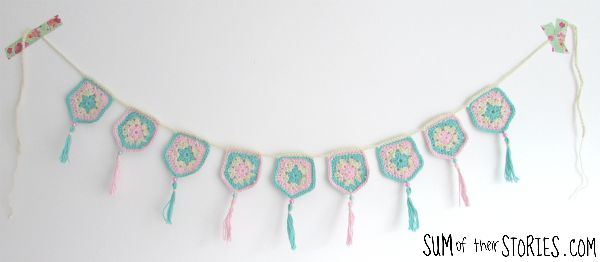
I’ve been joining my blogging friend Anna from Tea and a Sewing Machine with her #yearofbunting and her challenge for April was Crochet Bunting. I used some thin cotton yarn that I picked up in Tiger that’s been hanging about in my stash for a while and used it to make some hexagon bunting in pretty ice cream colours.
I’m an enthusiastic crocheter but I’d not call myself an expert. Writing my own patterns is not especially in my comfort zone but I’m going to have a go.
Here I’ve provided an in depth expanded version with lots of step by step photos so it’s perfect if you are a beginner, or just want some reassurance or extra advice. Imagine this is me sitting next to you on the sofa (I guess we are drinking tea and having a chat too!) giving you a few pointers and words of encouragement.
I have a simple, easy print version of this pattern available in my Etsy shop here for a nominal cost, and includes the pattern in UK terms and US terms.
You can make this pentagon bunting using any yarn. The thicker the yarn then the larger the bunting flags will be. Just use a crochet hook that suits the yarn you are using. Make a few test pentagons to check the size until you are happy. This would be a great stash buster if you made your bunting in all different colours, using up all your scraps.
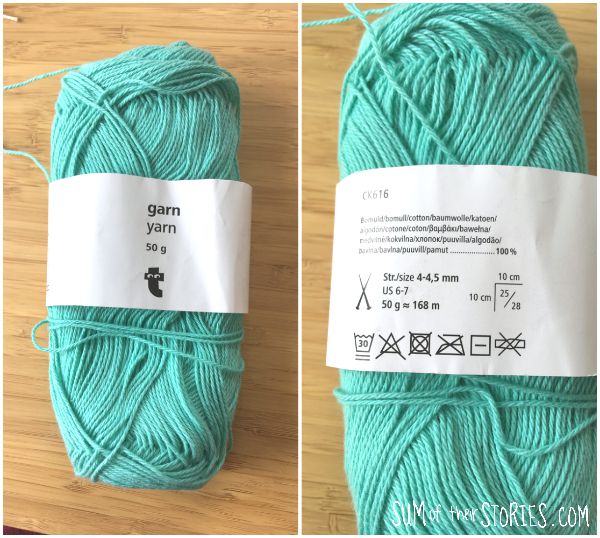
The yarn I’ve used here is this one from Tiger which doesn’t say what thickness of yarn it is. It does say 4 or 4.5mm knitting needles on the band but that has to be a mistake. This yarn is really quite fine, a 3 ply I think. I used a 3.25mm crochet hook with it.
I’d recommend trying the pattern out with the hook sized recommended on the button band and adjust if necessary.
Each flag I made turned out 5.5cm x 5.5cm or just over 2” x 2” and my bunting is 58cm (23’) long, not including the ties.
To make Pentagon Crochet Bunting you will need:
Yarn, I used 3 colours of a cotton yarn from Tiger. It doesn’t say the weight on the band but it feels like a 3 ply to me
Crochet hook to suit your yarn - mine was 3.25mm
Beads - mine are very similar to these
Tapestry needle (one that will go through the hole of your beads)
This pattern is written in UK crochet terms.
Pentagon Crochet Bunting Pattern
Remember this pattern is worked in UK crochet terms. (so if you work in US terms where I say tr for a UK treble crochet you’ll do a dc / double crochet)
Start with colour A, here I’m using the pink.
Make an adjustable loop and then chain 4. Slip stitch into the first chain to form a small loop. It’s hard to tell in the photo by there is a little hole in the middle of that blob!

Round 1: chain 3 (this is forming a substitute for the first tr of the round) Work 2 more tr into the tiny loop then work 1 chain.
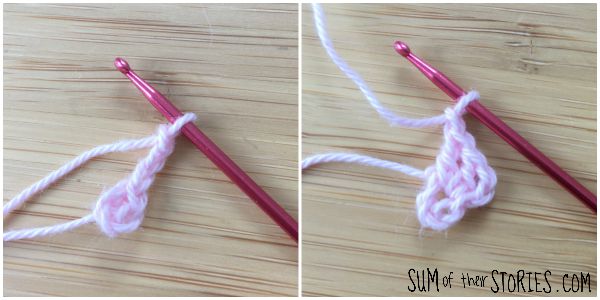
This is your first cluster of 3 stitches formed. You are now going to make 4 more clusters so you have 5 in total.
Do this by working 3 tr into the loop followed by a chain, then another 3 tr and a chain, and another, and another. At this point that’s a lot of stitches, 15 in total, all worked into that tiny loop so it is a bit fiddly. Just keep pushing the the stitches you’ve made close together to make room for some more.
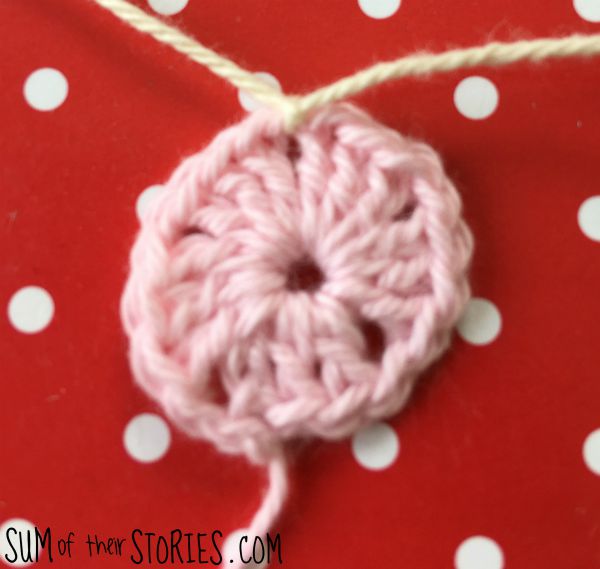
To finish the round work a sl st into the top of that 3 chain you made right at the beginning of the round.
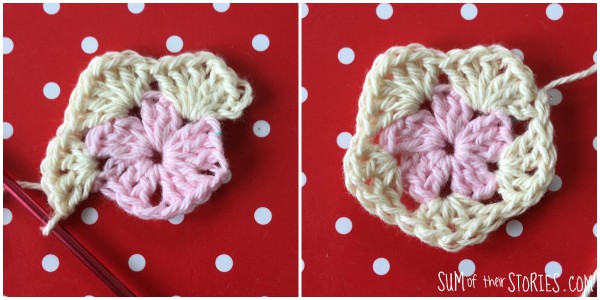
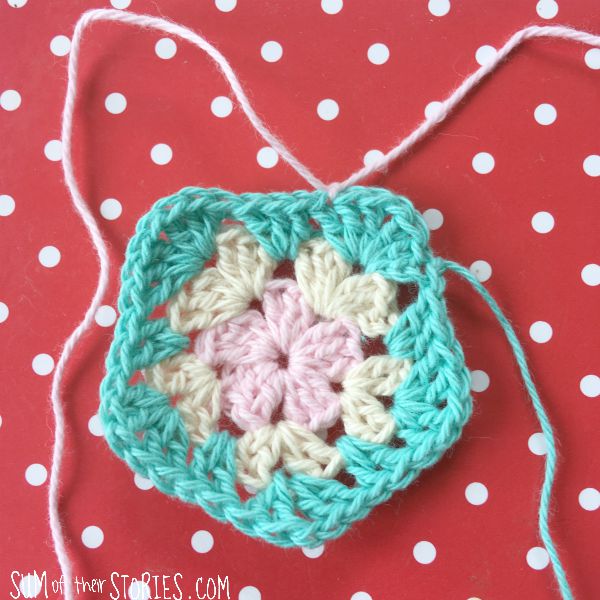
Ta dah! Round one is done and will look something like this. See how you’ve made 5 clusters of 3 stitches with a tiny little gap between each cluster. These are called chain spaces and are where you will work all the stitches in round 2.

Round 2: Pick up colour B and tie it to one of the chain spaces. This is how I always do my colour changes on granny squares but there are many different methods that other people might show you. If you know a different way that you prefer just do that, it’s fine!
Work a chain 3 (another of those substitute stitches) 2 tr, 1 chain and 3 more tr, all in that same chain space that you’ve joined your new colour. You’ve made 2 clusters in that space, this will be the top right corner of your bunting flag.
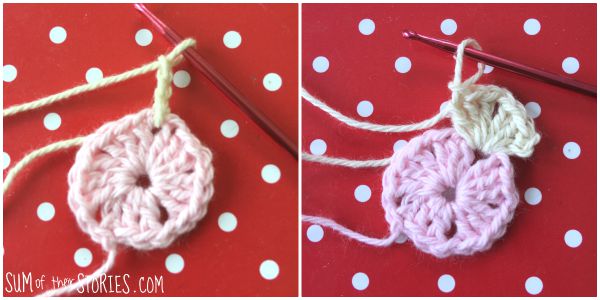
Now work 3 tr, 1 chain, 3 tr into the next chain space.
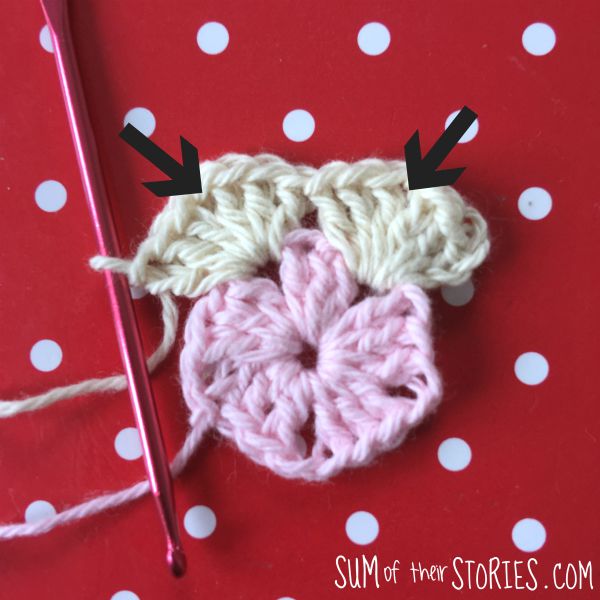
It’s a little bit hard to see in the photo as they are all quite bunched up but you have made 2 top corners and there is a chain space in the middle of each corner as marked by an arrow below. You’ll be needing these chain spaces in the next row so just check you can see where yours are!
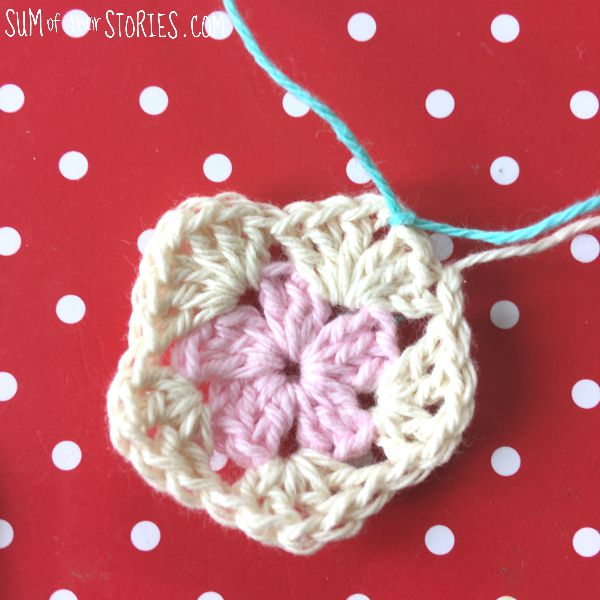
To finish round 2 you are going to work more clusters in the rest of the chain spaces from round 1 BUT you are only working 2tr, 1 chain, 2 tr. So you are still making clusters but this time they are only clusters of 2 trebles. When you get back to the beginning, join to the top of the 3 chain with a sl st as you did before.
Note: You can work your stitches over the ends of the yarn from the previous round if you like. It will save you having to sew them in at the end. I would never do this for a garment or blanket that is going to be washed lots as they tend to just work their way out but for something like this bunting which you will not be washing very often it is a great short cut.
Take a moment to study the photo, count the stitches, then have a look at your crochet and do the same. Count the number of clusters and the number of stitches in each cluster. Remember that the 2 top corners are the ones with 3 stitches in each cluster. From now on it matters which way up you look at your crochet!
Are you ok? Do you have the right number of everything? Yay! Now we are ready for round 3.
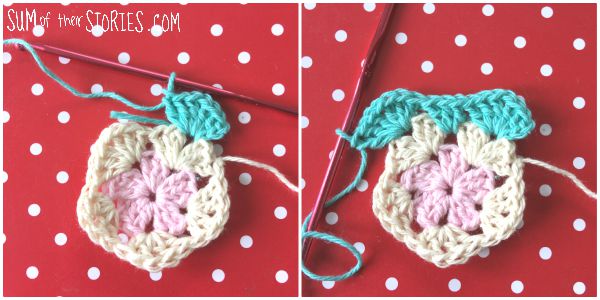
Round 3: Join colour C as before. This time it matters where you join so join it in the chain space of your top right corner.
Work a 3 chain, 2 tr, 1 chain, 3 tr in that same chain space.
Now work 3tr in the next chain space - you are working your way across the top…
Now work 3 tr, 1 chain, 3 tr in the next chain space.
To finish round 3 you will now work 2 tr in the next chain space, you are working your way down that left side now. Then 2tr, 1 chain, 2 tr in the next space.
2 tr in the next space, then 2 tr, 1 chain, 2 tr in the next space. That’s the bottom point that you’ve just done.
Now you are working back up the final side, so it’s 2 tr in the next chain space, followed by 2 tr, 1 chain, 2 tr in the last chain space. Sl st the top of the first 3 chain of the round to finish, just as you’ve done before.
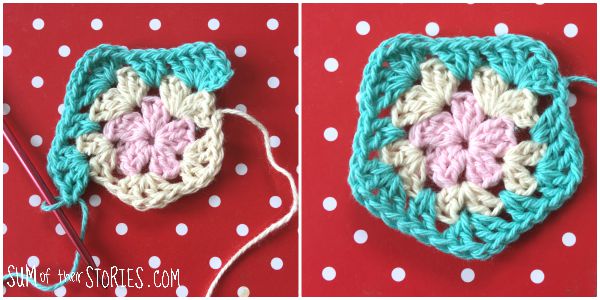
Take another moment just to count your stitches again, check you have clusters of 3 across the top and clusters of 2 down the sides. Can you see how you’ve made a pentagon but it’s a bit top heavy? That’s what we want to make the bunting flags.
Now on to round 4 - nearly there now!
Round 4: Join colour A again, it doesn’t actually matter where you join it this time, but I like to join somewhere along the top edge, just so that it’s neater when I work the final row of crochet to join all the bunting flags together.
Chain 1 and then dc into every stitch along the top. When you get to the corners ie any of your chain spaces from the previous row (and you should have 5 of them!) work 2 dc into the chain space then carry on round with 1 dc into each stitch. Remember these are UK terms so if you are using US terms you will be doing sc.
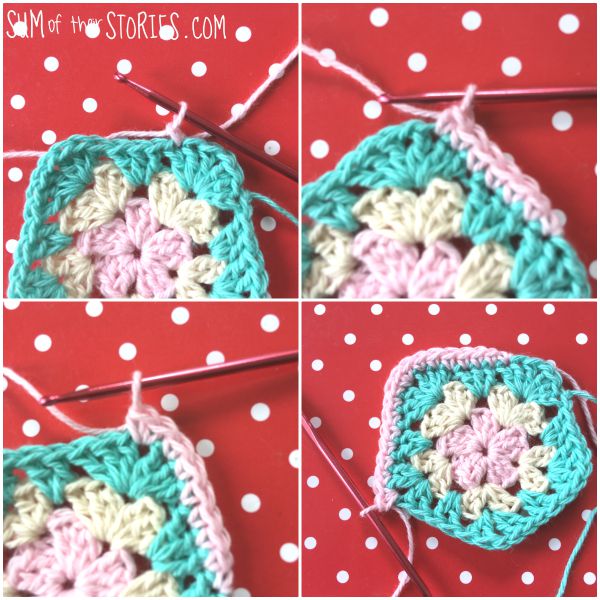
Sl st into the chain 1 when you get back to the beginning and your first flag is done! Celebrate with a cup of tea!
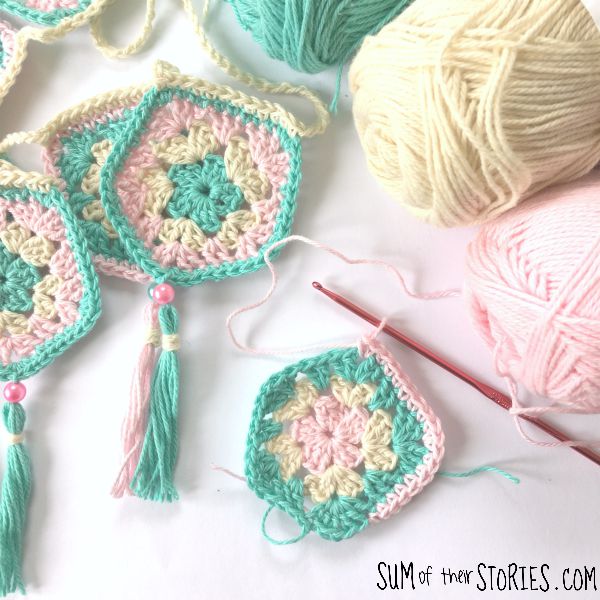
Now make some more. I made 9 flags for my bunting. 5 starting with the teal colour and 4 starting with the pink. How you mix up the colours is entirely up to you. Sew in any ends that you’ve not worked over.
When you have the number of flags you want for your bunting you are ready to join them together.
I used colour B to join mine but again this is your choice. I suggest you stack up your flags in the order you want them joined, remembering that if you are right handed you will join them from right to left. Make sure they are all the right way up and all stacked so that which edge is the top of the pentagon shape is obvious to you.
Chain about 27cm (11”) this was about 40 chain with my yarn and hook size. then dc into each stitch along the top of your first flag. Chain 5 then dc all along the top of the next flag and so on until you have no more flags. chain another 27cm (11”) and tie off.
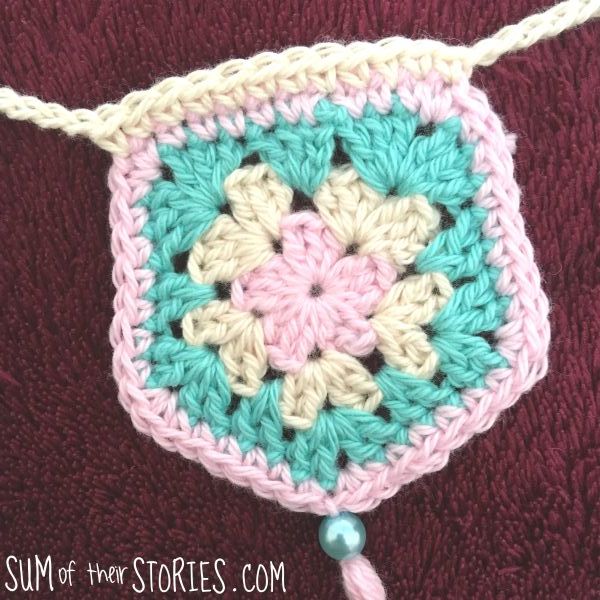
You could call it a day and have perfectly lovely bunting at this point. If you’d like to finish them off with the tassels then you have just a little bit more work to do.
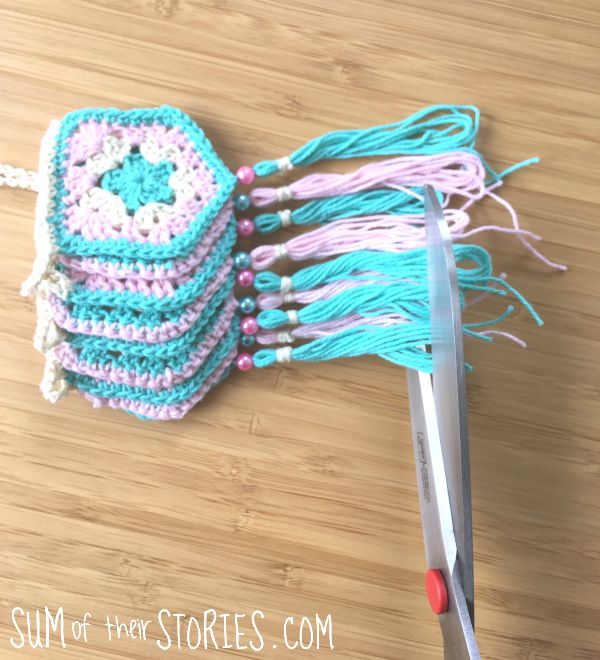
I matched my tassels to the colour that I’d used for the final round of each flag. You might like to do a contrast.
To make a tassel:
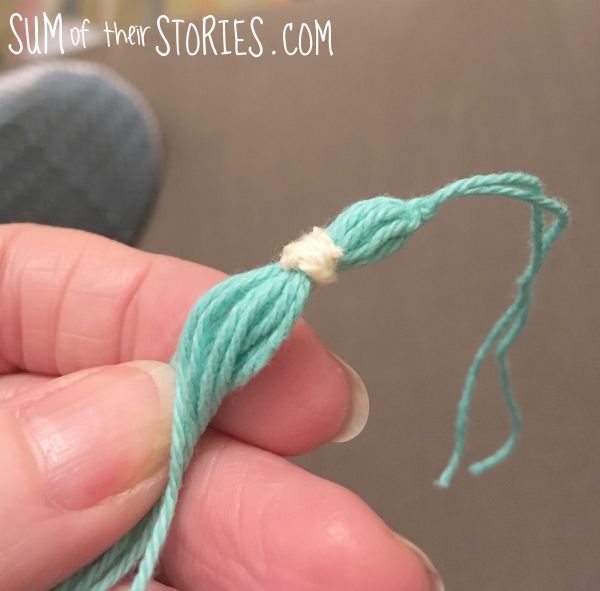
Wind yarn around your fingers LOOSELY 6 times. Remove from your finger and lay the loops down gently.
Take another length of yarn about 20cm/ 8” and poke it through the loops. Tie tightly in a double knot.
Take a length of yarn B, about 15cm / 6” and tie it around the loop about 1cm (3rd of an inch) from the knotted end. Wrap it round 3 or 4 times and then knot again securely. Use a needle to sew the ends into the wrapped area and then trim off as close as possible.
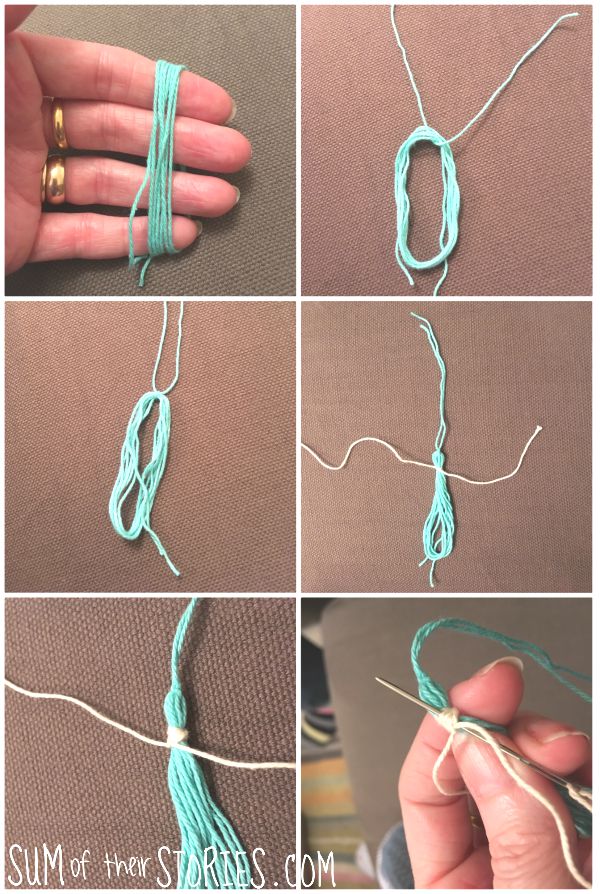
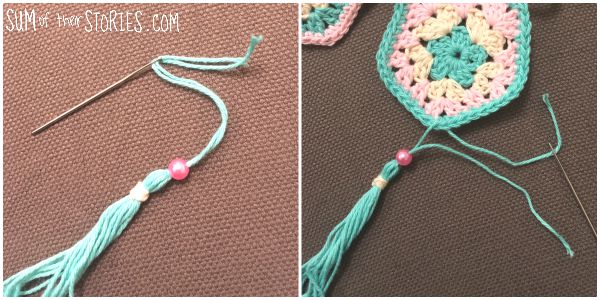
Thread both the long ends of the tassel and thread through a bead. Then remove one thread so you are only working with one and sew the tassel to the bottom of one of your bunting flags. Tie the threads in a knot and then sew in the ends.
When all the tassels are attached stack the bunting up neatly, lining all the tassels up and then trim them so they are all the same length.

That’s it! Your crocheted pentagon bunting is complete. All you need to do now is fine somewhere fabulous to hang it.
Trying different yarns and hook sizes
I’ve worked this pattern up with DK yarn too (that’s a light worsted) and a 4mm hook at it came out 8.5cm x 8.5cm (3.25” x 3.25”)

And don’t forget, there is an easy to print version of this pattern available for a small cost in my Etsy shop here.
Julie


