Rainbow Flower - Sew a Softie
/

It’s Sew a Softie Month! Yay!
Sew a Softie started back in 2015 as a single day, it’s the brainchild of Trixi who wanted to encourage children all around the world to sew. It’s gone from strength to strength and now lasts for the whole month of July with over 50 tutorials this year from creative bloggers all over the world sharing fun tutorials to help kids (and adults!) learn to sew. If you already know how to sew you are obviously most welcome too!
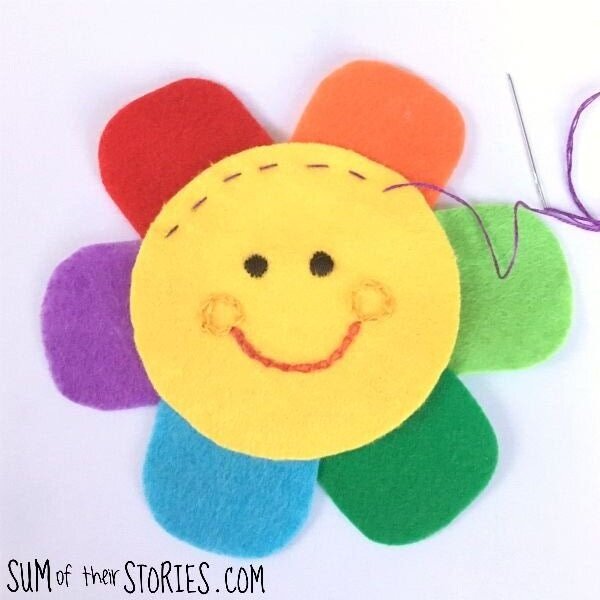
Today I’m sharing my contribution to Sew a Softie 2020 with this rainbow flower. I’ve made this flower quite small, hand sized so it could pop in a pocket or hung in a window. You could easily scale it up to a cushion size if you wanted to.
How to make a Rainbow Flower Soft Toy
While making the rainbow flower you will learn cutting out skills, some embroidery stitches, tacking and basic hand sewing.
To make a rainbow flower you need:
Felt, scraps of rainbow colours and a slightly bigger piece of yellow
Embroidery thread
A small amount of fibre fill
Something to mark the felt with, I used an air erasable pen but you could use a pencil
How to make your felt flower
Cut 2 circles of yellow felt and 6 colourful petals. You can download my template here or draw your own size.

Take one of the yellow circles and draw on a face.
Embroider the face
Embroider the features using any embroidery stitches that you’d like. I used chain stitch for the smile and cheeks and satin stitch for the eyes. You can find a guide for a few basic embroidery stitches here and some tips for starting and stopping too. If you don’t want to embroider a face you can draw one on with a colouring pen, glue on cut out felt shapes or leave your flower face free - your flower your choice!

Attach the petals
Lay the petals around the plain yellow circle, overlapping them slightly and then tack them into place. Tacking is a basic temporary stitch that you do to hold fabric in place. Often you’ll use pins to hold fabric in place when sewing but here you can’t because the pins would get stuck inside the flower so tacking works much better.
Use a regular sewing thread if you have one for the tacking, just work big ol’ running stitches around. They don’t have to be fancy, just enough to hold those felt petals in place temporarily. Start and finish on the back, the non petal side. You can use a big knot here to start as you are going to remove these tacking stitches later anyway.

Sew the flower together
Layer the face yellow felt circle on top, so the petals are sandwiched between the 2 circles. Sew all around the circle using a running stitch.
Make sure you do the running stitch one stitch at a time, poke the needle right through all the layers of fabric at a right angle, pull the thread all the way through and then poke it back through all the layers again in the opposite direction.

I would really advise NOT doing the running stitch like this with the needle going in and out in one manoeuver. The thickness of all the layers of felt would mean that the stitches would be teeny tiny on the back and not as secure.

Once you are almost all the way round stop and pop a little bit of fibre fill into the flower. Then finish stitching all the way round and cast off.

The last step is to remove the tacking stitches. Just snip off the knot and then pull the stitches out.

That’s it, your rainbow flower softie is finished. Why not make them for all your friends?


There are lots more softie tutorials that are part of sew a softie month, and lots from previous year. A good place to find them all is the Sew a Softie Pinterest Board.
My previous Sew a Softie month contributions from previous years were:
Julie
I’ll be sharing this idea at these link ups